Getting started

Sign in to the NIEMS Portal

Access the portal and confirm the modules assigned to your role.

All NIEMS Portal users 2 min read Web

Before you start

  • An active NIEMS Portal account
  • Your assigned sign-in details
  • A supported browser and internet connection

Open the portal sign-in page

Open the NIEMS Portal address supplied by your administrator and confirm that the page says Sign in to the NIEMS Portal.
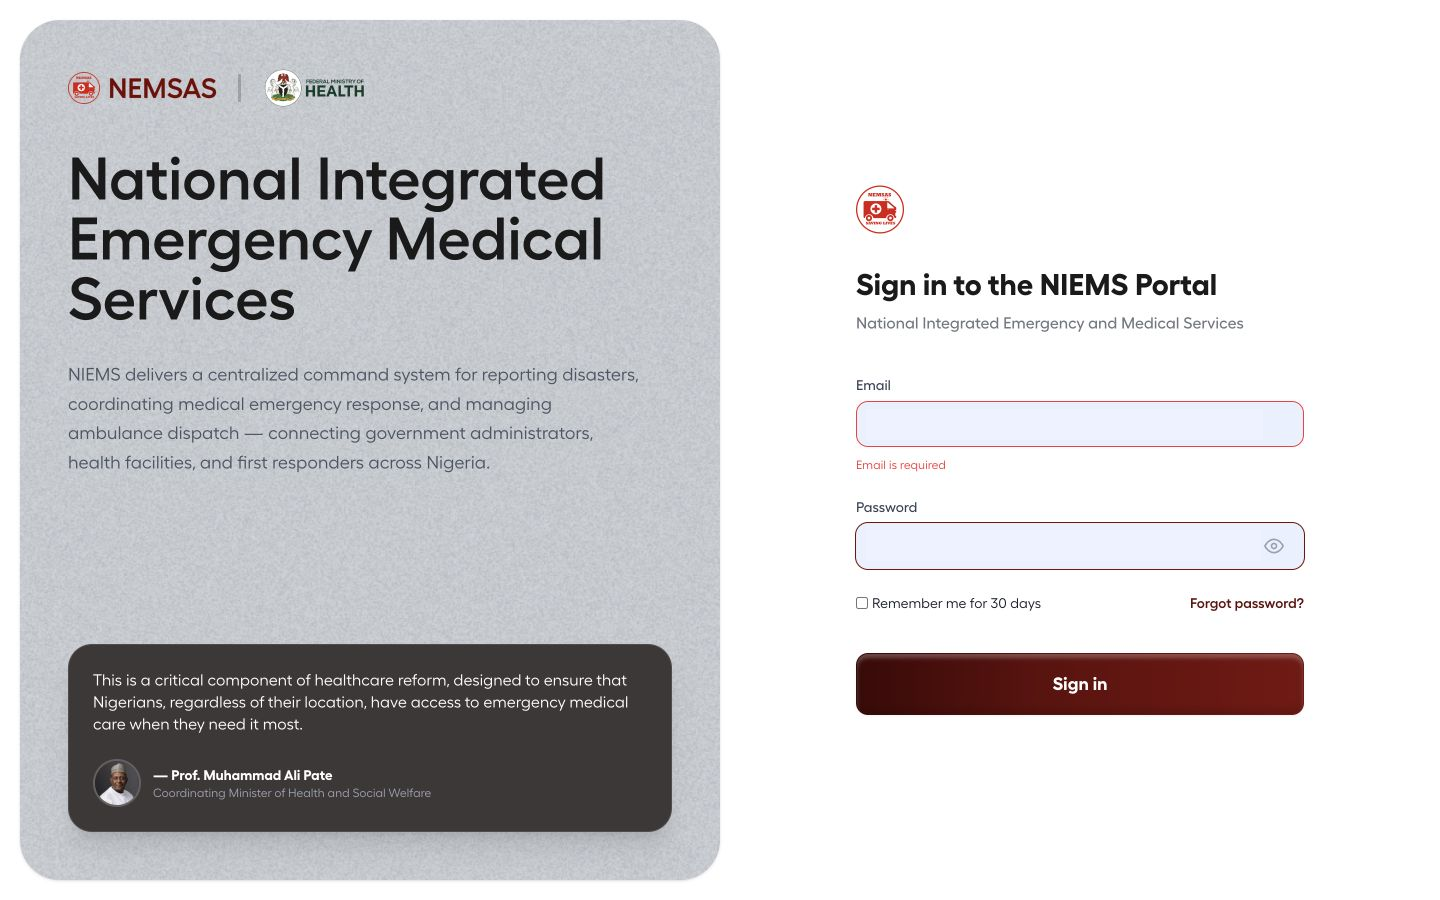
NIEMS Portal sign-in page with email, password and Sign in controls

1 — Sign in to the NIEMS Portal heading.

NIEMS Portal sign-in page with email, password and Sign in controls

Enter your sign-in details

Enter the assigned email address and password. Leave Remember me for 30 days clear on a shared computer, then select Sign in.
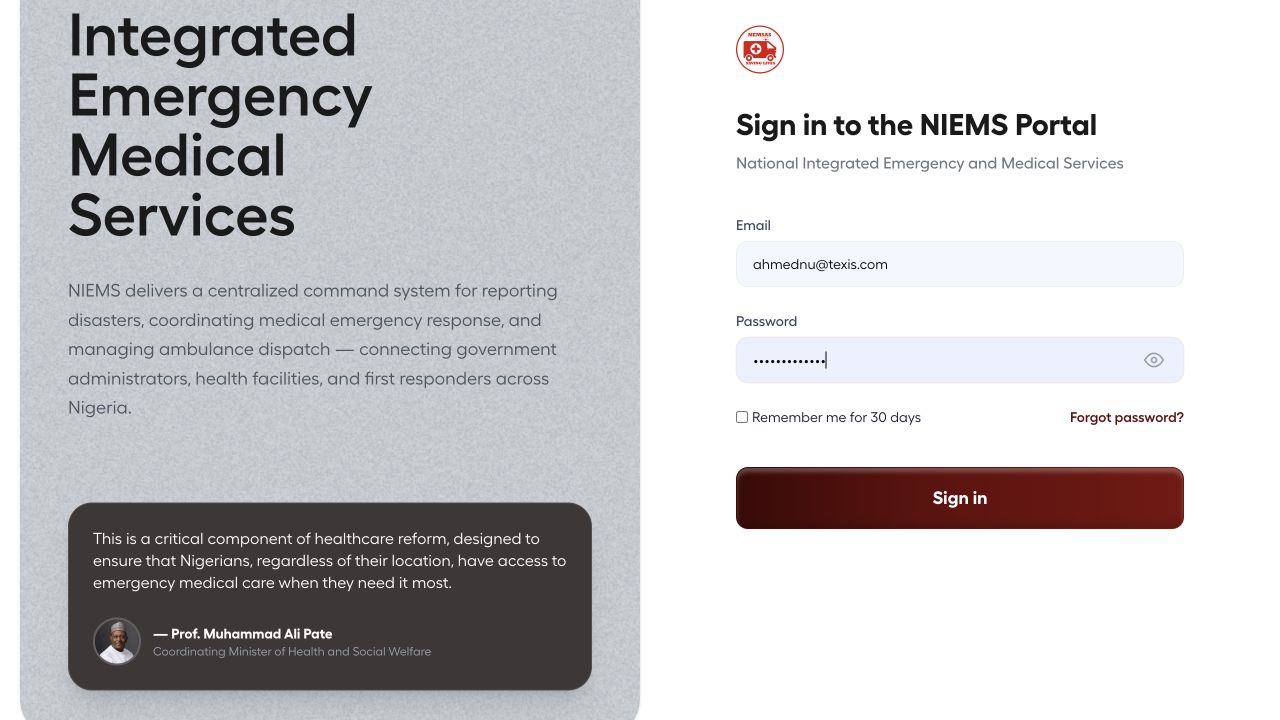
NIEMS Portal sign-in form populated with a demonstration account and masked password

1 — Email field · 2 — Password field · 3 — Sign in button.

NIEMS Portal sign-in form populated with a demonstration account and masked password

Confirm your workspace

Check the role at the bottom of the sidebar and review the available modules. The Dashboard and navigation change with your permissions.
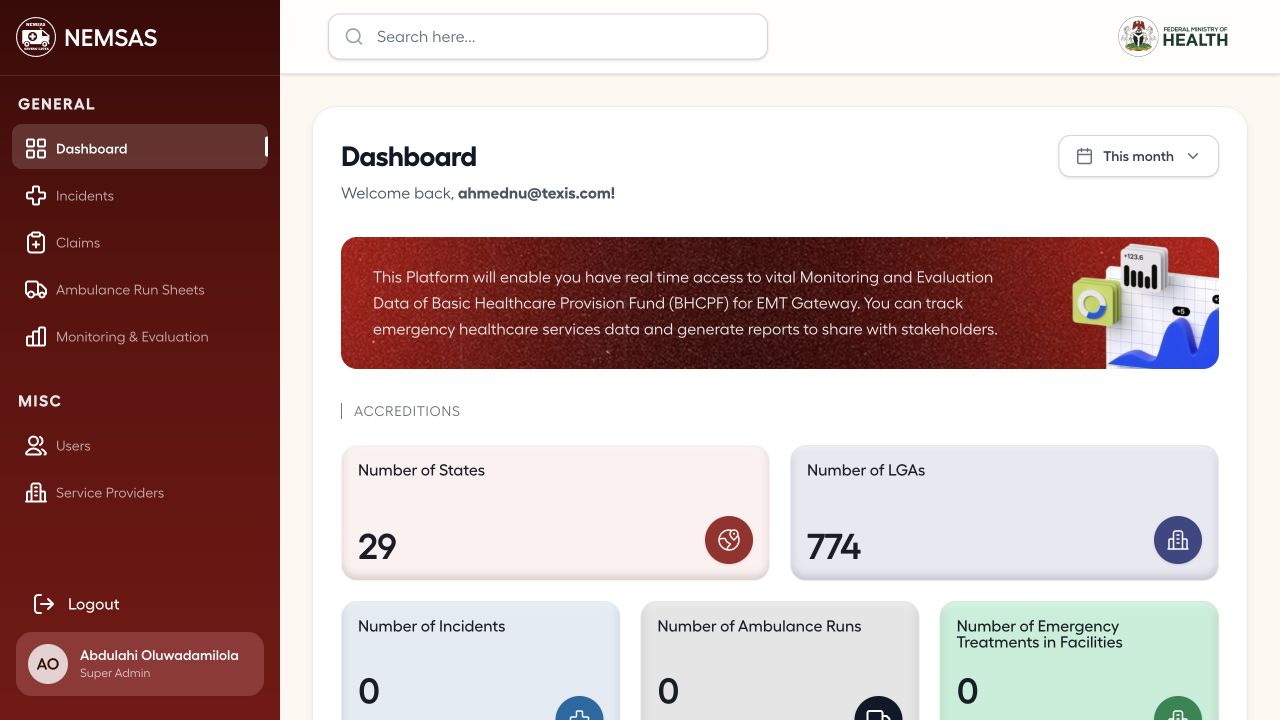
NIEMS Portal dashboard with summary cards, navigation and signed-in role

1 — role card · 2 — navigation modules.

NIEMS Portal dashboard with summary cards, navigation and signed-in role

Done. You are signed in and can see the NIEMS Portal modules assigned to your role.

If something goes wrong

The portal does not accept the sign-in details.

Re-enter the assigned details carefully. If the problem continues, ask an administrator to confirm that the account is active.

An expected module is missing.

Check the role shown in the sidebar. Access is role-based, so an administrator may need to correct the assignment.
Monitoring and evaluation

Read the national monitoring dashboard

Interpret national accreditations, incidents, ambulance runs, emergency treatments and claim summaries.

National administrators and viewers 5 min read Web

Before you start

  • A national administrator or viewer account
  • The reporting period you want to review

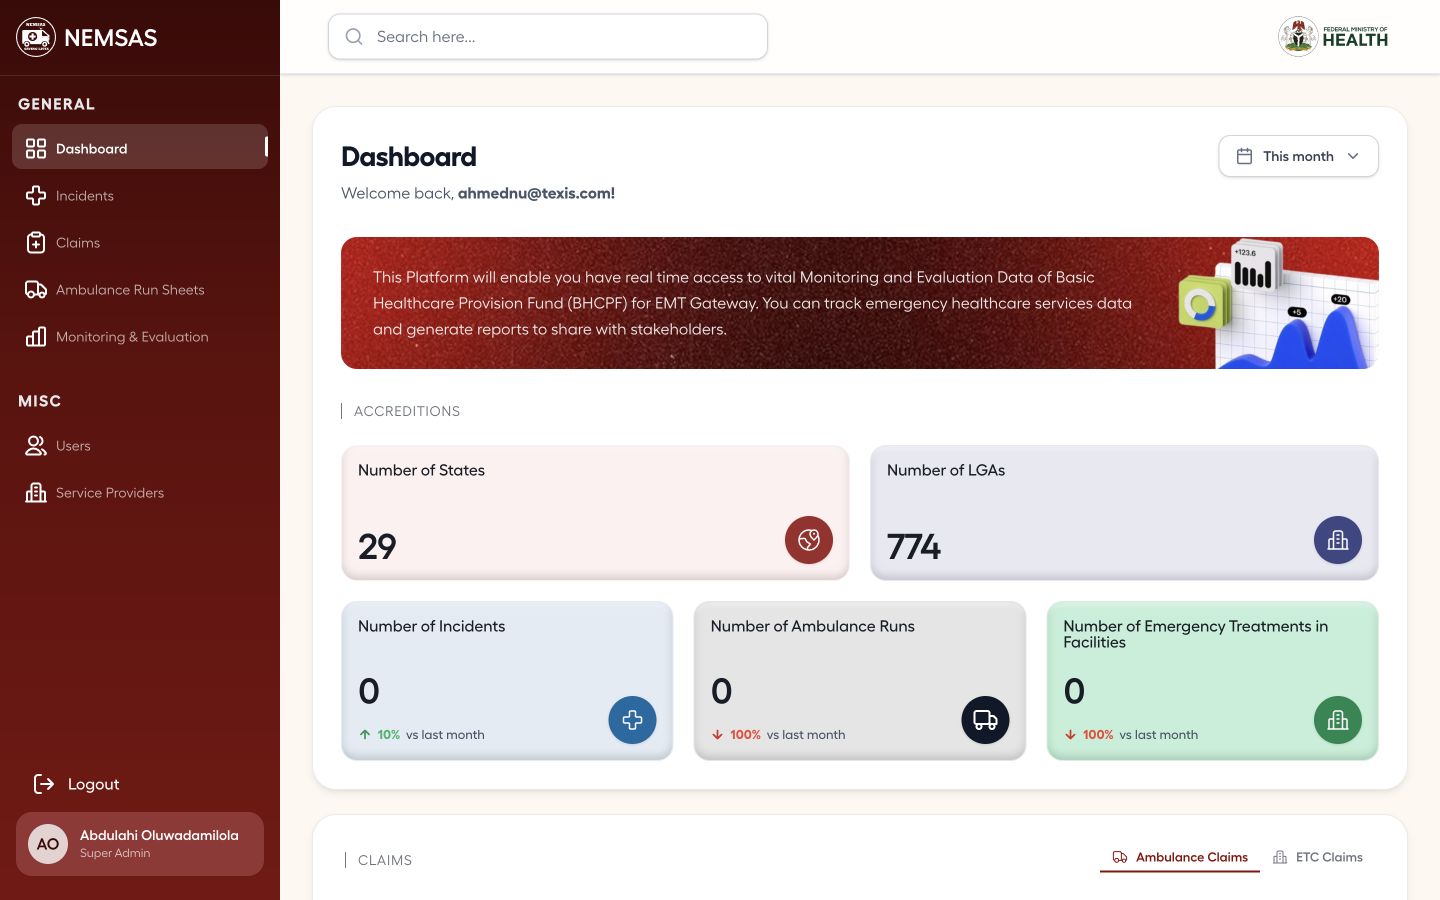
Review the headline indicators

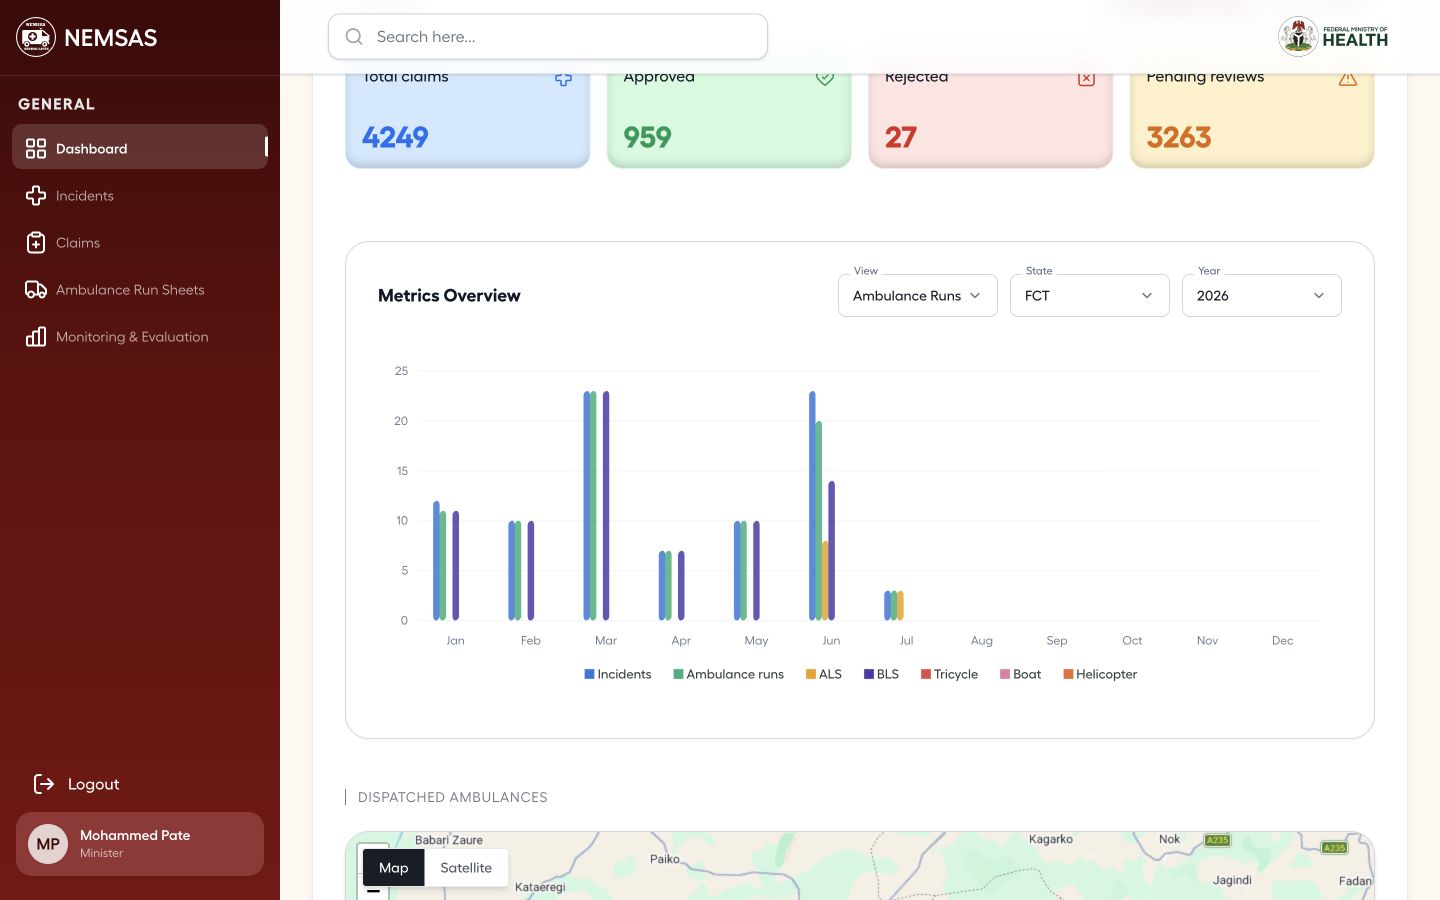
Open Dashboard and read the accreditation, incident, ambulance-run, emergency-treatment and claim cards before interpreting the chart and map.

NIEMS national administrator dashboard with accreditation, incident, ambulance run, treatment and claims indicators

1 — national summary cards.

NIEMS national administrator dashboard with accreditation, incident, ambulance run, treatment and claims indicators

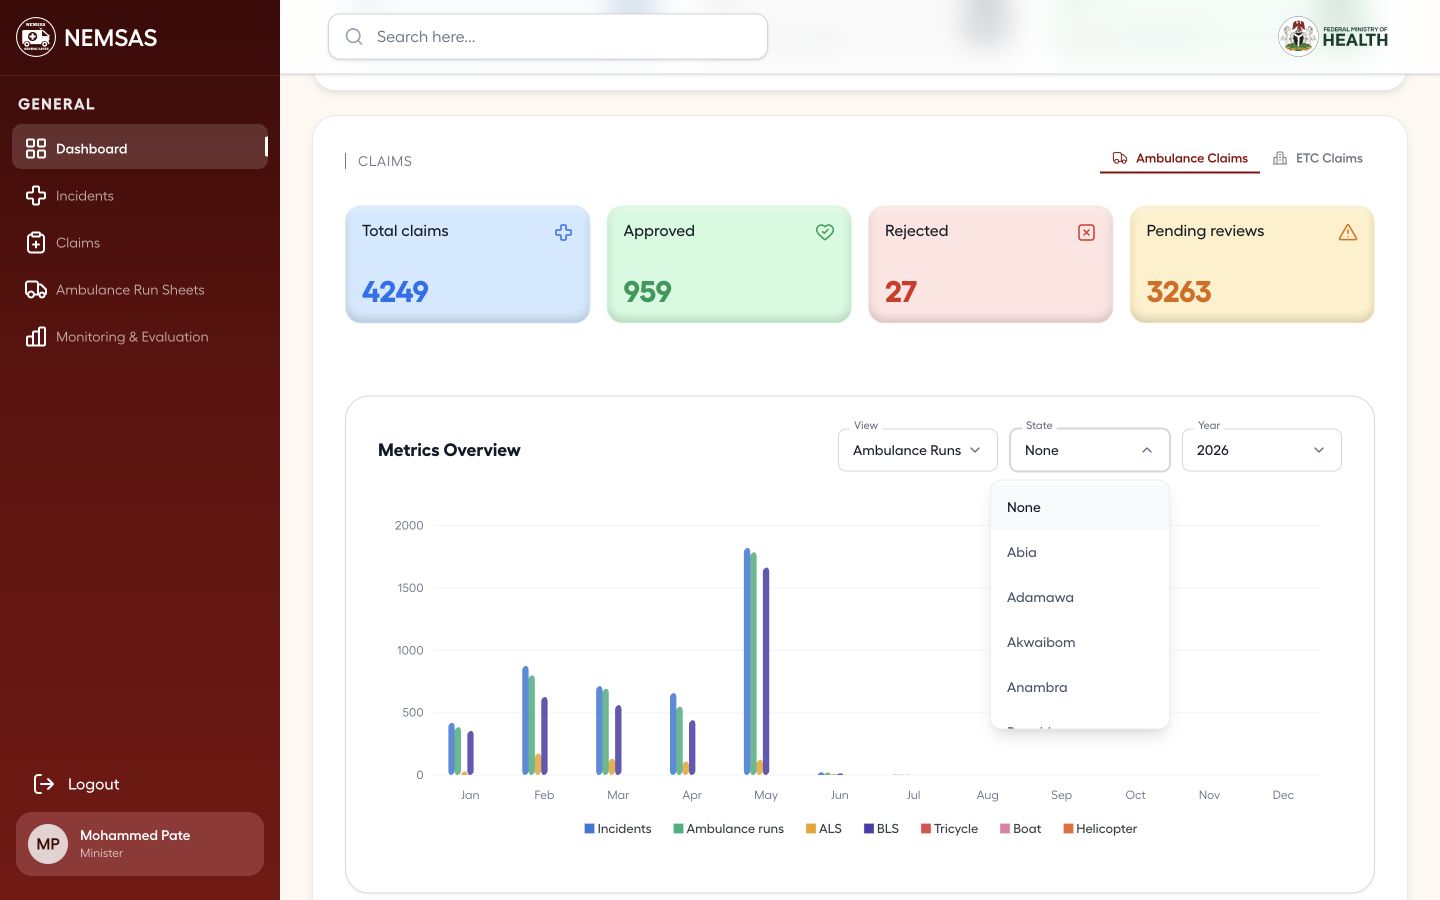
Choose a state for the metric chart

Use the chart's State selector when you need to compare the national view with a particular state.

Minister national dashboard with the metric chart State selector open

1 — State selector.

Minister national dashboard with the metric chart State selector open

Interpret the filtered chart

Confirm the selected State and Year above the chart, then compare incidents and ambulance runs for the filtered geography without changing the national headline cards.

Minister national dashboard metric chart filtered to FCT

1 — State and Year selectors · 2 — filtered chart.

Minister national dashboard metric chart filtered to FCT

Done. You can explain the national activity and claims position shown by the current dashboard filters.

If something goes wrong

The values appear to be out of date.

Confirm the selected period and reload the page. Escalate a persistent discrepancy to the data or platform administrator.

User administration

Manage Portal users

Review role assignments and prepare a new user account for the correct operational scope.

National and state administrators 5–8 min read Web

Before you start

  • User-management permission
  • The person's approved name and contact details
  • The required role, state and programme scope

Review the user register

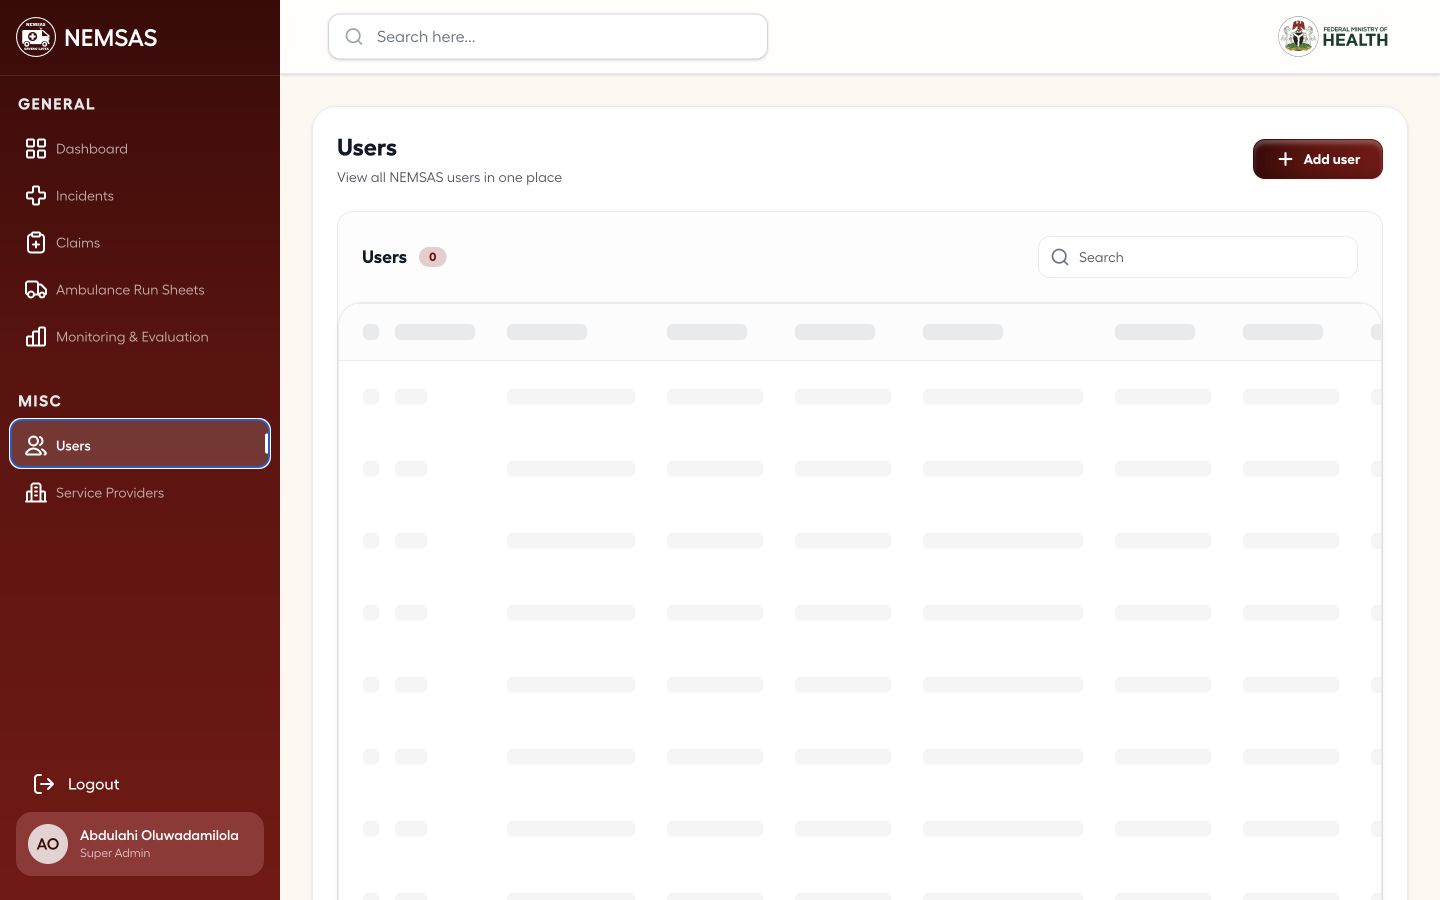
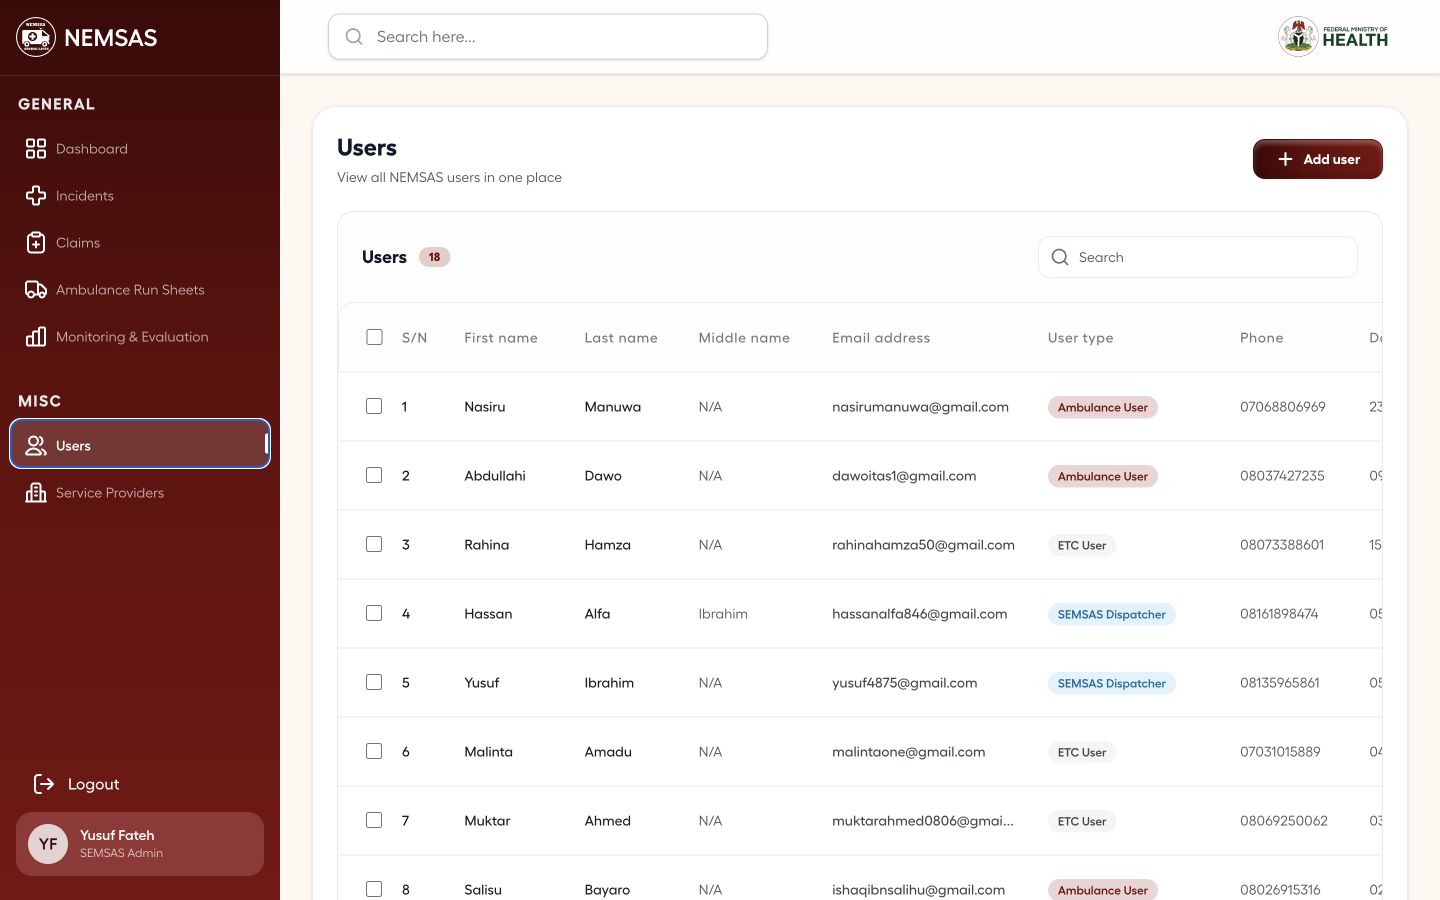
Open Users and search the register before creating an account. Compare the person's name, contact information, role and current status.

NIEMS Portal Users page with search, user rows, roles and Add user control

1 — Search field · 2 — Add user button.

NIEMS Portal Users page with search, user rows, roles and Add user control

Confirm the state scope when applicable

State administrators should confirm that the register and available role assignments are limited to their assigned state before continuing.

State administrator Users page with state-scoped user records and roles

1 — State Admin role card · 2 — User type column.

State administrator Users page with state-scoped user records and roles

Prepare a national user

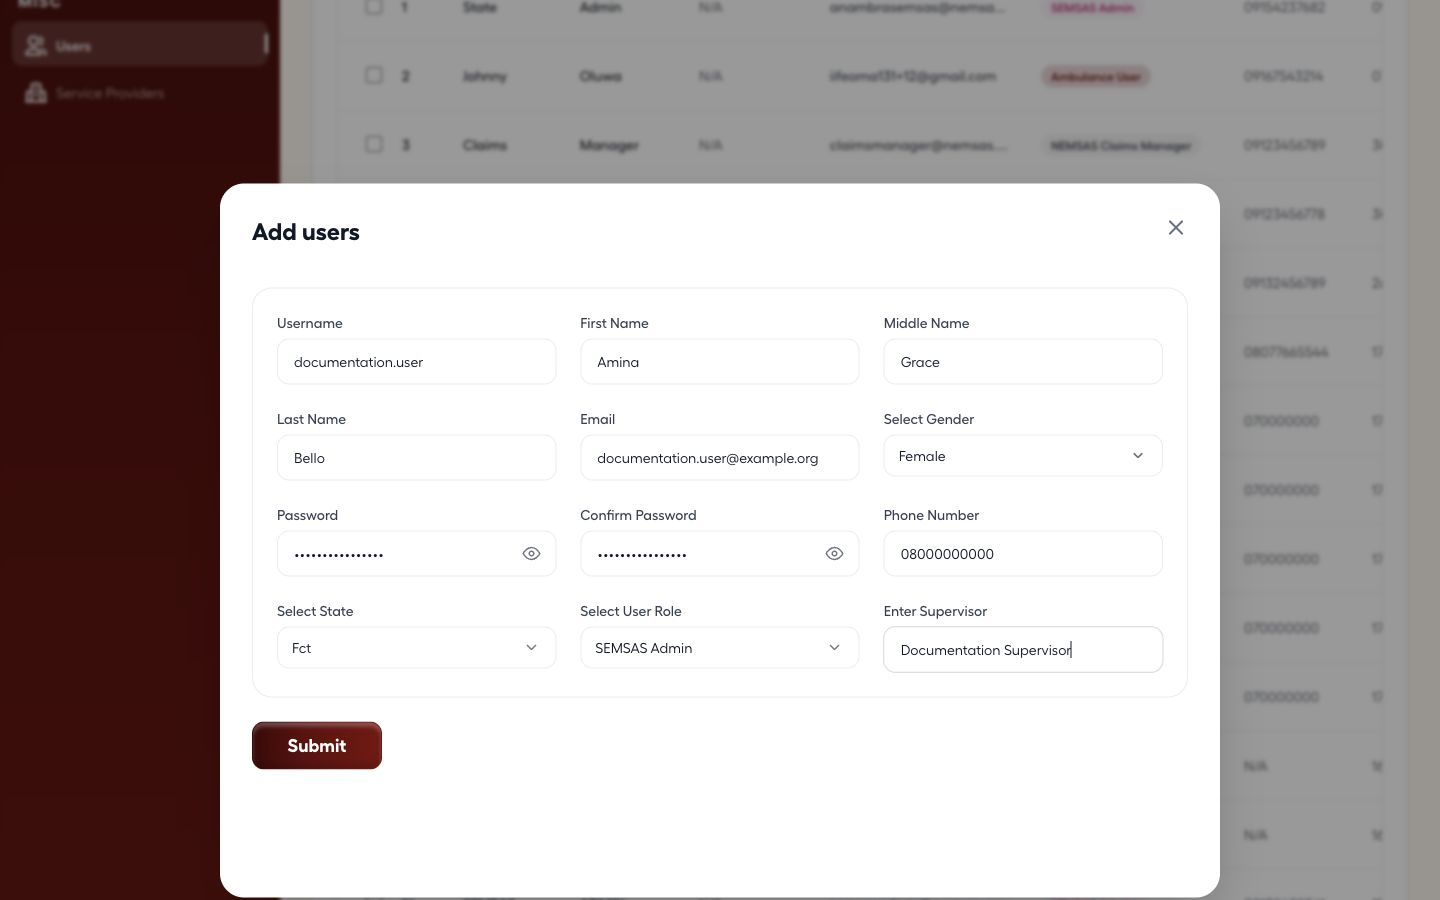
A national administrator can select Add user, enter the approved identity and contact details, then choose any permitted national role and its location or supervision scope.

National administrator Add user form populated with demonstration identity, contact and role details

1 — identity and contact fields · 2 — role and supervision fields · 3 — Submit button.

National administrator Add user form populated with demonstration identity, contact and role details

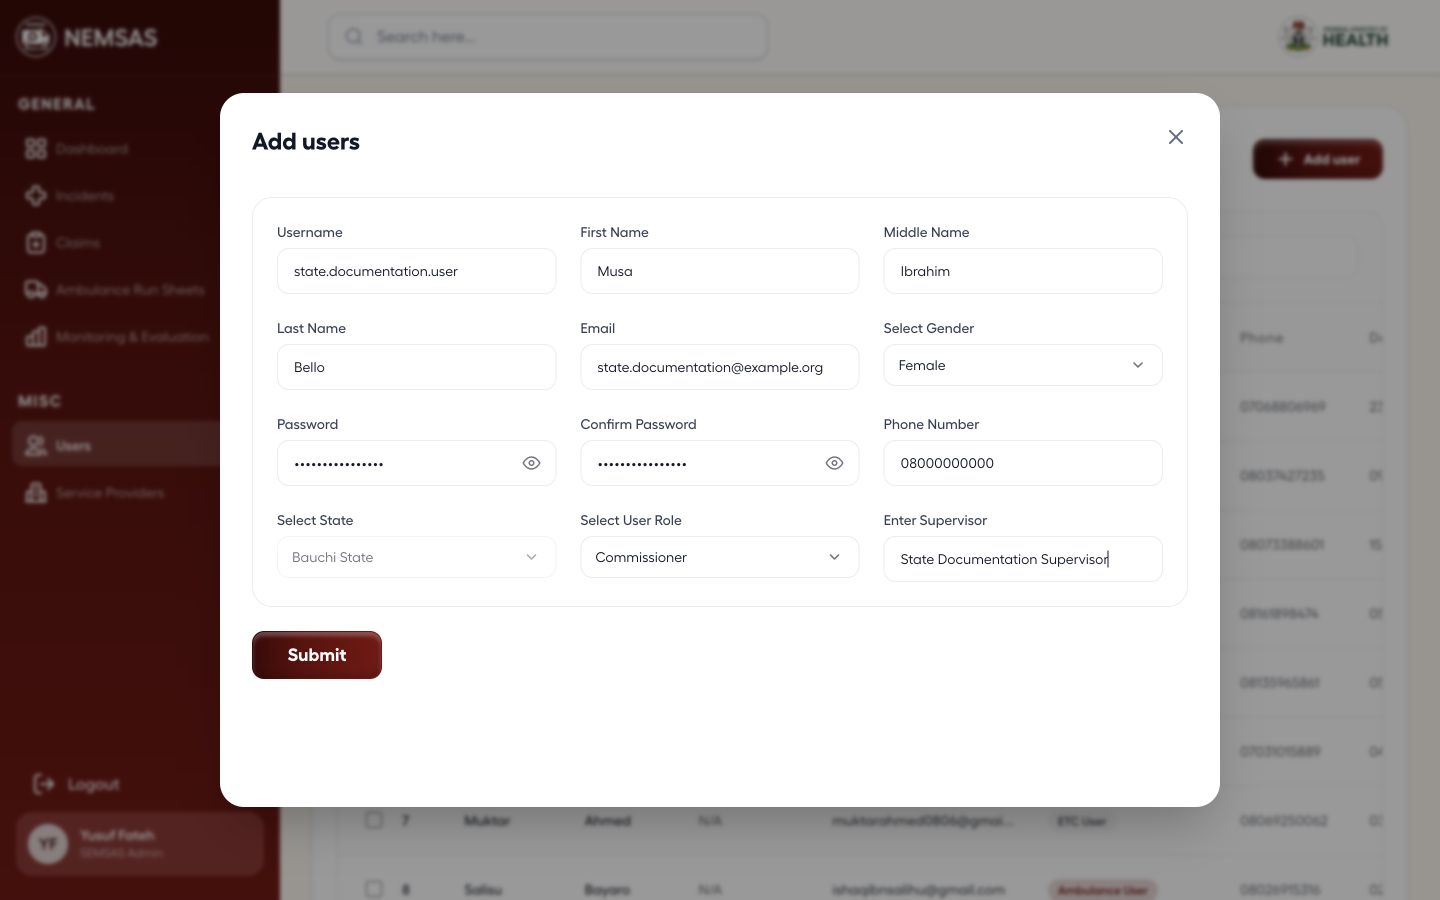
Prepare a state user

A State Admin uses the same form with State fixed to the assigned state and a limited role list. Complete the role-dependent LGA or supervisor field before review.

State administrator Add user form populated with a state-scoped demonstration account and role

1 — State, User Role and Supervisor fields · 2 — Submit button.

State administrator Add user form populated with a state-scoped demonstration account and role

Important: Creating a user grants platform access. Confirm the role and scope before submission.

Done. The account details and role assignment are ready for review before creation.

If something goes wrong

A role is not available.

Confirm that your administrator account has authority to assign that role and that the correct state scope is selected.

The user already appears in the list.

Open the existing record instead of creating a duplicate account.

Service-provider management

Register ambulance and ETC service providers

Review existing providers and prepare ambulance-service or emergency-treatment-centre registrations.

National and state administrators 10–15 min read Web

Before you start

  • Service-provider management permission
  • Provider identity, registration and contact details
  • Approved state, LGA, ward and service type

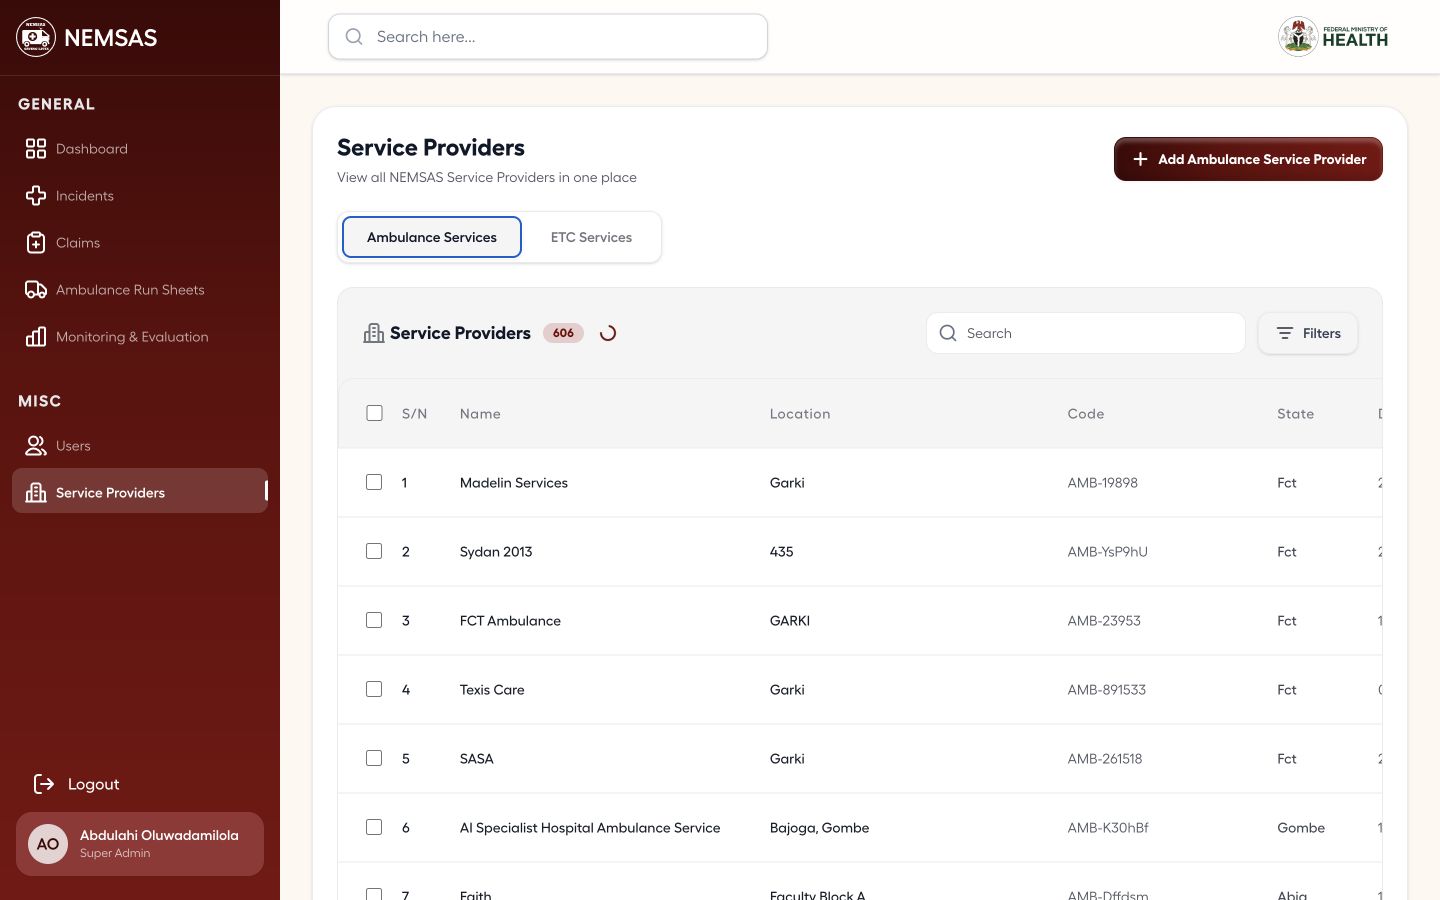
Review ambulance service providers

Open Ambulance Service Providers and search the register to confirm that the organisation and vehicle registration are not already recorded.

NIEMS Portal ambulance service provider register with search, filters and provider rows

1 — Ambulance Services tab · 2 — Search field.

NIEMS Portal ambulance service provider register with search, filters and provider rows

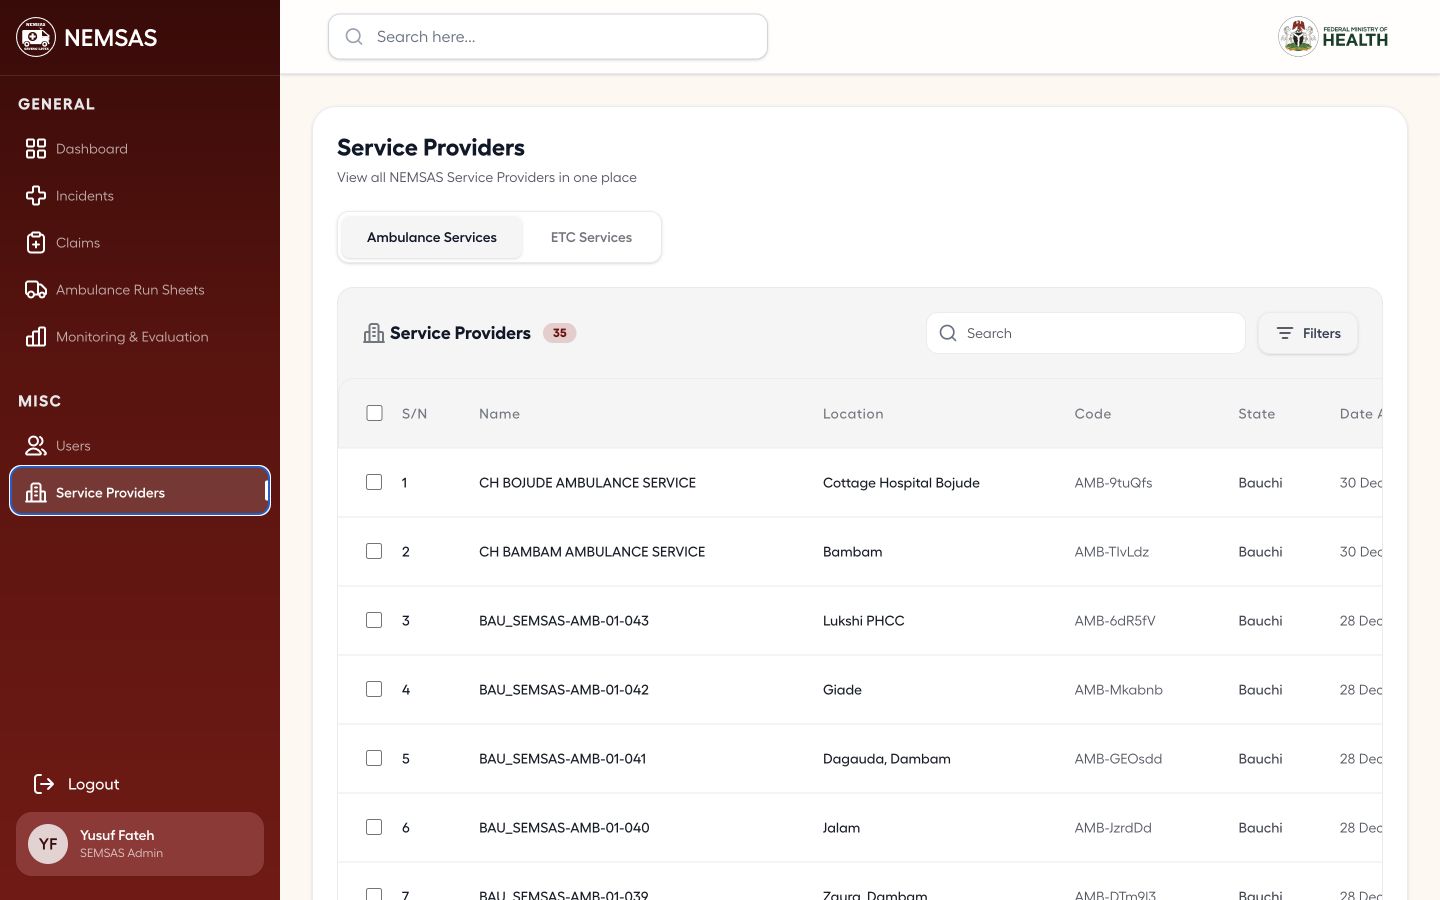
Confirm the State Admin view

State Admins can search and filter provider registers for their state, but the current role does not show Add provider controls.

State Admin Service Providers page with state-scoped provider tables and no Add provider control

1 — Search and Filters controls.

State Admin Service Providers page with state-scoped provider tables and no Add provider control

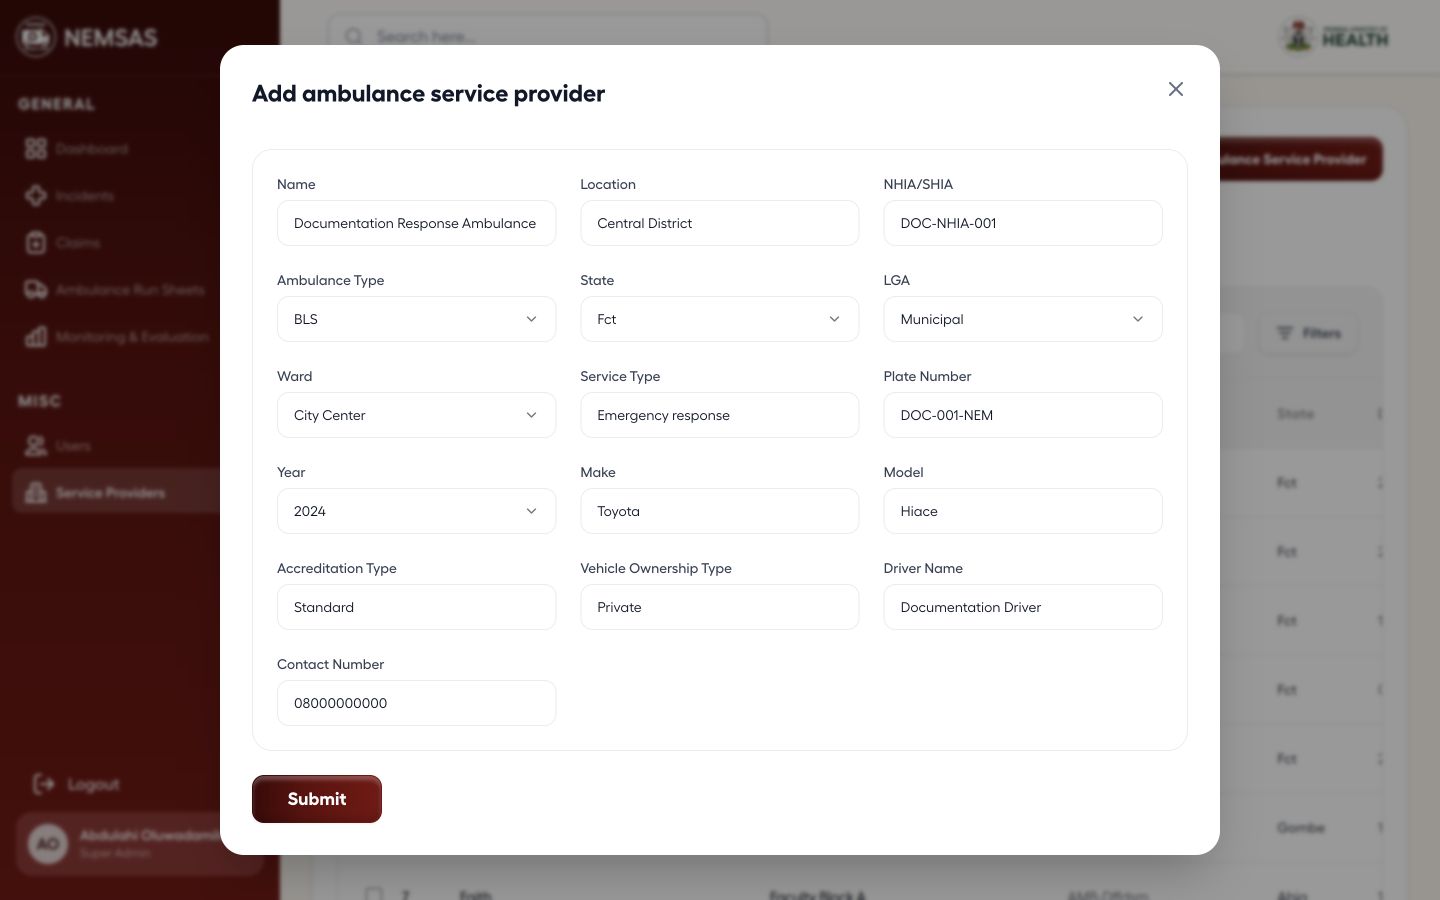
Enter the ambulance provider details

As a Super Admin, select Add Ambulance Service Provider and enter the approved organisation, vehicle, location, contact and accreditation details. Review before submitting.

Super Admin Add ambulance service provider form populated with demonstration organisation, vehicle, location and contact details

1 — organisation, vehicle and location fields · 2 — accreditation and contact fields · 3 — Submit button.

Super Admin Add ambulance service provider form populated with demonstration organisation, vehicle, location and contact details

Review emergency treatment centres

Open ETC Service Providers and search the register before adding a treatment centre.

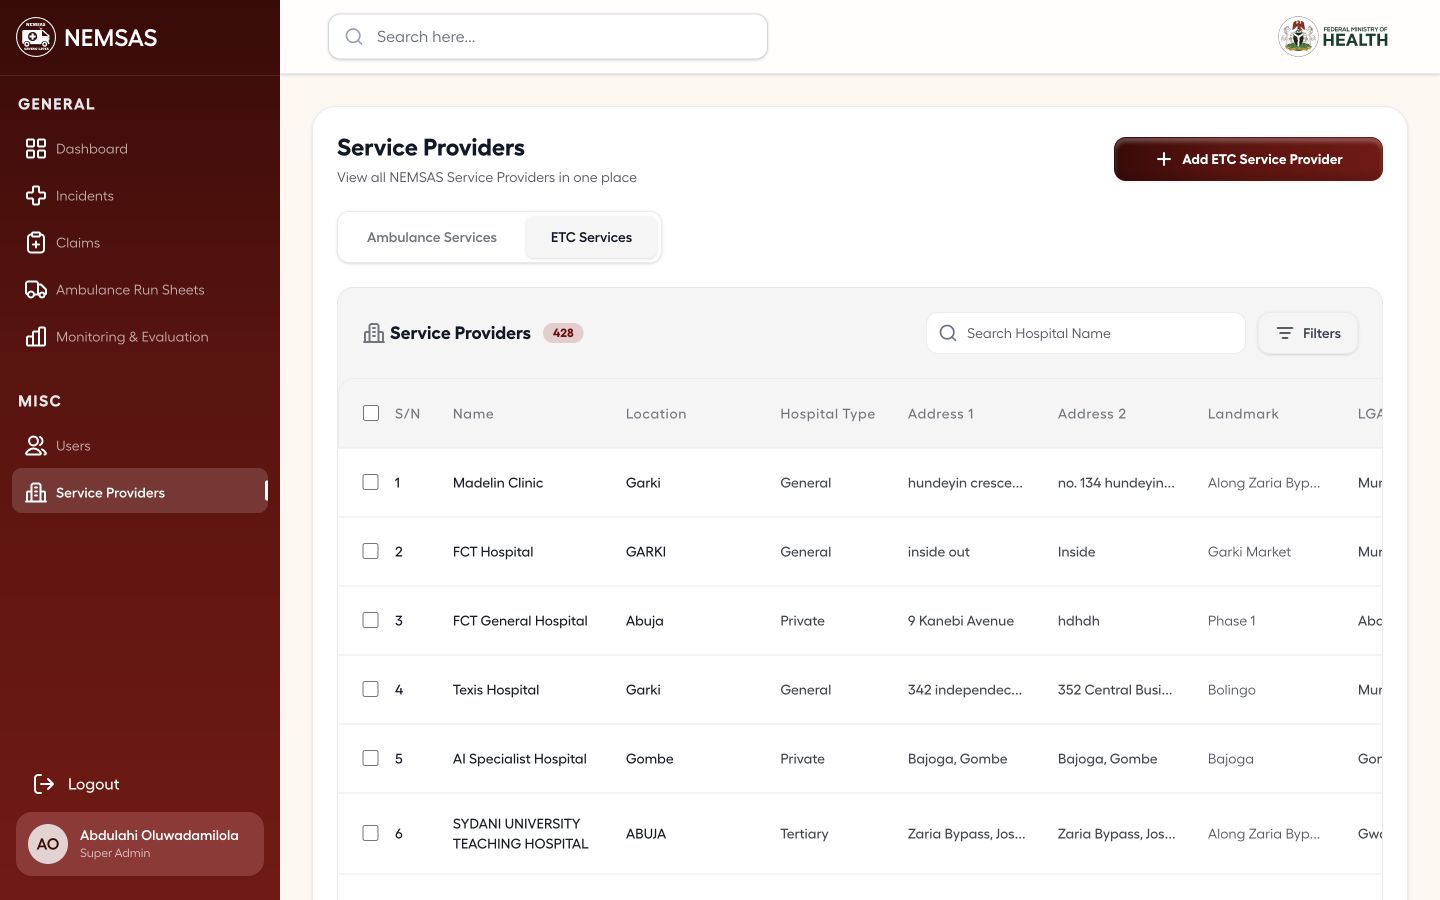
NIEMS Portal emergency treatment centre provider register with search and provider rows

1 — ETC Services tab · 2 — Search Hospital Name field.

NIEMS Portal emergency treatment centre provider register with search and provider rows

Enter the ETC provider details

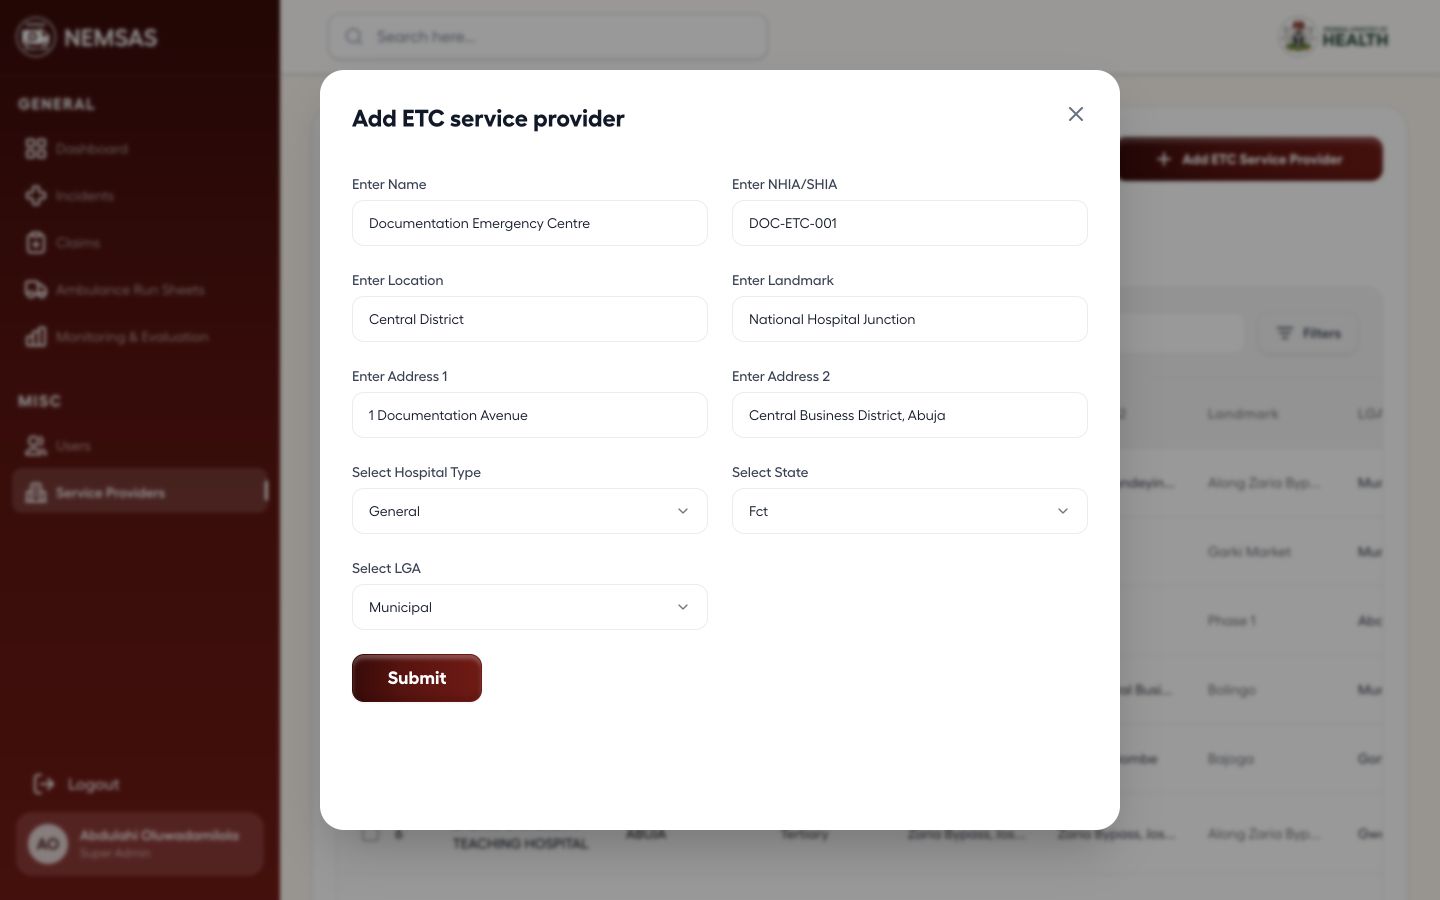
As a Super Admin, select Add ETC Service Provider and enter the centre's identity, NHIA or SHIA reference, location, contact and service information. Review before submitting.

Super Admin Add ETC service provider form populated with demonstration facility, registration, location and contact details

1 — centre name and NHIA or SHIA fields · 2 — location and service fields · 3 — Submit button.

Super Admin Add ETC service provider form populated with demonstration facility, registration, location and contact details

Important: Provider records are automatically approved in the current workflow, so verify every field before submission.

Done. The correct provider form is populated and ready for final verification before submission.

If something goes wrong

A provider already exists.

Search both ambulance and ETC registers using the provider name and registration number before adding another record.

A location field is empty.

Select State, LGA and Ward in sequence so each dependent option can load.

Monitoring and evaluation

Manage monitoring and evaluation records

Review, filter, export and prepare monthly EMT gateway monitoring records.

National and state administrators 8–12 min read Web

Before you start

  • Monitoring and Evaluation access
  • The reporting state, year and month
  • Verified activity totals or a completed import template

Review the metric register

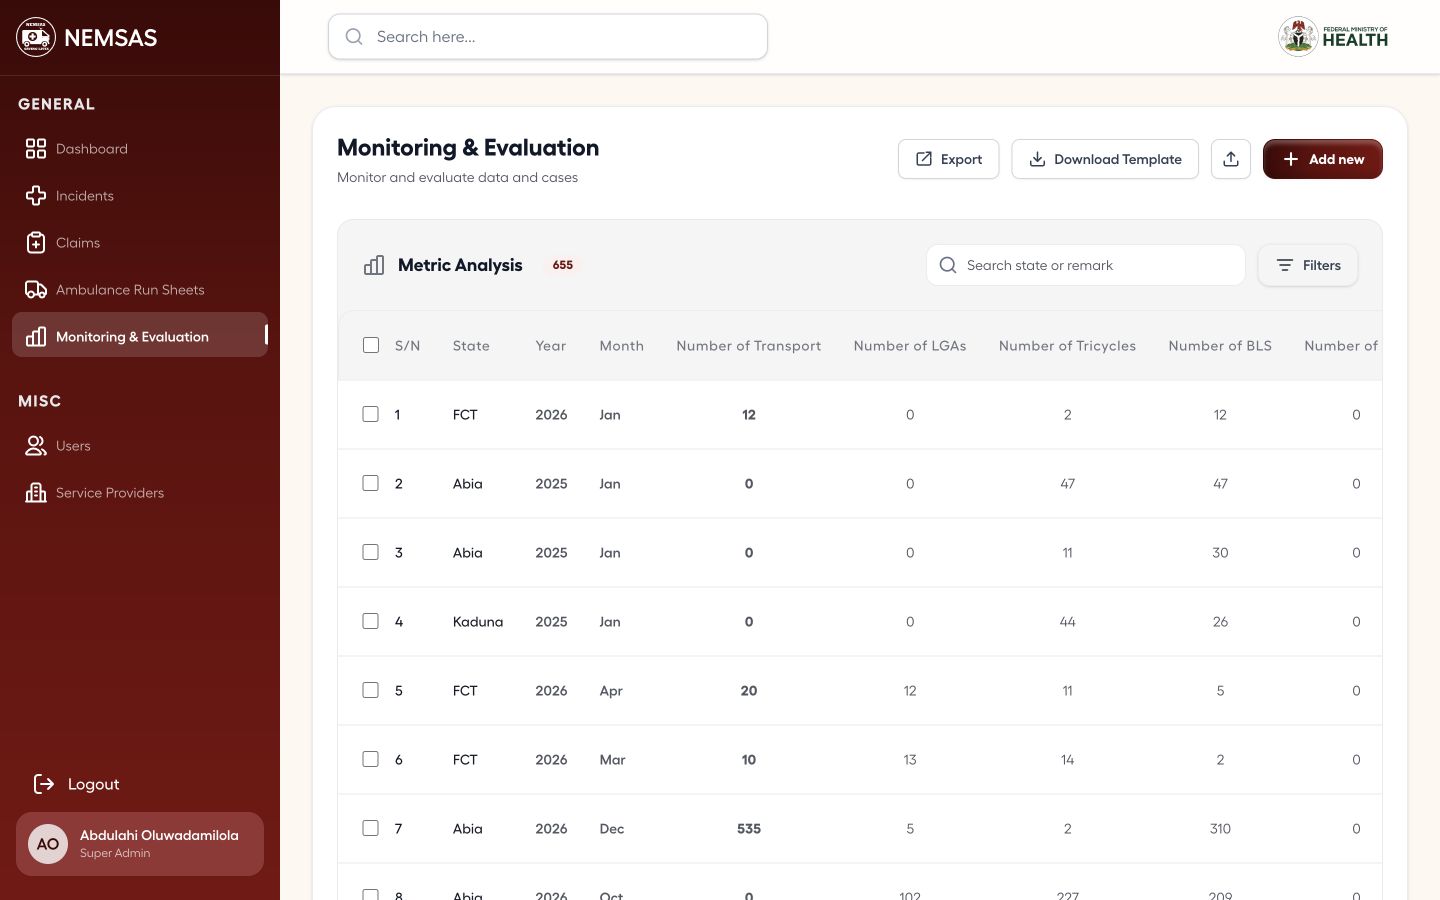
Open Monitoring & Evaluation and use the register to compare state, year, month and EMT gateway activity totals. Use Export or Download Template when required.

NIEMS Portal Monitoring and Evaluation register with Export, Download Template, Add new and metric rows

1 — Export and Download Template controls · 2 — reporting-period and activity columns.

NIEMS Portal Monitoring and Evaluation register with Export, Download Template, Add new and metric rows

Confirm the state scope

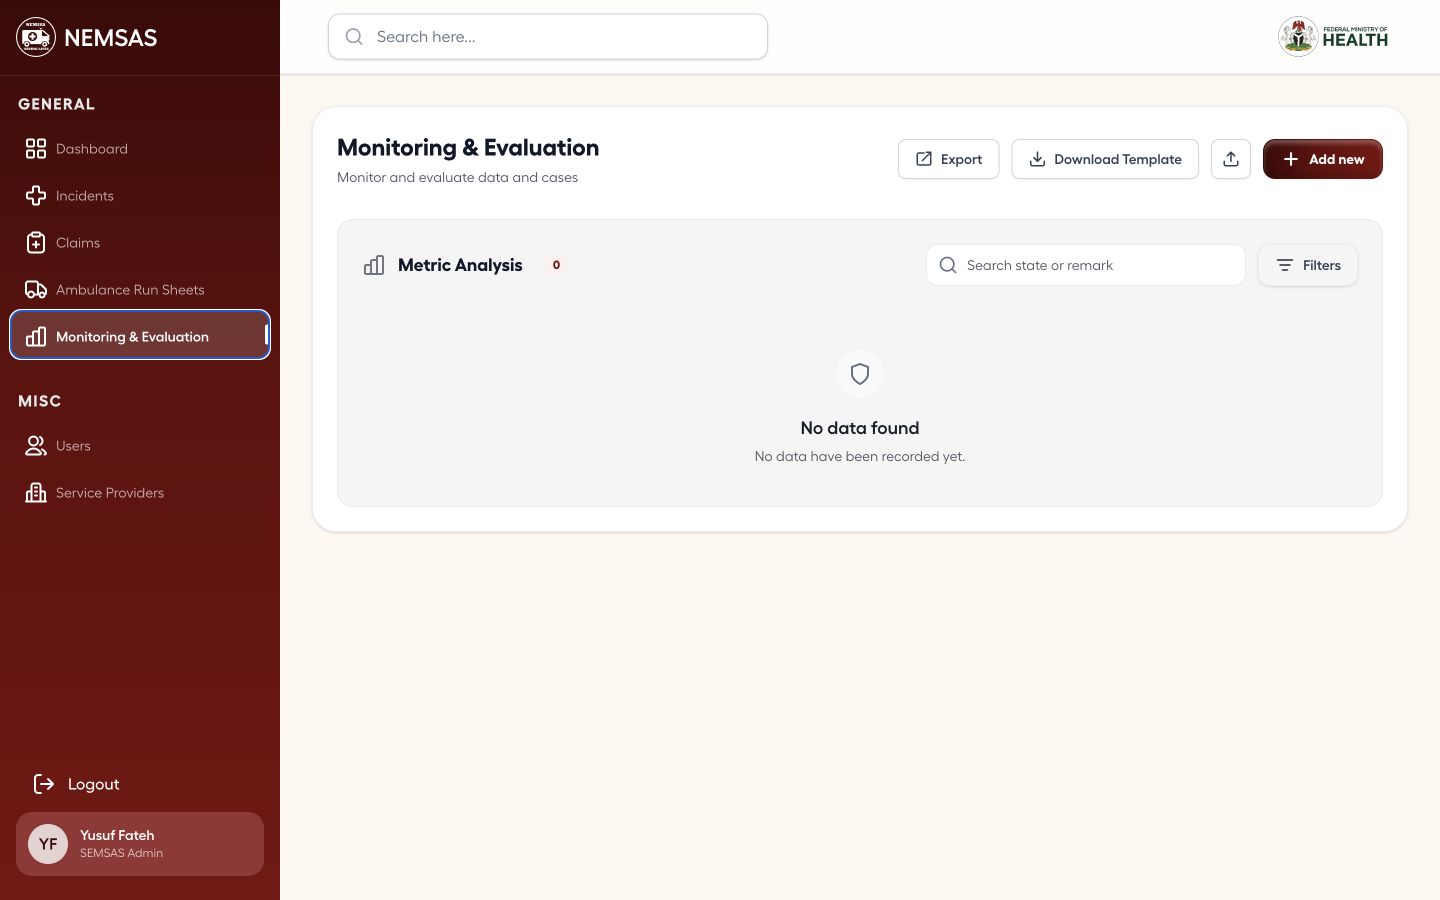
State Admins should confirm that the register is scoped to their assigned state before filtering, exporting or adding a record.

State Admin Monitoring and Evaluation page with state-scoped controls and an empty register

1 — State Admin role card · 2 — state-scoped register.

State Admin Monitoring and Evaluation page with state-scoped controls and an empty register

Configure the reporting filters

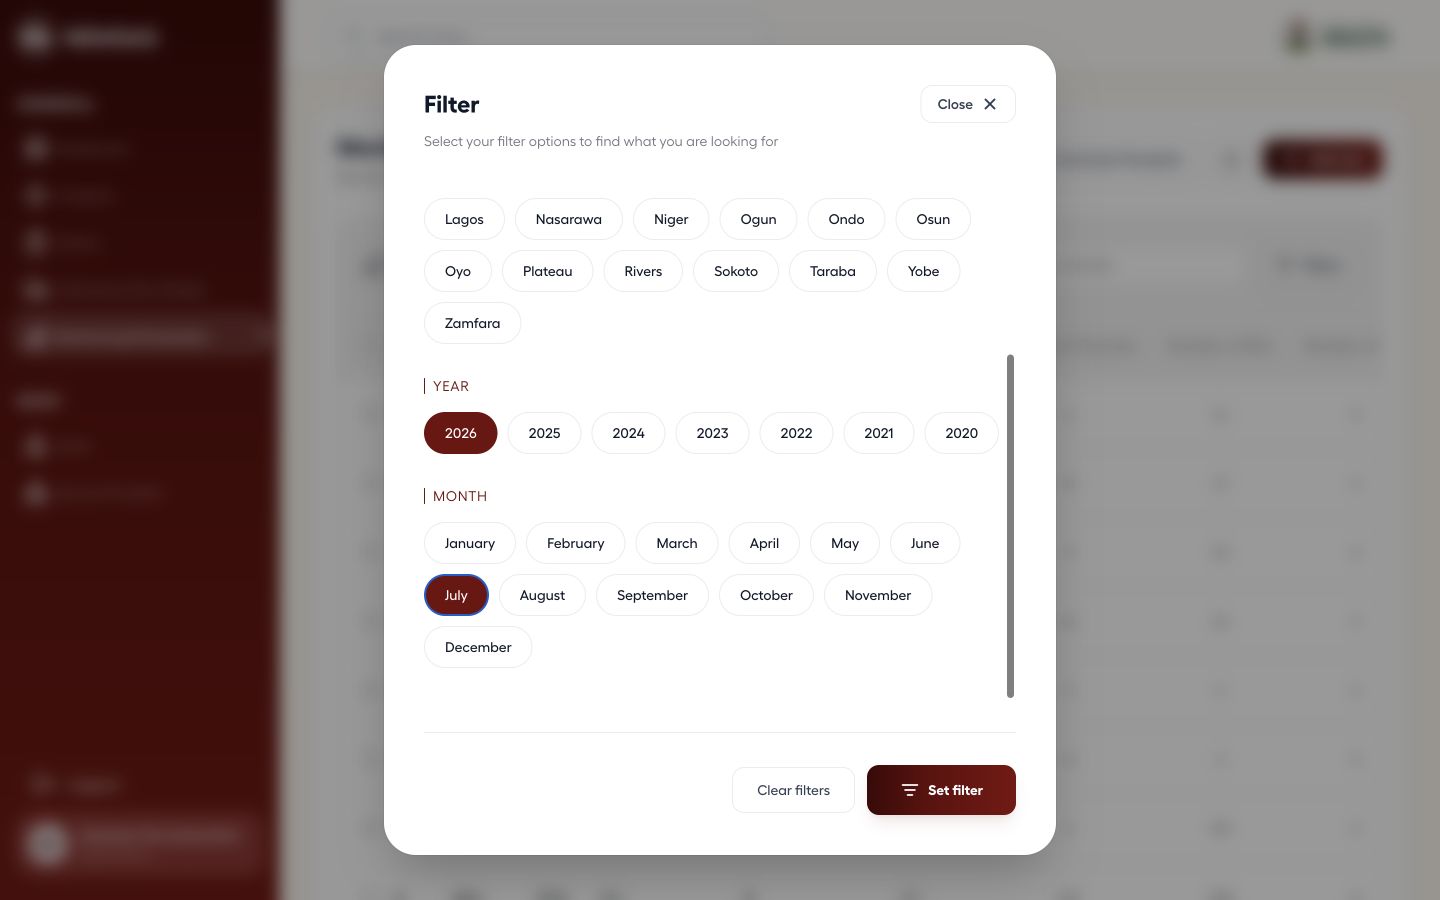
Select Filters and choose the State, Year and Month that match the reporting period, then apply the filter.

Monitoring and Evaluation filter panel configured with demonstration state, year and month

1 — Year options · 2 — Month options · 3 — Set filter button.

Monitoring and Evaluation filter panel configured with demonstration state, year and month

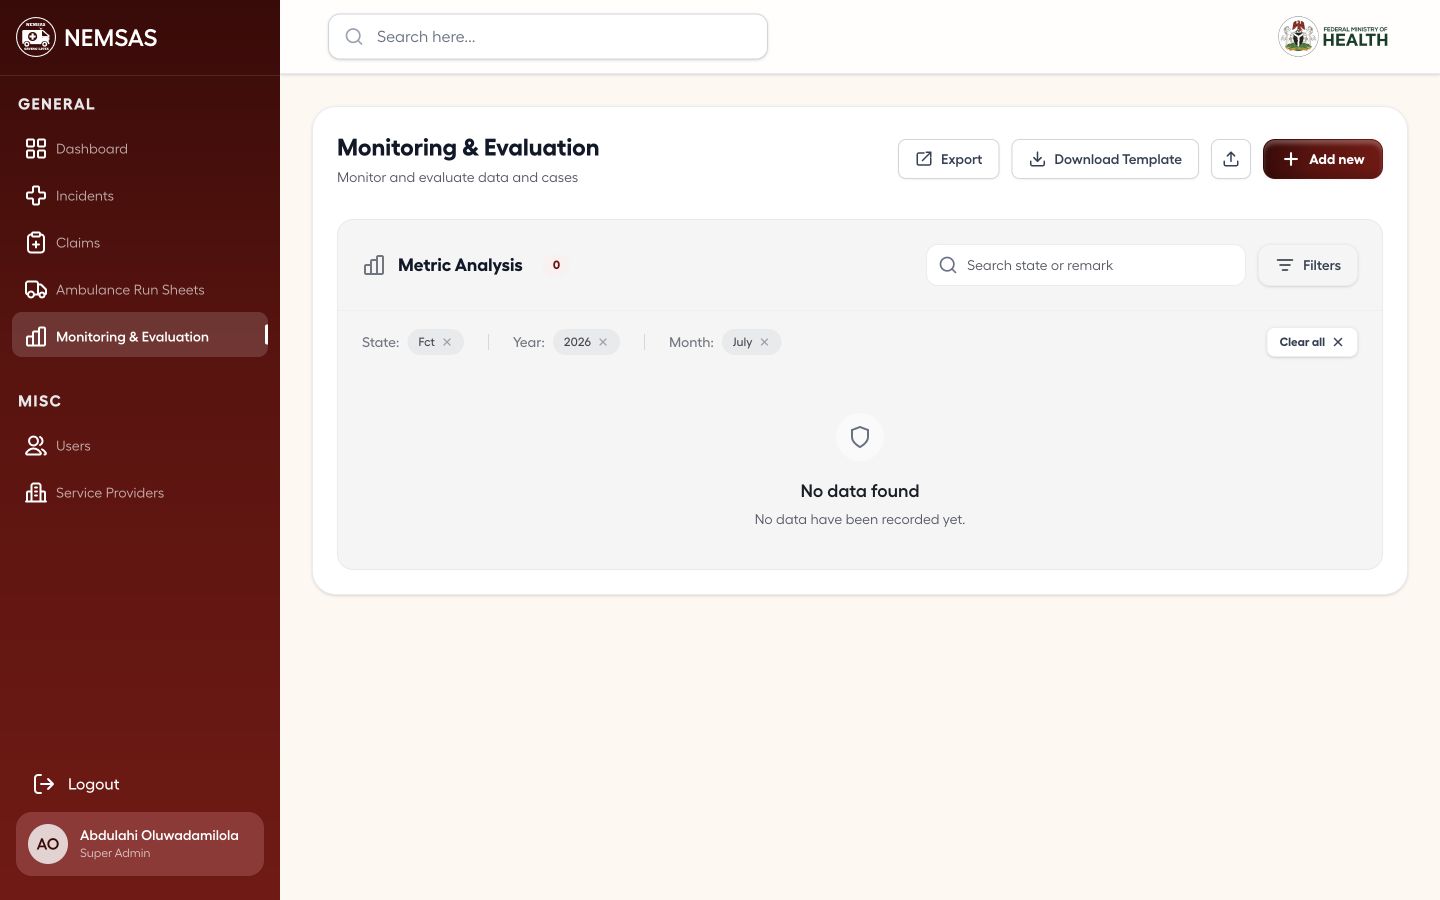
Interpret the filtered result

Confirm the active filter chips above the register and review the returned records. A No data found result means no row matches the complete filter set.

Monitoring and Evaluation register with active filters and a no-data result

1 — active filter chips · 2 — No data found result.

Monitoring and Evaluation register with active filters and a no-data result

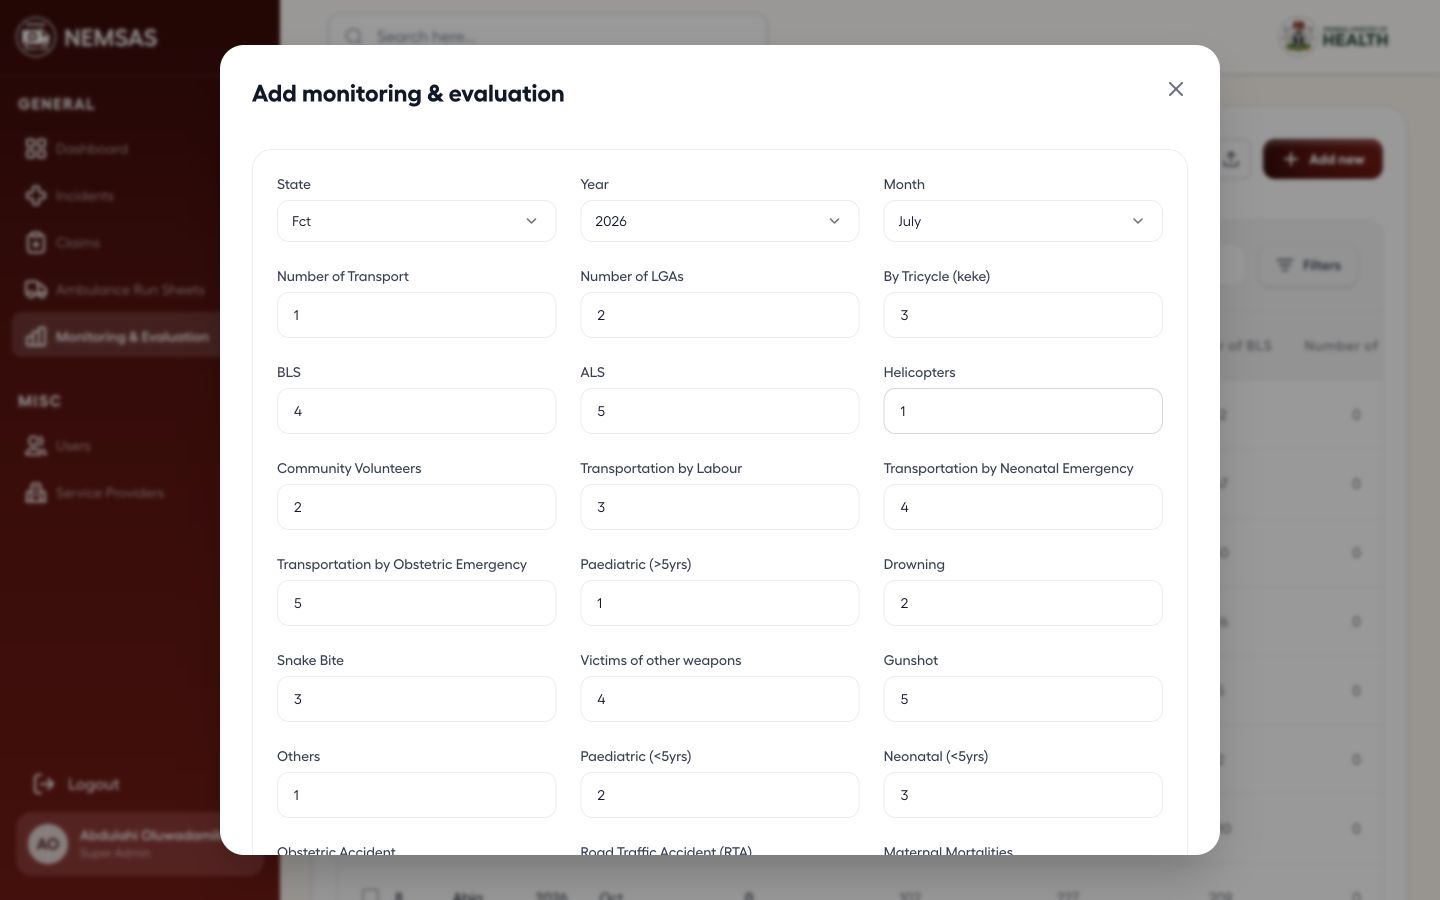
Enter the monthly metrics

Select Add new and enter the transport, incident, ambulance-run, treatment, maternal and paediatric indicators from the verified monthly source.

Add monitoring and evaluation form populated with demonstration monthly metric values

1 — reporting period fields · 2 — activity and clinical indicator fields.

Add monitoring and evaluation form populated with demonstration monthly metric values

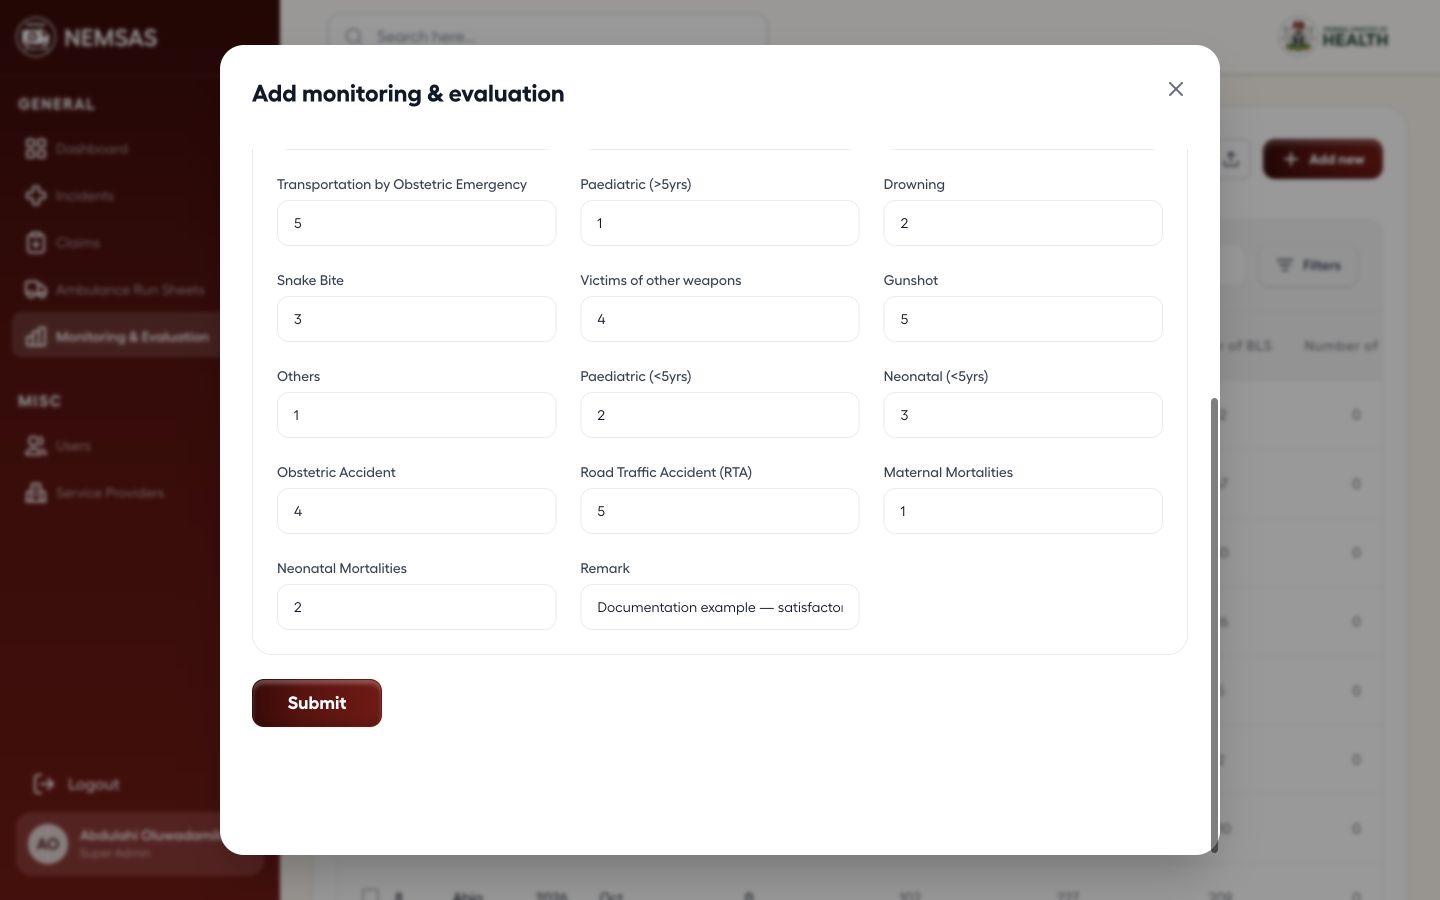
Review the complete record

Check every metric, remark and documentation reference in the full form before selecting Submit.

Completed monitoring and evaluation form showing the full set of demonstration indicators and Submit

1 — metric fields · 2 — Remark field · 3 — Submit button.

Completed monitoring and evaluation form showing the full set of demonstration indicators and Submit

Important: Use verified reporting totals. Submission changes the monitoring dataset used by dashboards and exports.

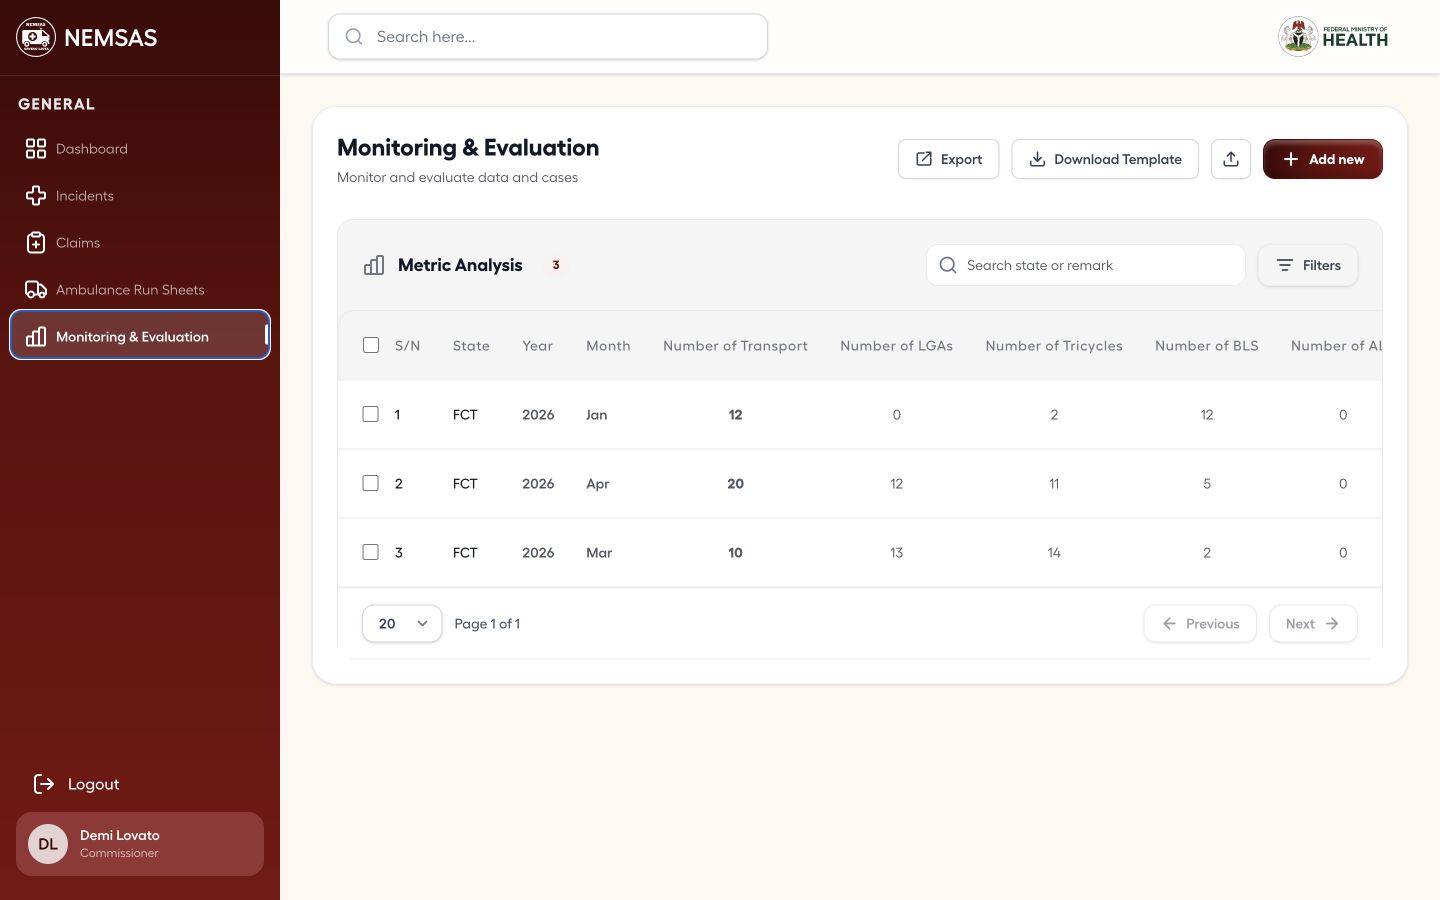
Follow approved permissions in viewer roles

The current Minister and Commissioner workspaces visibly expose Export, Download Template, Upload Batch Data and Add new. Use those controls only when your organization has authorized the action.

Commissioner Monitoring and Evaluation page with export, template, batch upload and Add new controls visible

1 — data action controls.

Commissioner Monitoring and Evaluation page with export, template, batch upload and Add new controls visible

Access: Follow your organization's permissions even when editing controls are visible.

Done. The required reporting records are filtered or a new monthly record is fully prepared for submission.

If something goes wrong

A filter returns no data.

Check the selected state, year and month. Clear one filter at a time to determine which criterion excludes the records.

An import is rejected.

Download a fresh template, preserve its columns and formats, and correct validation issues before uploading again.

Monitoring and evaluation

Read the state monitoring dashboard

Interpret state accreditations, incidents, ambulance runs, treatments and claims.

State administrators and viewers 5 min read Web

Before you start

  • A state-scoped administrator or viewer account
  • The reporting period you want to review

Review the state indicators

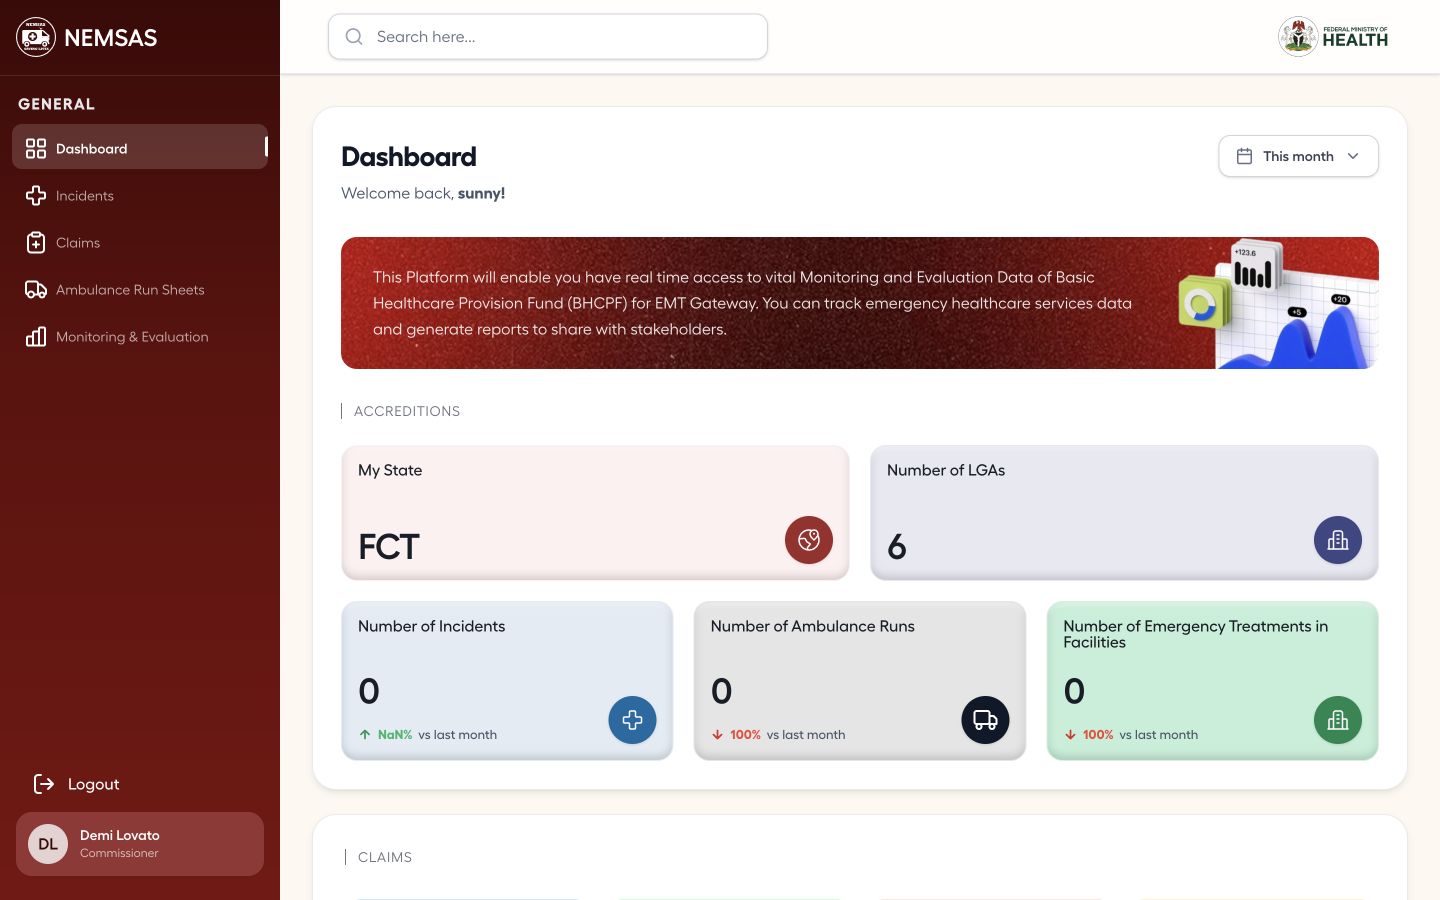
Open Dashboard and confirm My State, then read the LGA, incident, ambulance-run, emergency-treatment and claim indicators for the selected period.

Commissioner state dashboard showing the assigned state and state-level EMT gateway indicators

1 — My State card · 2 — state indicator cards.

Commissioner state dashboard showing the assigned state and state-level EMT gateway indicators

Choose the dashboard period

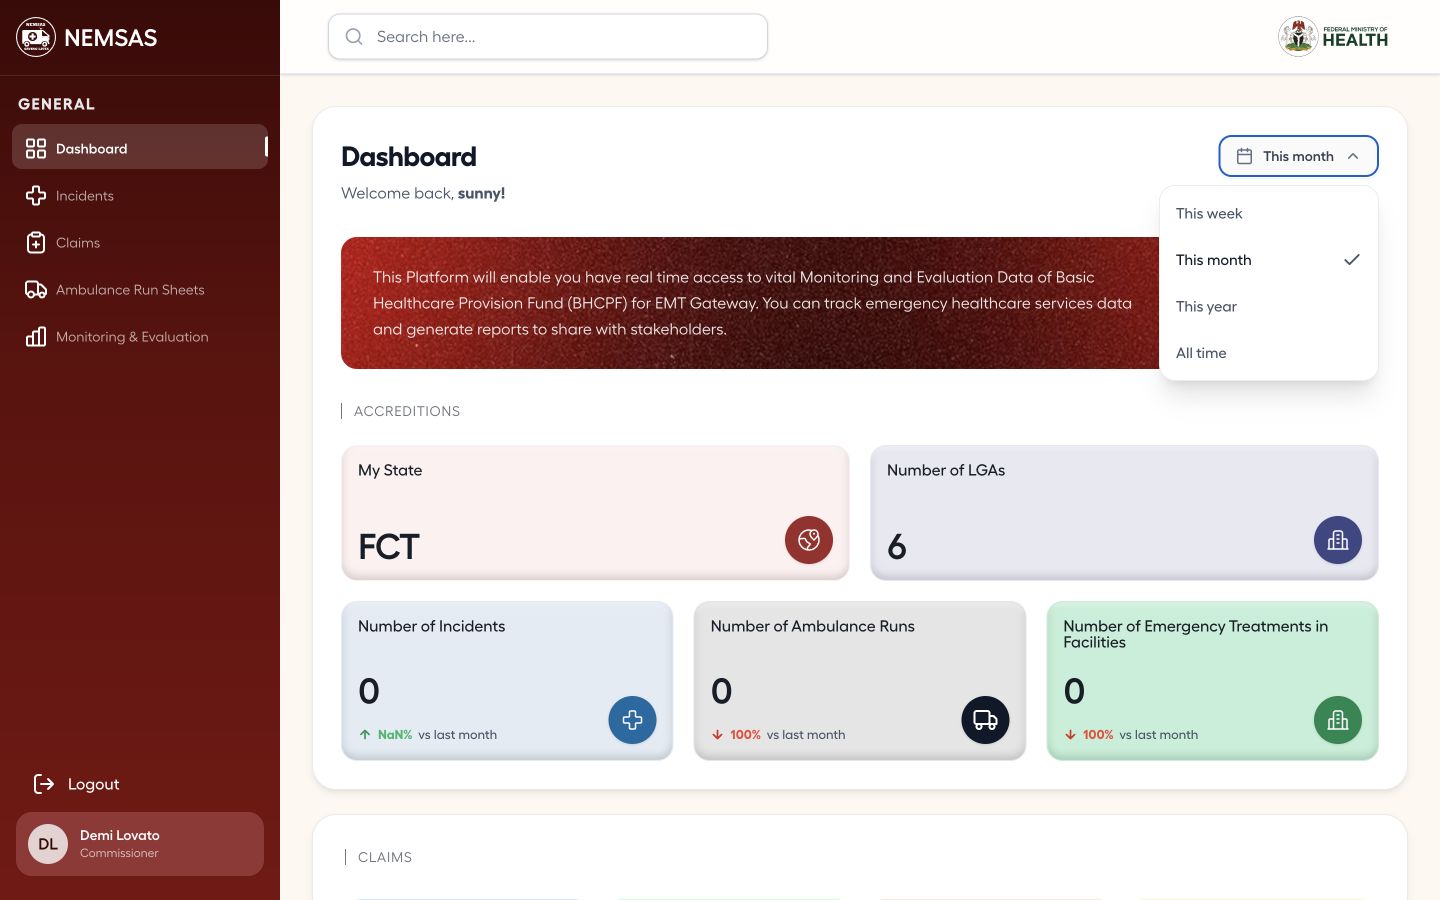
Use the period menu to select This week, This month, This year or All time according to the review you are performing.

Commissioner state dashboard with the reporting period menu open

1 — period menu.

Commissioner state dashboard with the reporting period menu open

Review the selected state period

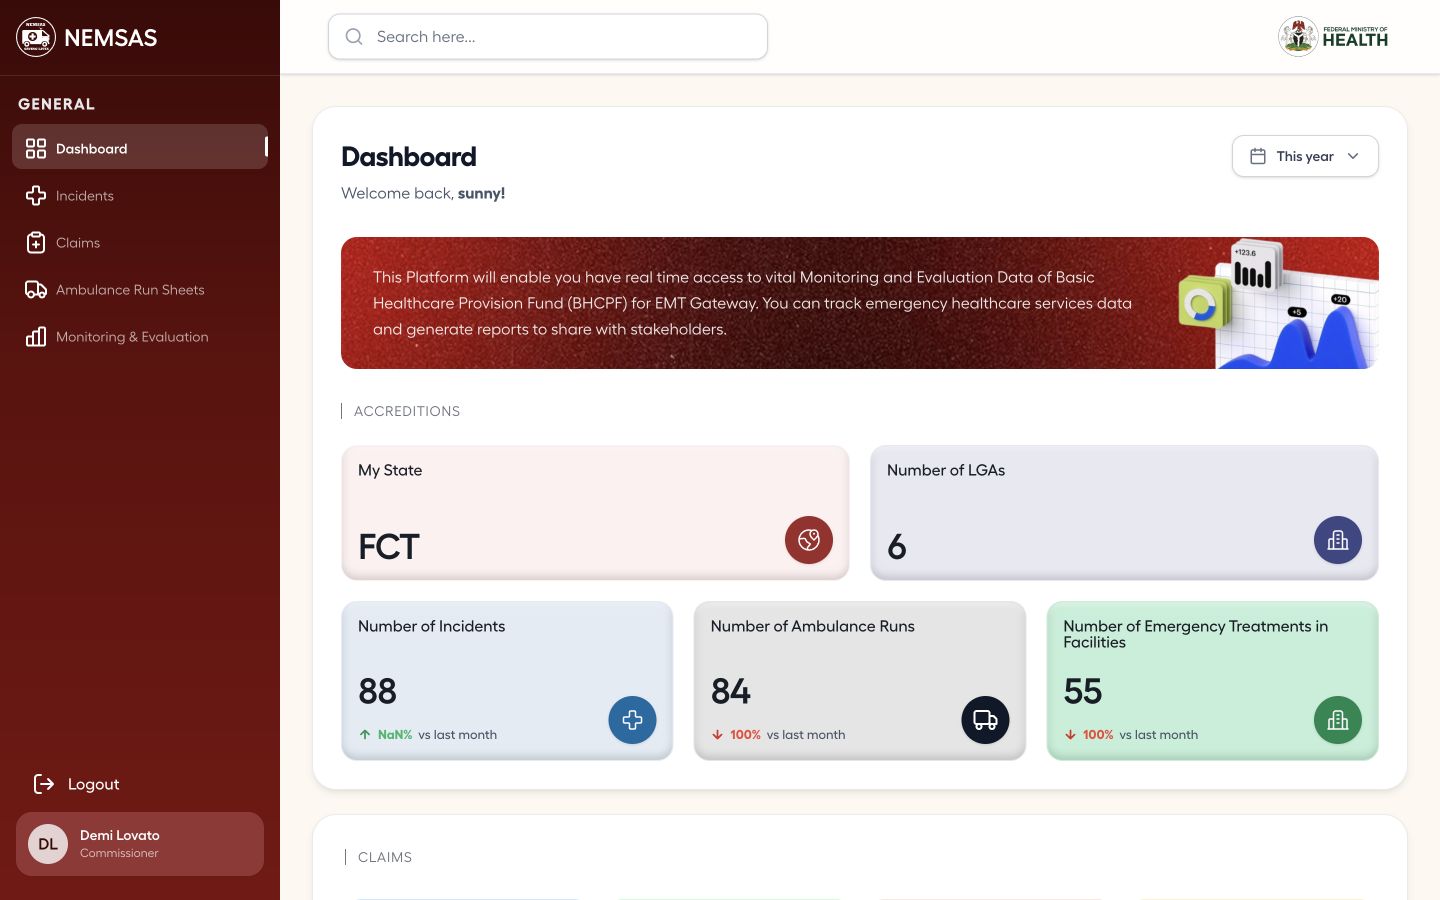
Confirm the period above the dashboard and interpret the updated state summary, chart and dispatched-ambulance map together.

Commissioner state dashboard showing the selected yearly period

1 — selected period · 2 — updated state summary.

Commissioner state dashboard showing the selected yearly period

Done. You can explain the state-level activity and claim position shown by the dashboard.

If something goes wrong

The dashboard shows the wrong state.

Check the assigned role and state in the account profile. A platform administrator must correct an incorrect scope.

National oversight

Monitor national incidents, claims and run sheets

Use the read-only operational registers to monitor incidents, claims and completed ambulance runs nationwide.

National viewers 8–10 min read Web

Before you start

  • A Minister or national viewer account
  • The reporting criteria you want to review

Review national incidents

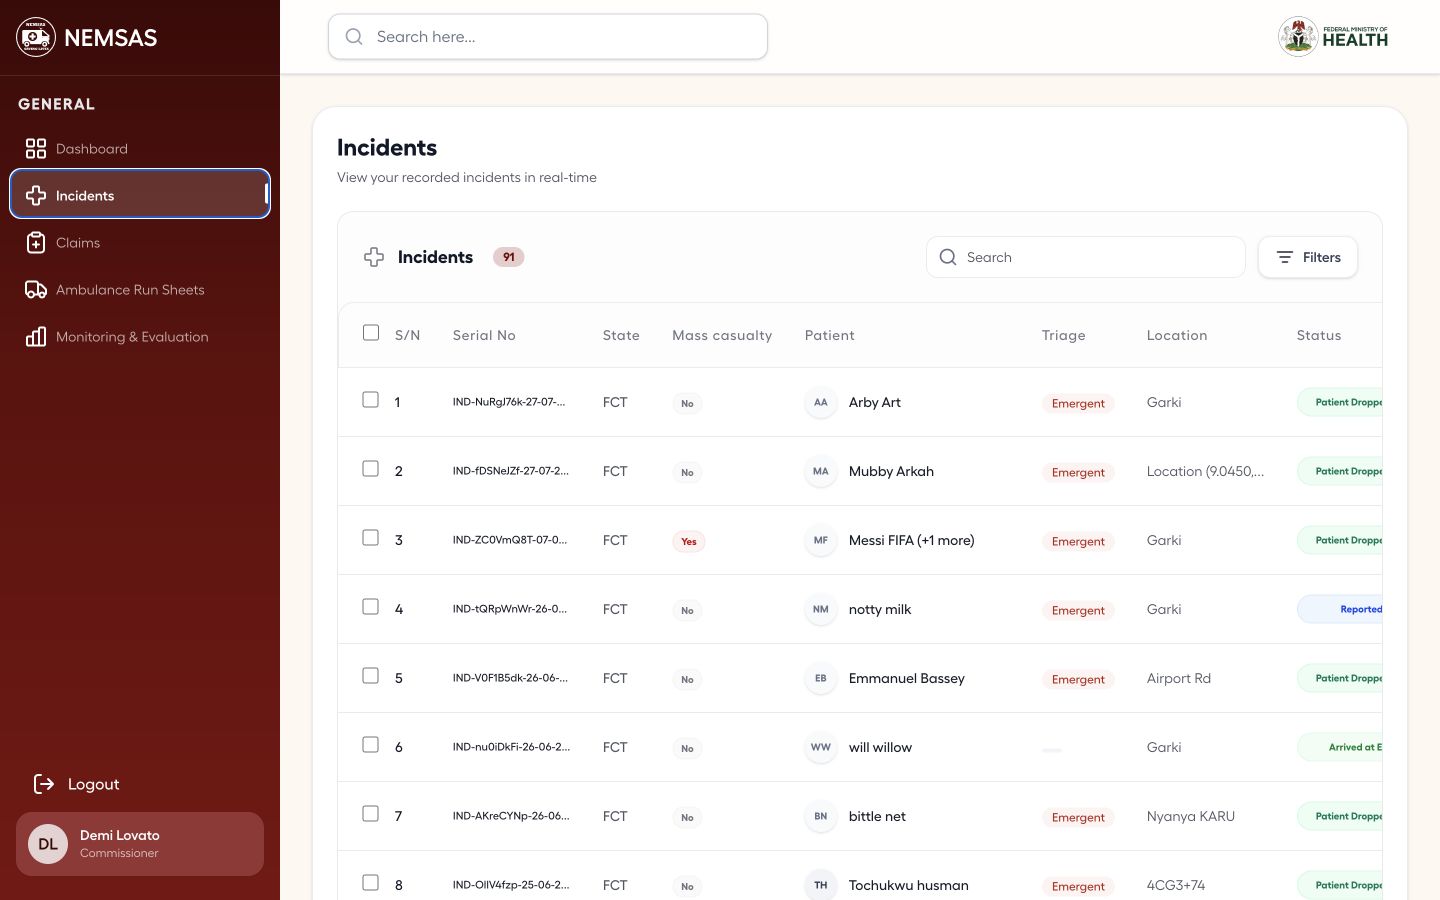
Open Incidents and use search or Filters to monitor patient, triage, location and response status records. The national viewer does not see New incident.

Minister national incident register with search, filters, patient, triage, location and status columns

1 — Search and Filters controls · 2 — patient, triage, location and status columns.

Minister national incident register with search, filters, patient, triage, location and status columns

Review ambulance claims

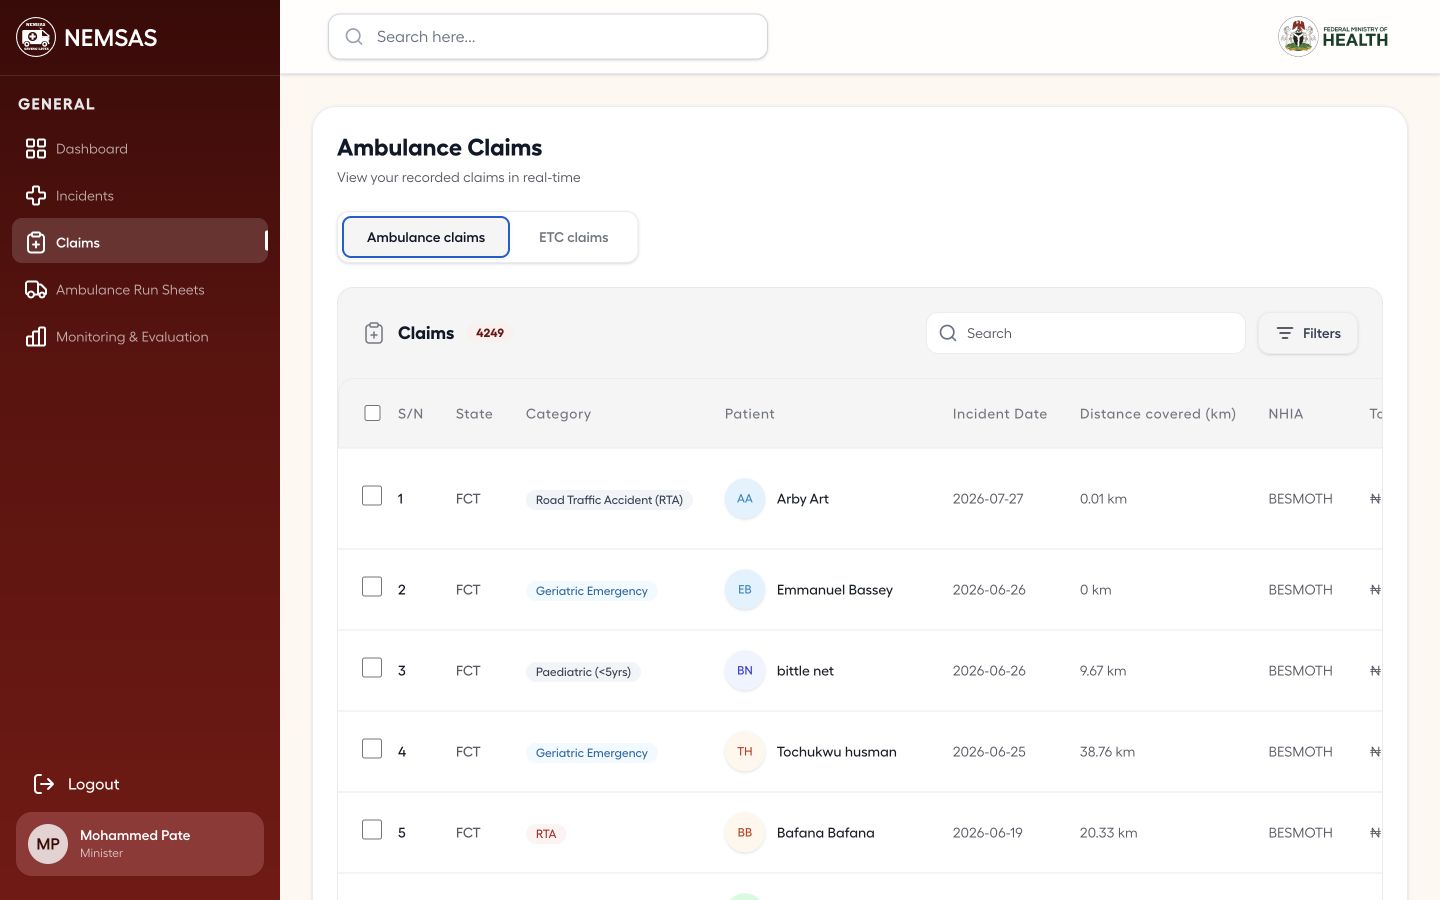
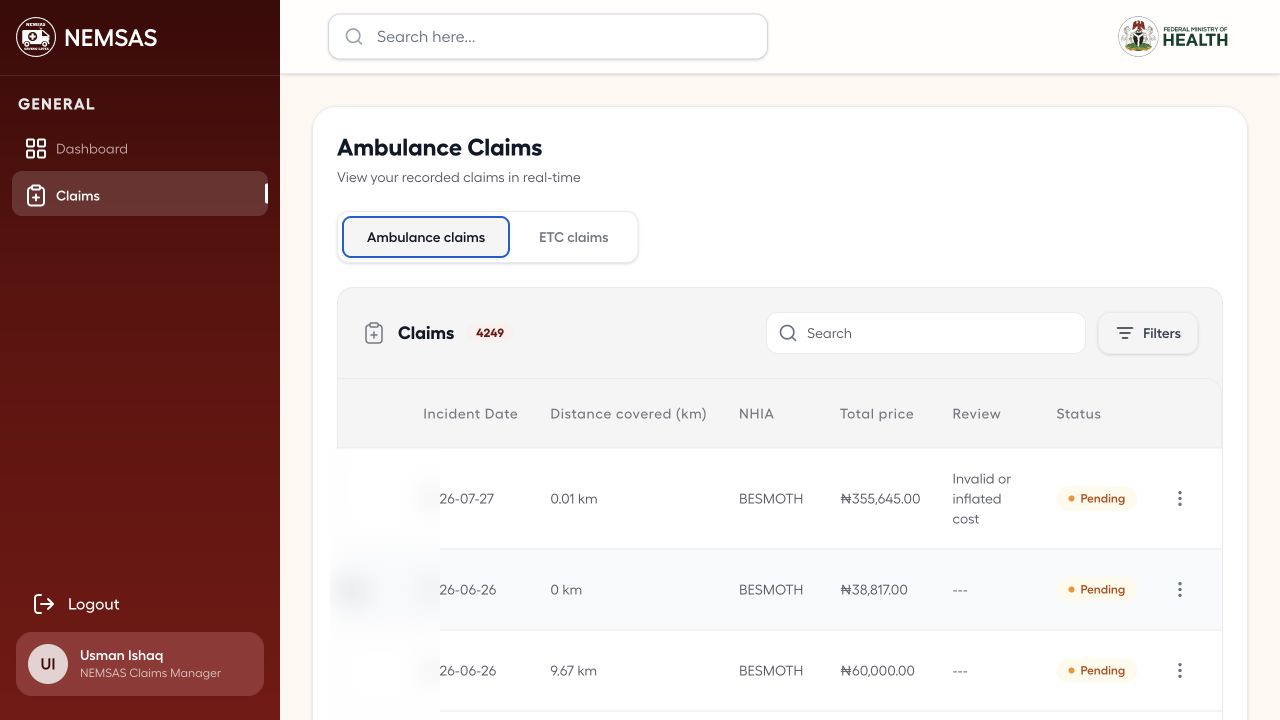
Open Claims and keep Ambulance claims selected. Compare state, category, patient, incident date, cost, review and status fields.

Minister read-only national Ambulance claims table with state, patient, cost, review and status columns

1 — Ambulance claims tab · 2 — claim reporting fields.

Minister read-only national Ambulance claims table with state, patient, cost, review and status columns

Review ETC claims

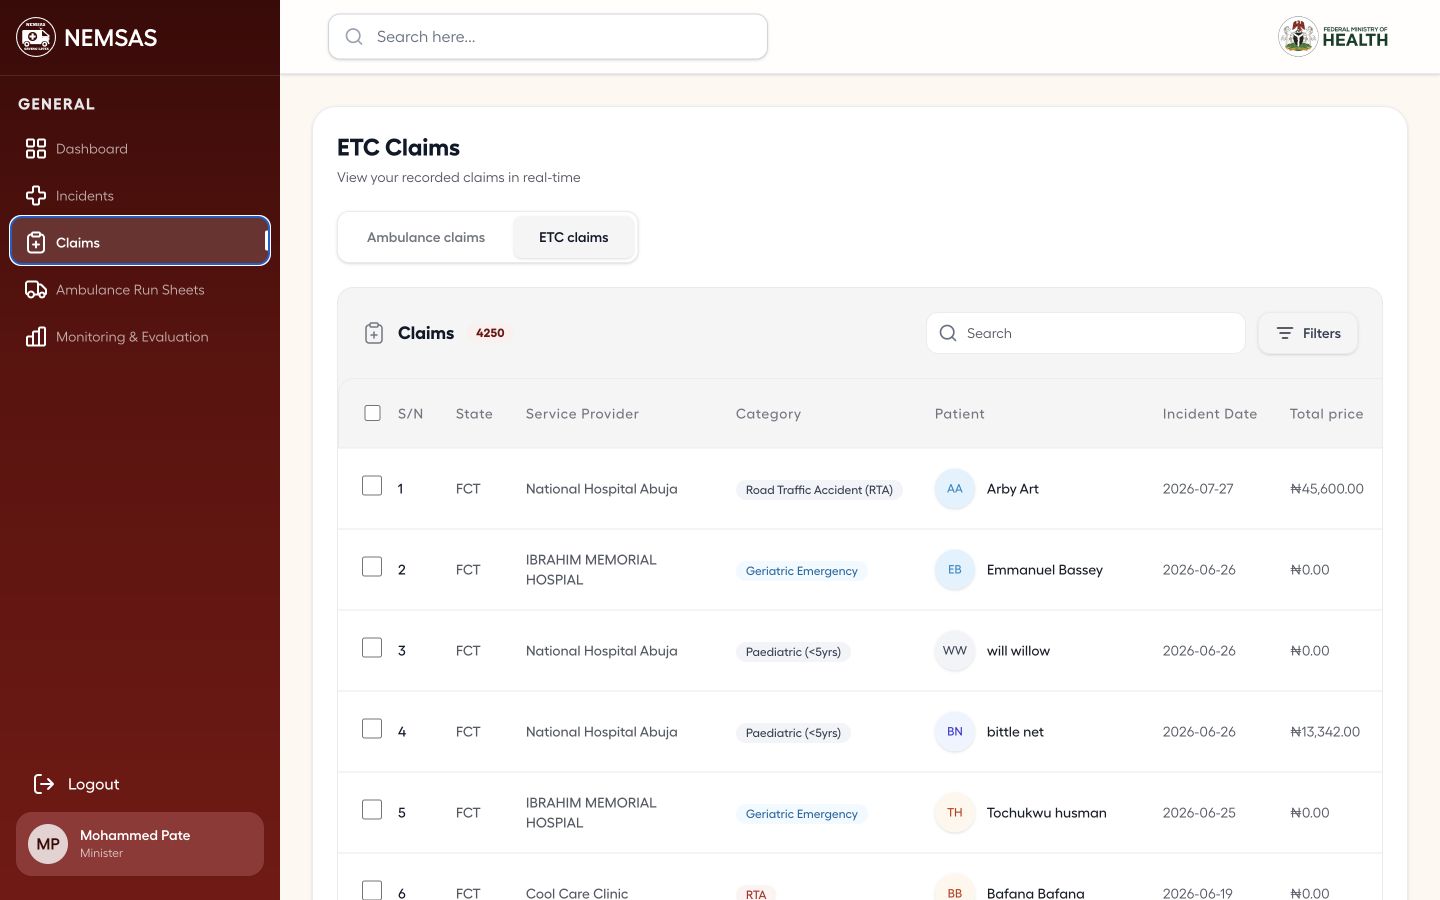
Select ETC claims and compare the same reporting fields for emergency treatment centre claims.

Minister read-only national ETC claims table with state, patient, cost, review and status columns

1 — ETC claims tab · 2 — claim reporting fields.

Minister read-only national ETC claims table with state, patient, cost, review and status columns

Review ambulance run sheets

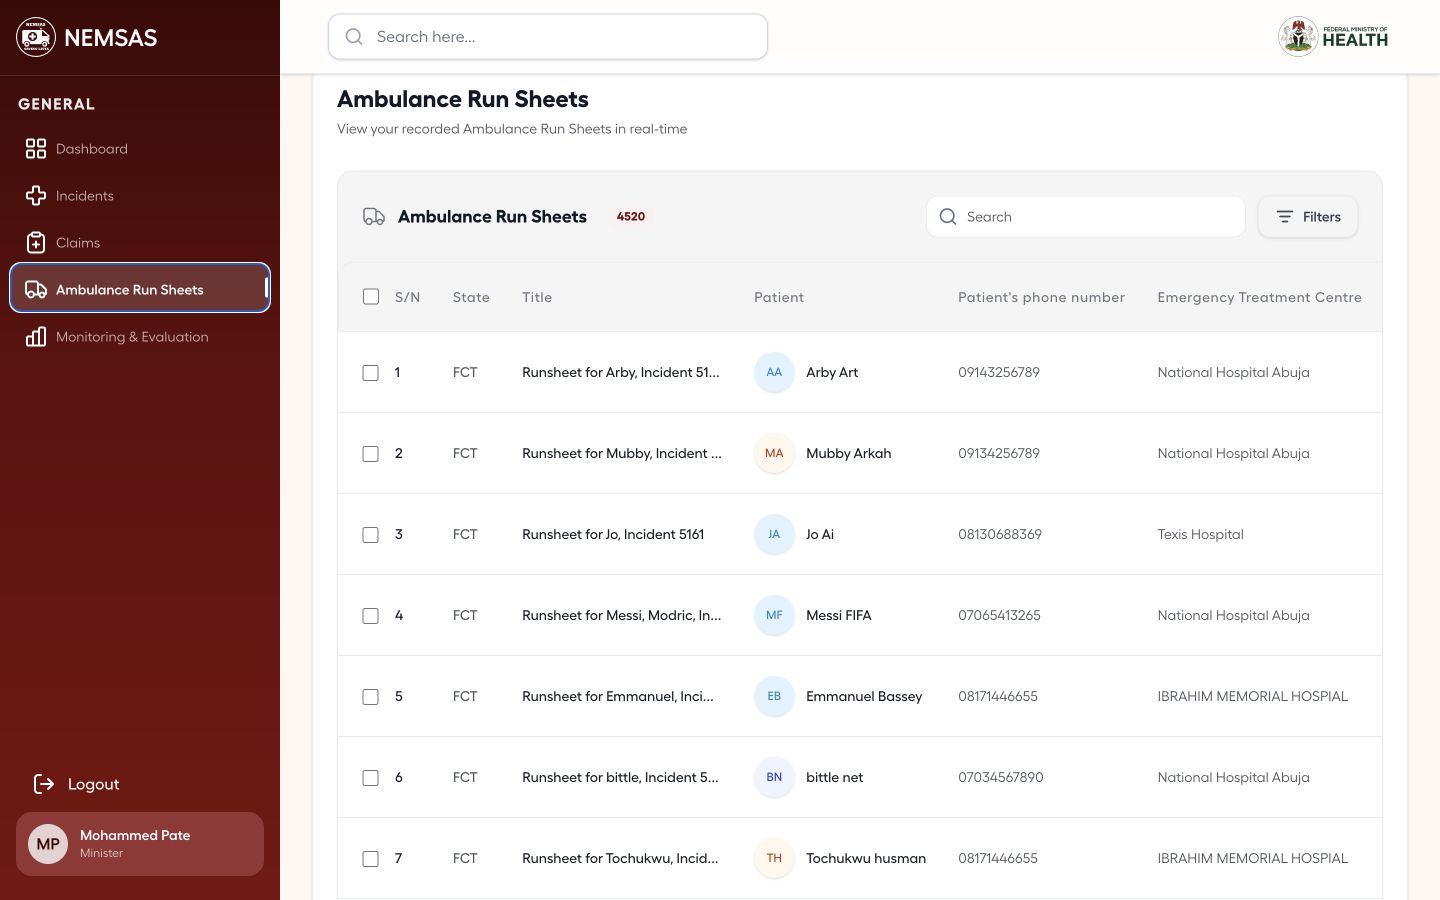
Open Ambulance Run Sheets and use Filters to review patient, ETC, route, timestamps, duration and price for completed runs.

Minister national Ambulance Run Sheets table with patient, ETC, route, timestamps, duration and price

1 — Filters button · 2 — run-sheet review fields.

Minister national Ambulance Run Sheets table with patient, ETC, route, timestamps, duration and price

Done. You can summarize the national incident, claim and ambulance-run records without changing operational data.

If something goes wrong

A decision action is not visible.

The Minister workspace is read-only for claims. Decision controls belong to claims-management roles.

State oversight

Monitor state incidents

Review and filter the incident register for the Commissioner's assigned state.

State viewers 4 min read Web

Before you start

  • A Commissioner or state viewer account
  • The incident period or category you want to review

Review the state incident register

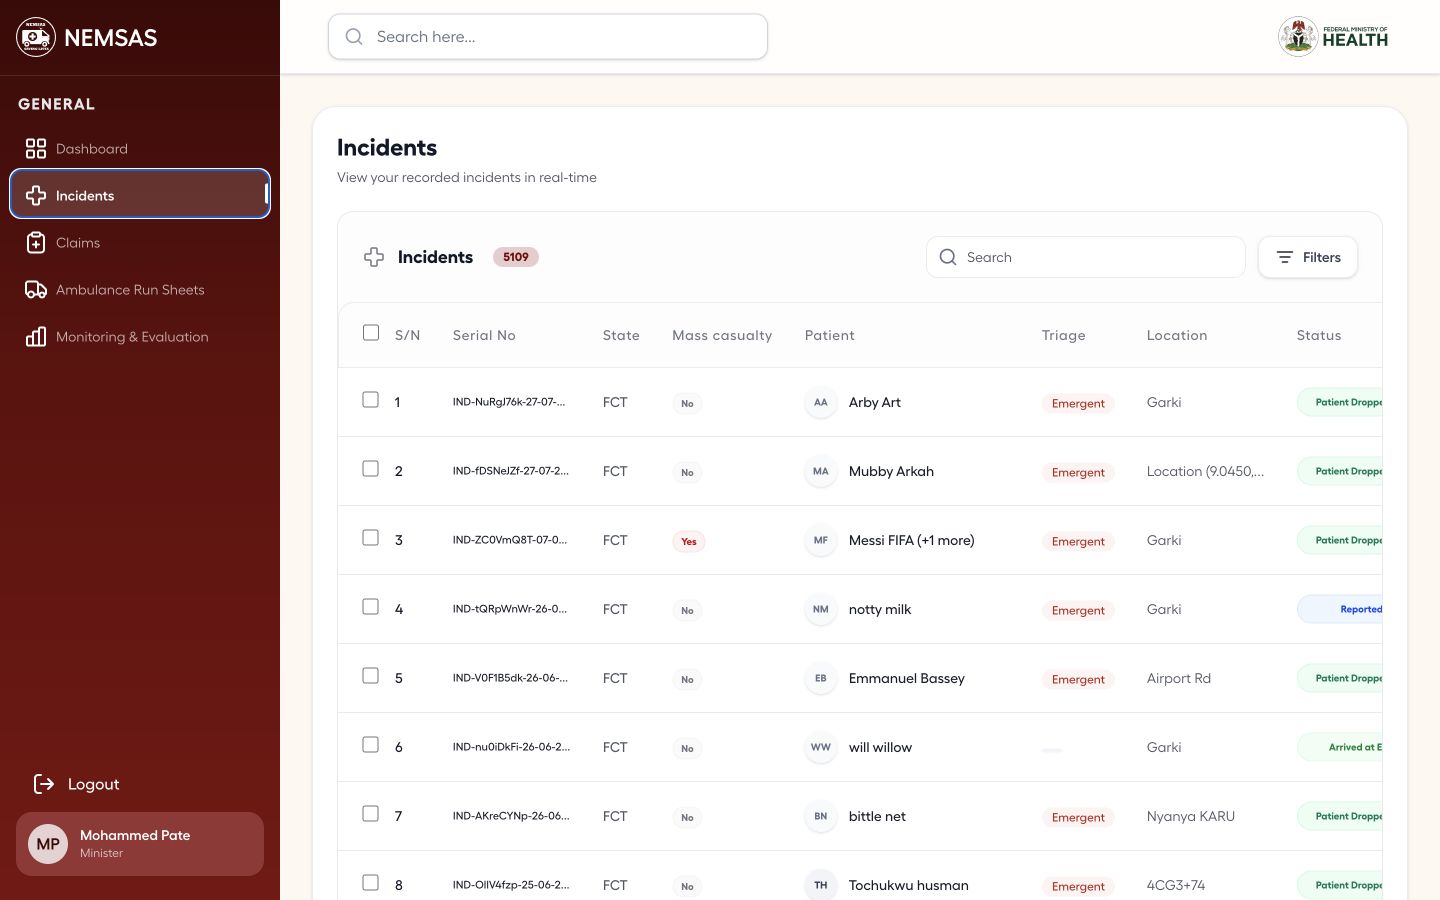
Open Incidents and compare the mass-casualty flag, patient, triage, location, status and date. The Commissioner role does not show New incident.

Commissioner state incident register with patient, triage, location, status and date columns

1 — incident oversight fields.

Commissioner state incident register with patient, triage, location, status and date columns

Review the available incident filters

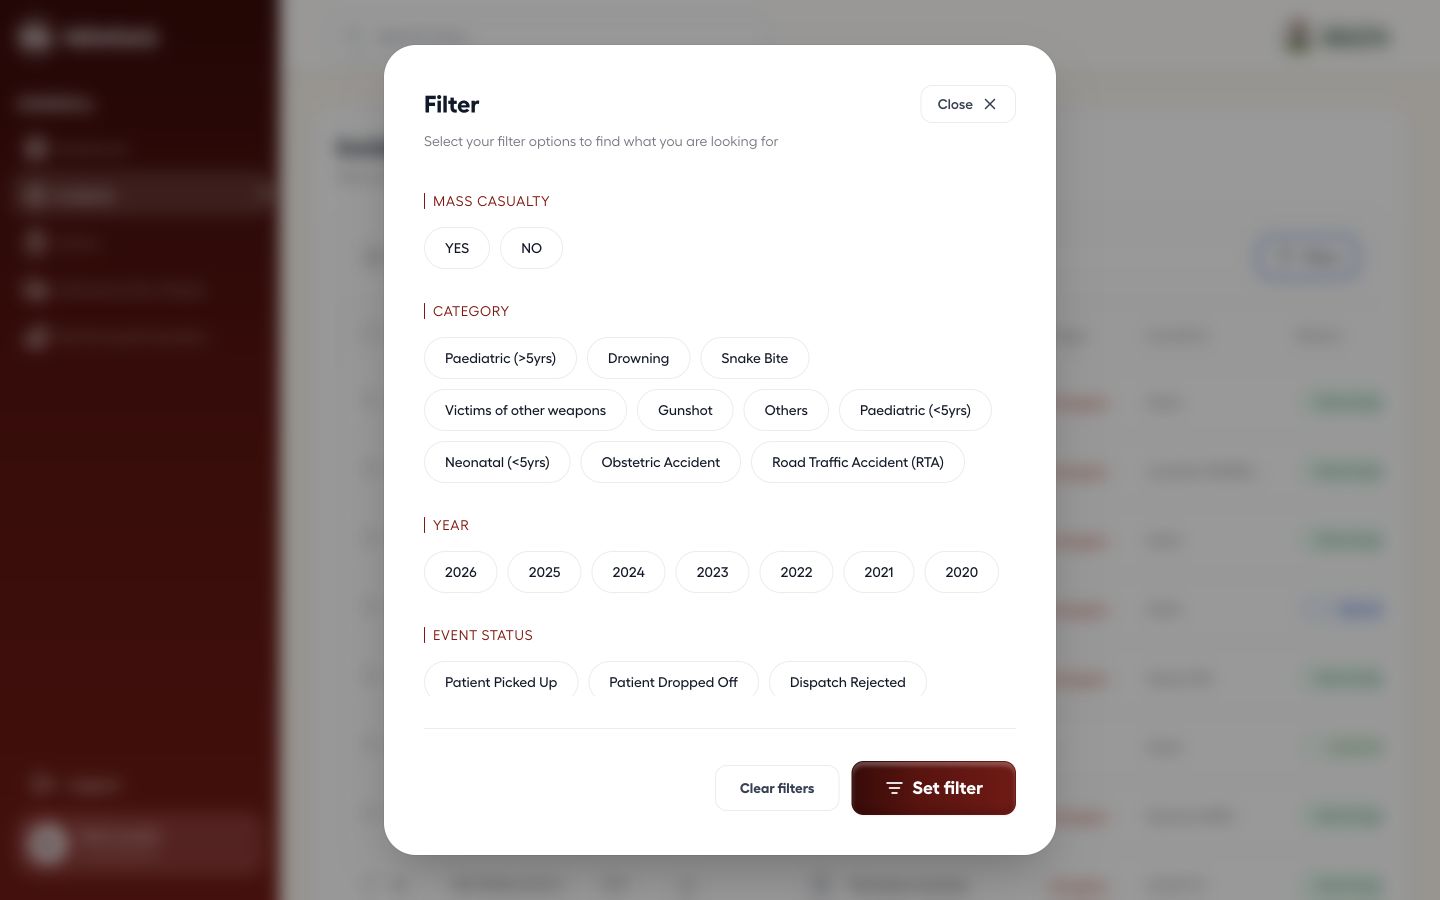
Select Filters and review the mass-casualty, category, year and event-status criteria before choosing the combination that matches the oversight question.

Commissioner incident filter panel with mass-casualty, category, year and event-status options

1 — incident filter criteria · 2 — Set filter button.

Commissioner incident filter panel with mass-casualty, category, year and event-status options

Done. You can identify the state's incidents and their current response status without changing records.

If something goes wrong

Claims or run sheets remain loading.

Reload the page and try again. If the tables still do not load, contact support and include the page name and selected filters.

Emergency coordination

Read the dispatch dashboard

Review state-level response indicators before opening the incident workspace.

Dispatchers 3 min read Web

Before you start

  • Dispatcher access to the NIEMS Portal
  • The reporting period you want to review

Review the state response summary

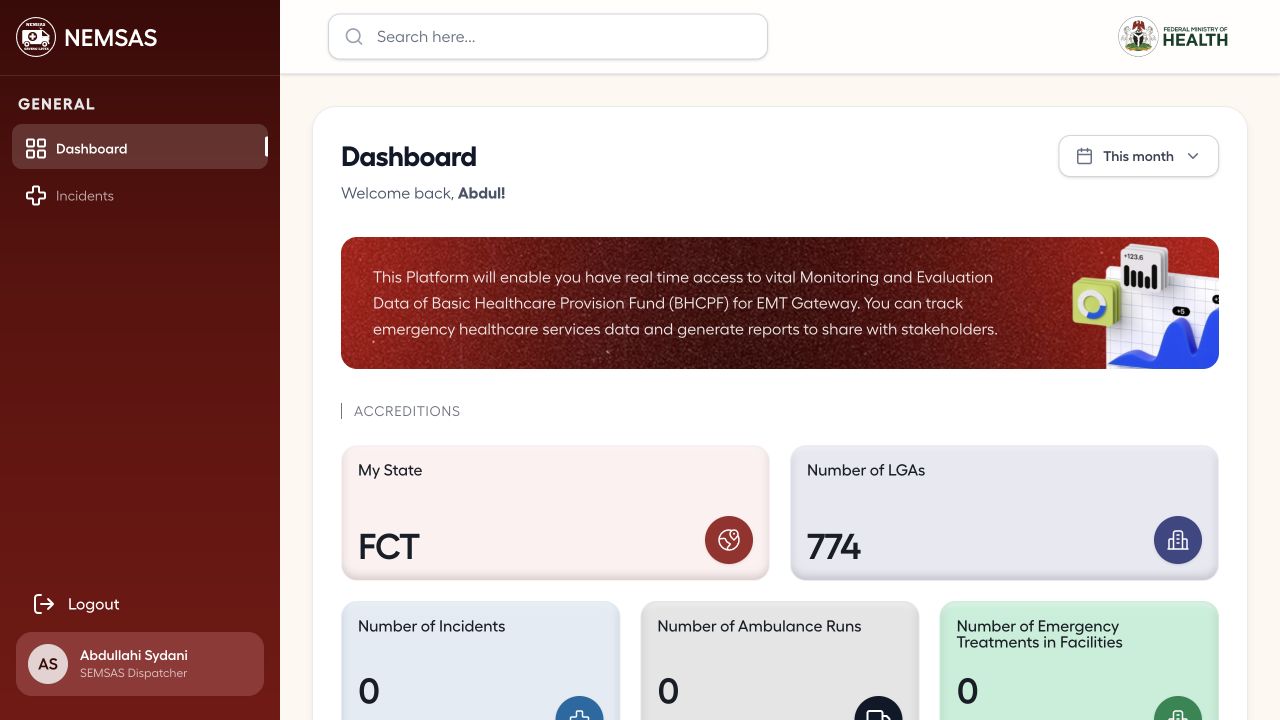
Open Dashboard and confirm My State. Read the LGA, incident, ambulance-run, emergency-treatment and claims cards before opening Incidents.

Dispatcher dashboard showing the assigned state and state-level emergency-response indicators

1 — My State card · 2 — operational indicator cards · 3 — Incidents navigation.

Dispatcher dashboard showing the assigned state and state-level emergency-response indicators

Done. You can explain the assigned state's emergency-response totals and proceed to the incident register.

If something goes wrong

The assigned state is incorrect.

Check the role and account scope shown in the sidebar, then ask an administrator to correct the assignment.
Emergency coordination

Find and review incidents

Locate incidents, compare their response status and open the correct record.

Dispatchers 3 min read Web

Before you start

  • Dispatcher access to the NIEMS Portal
  • An incident identifier, patient name or location

Review the incident status list

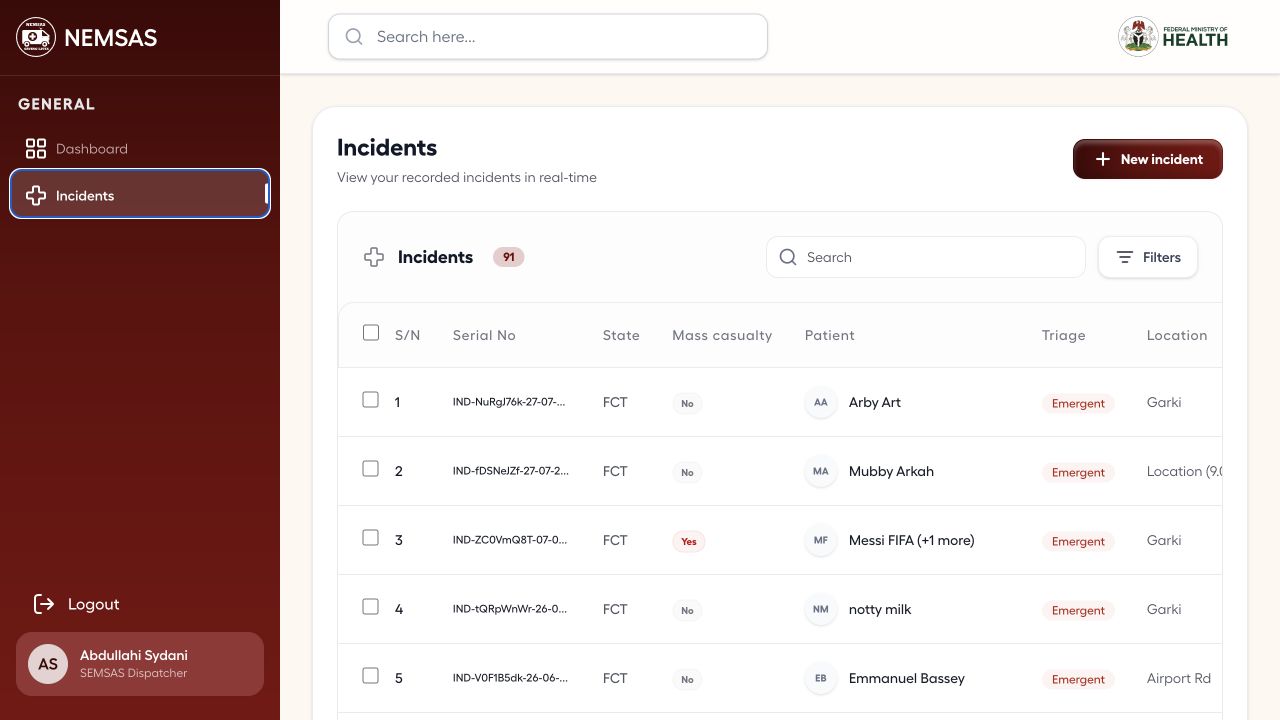
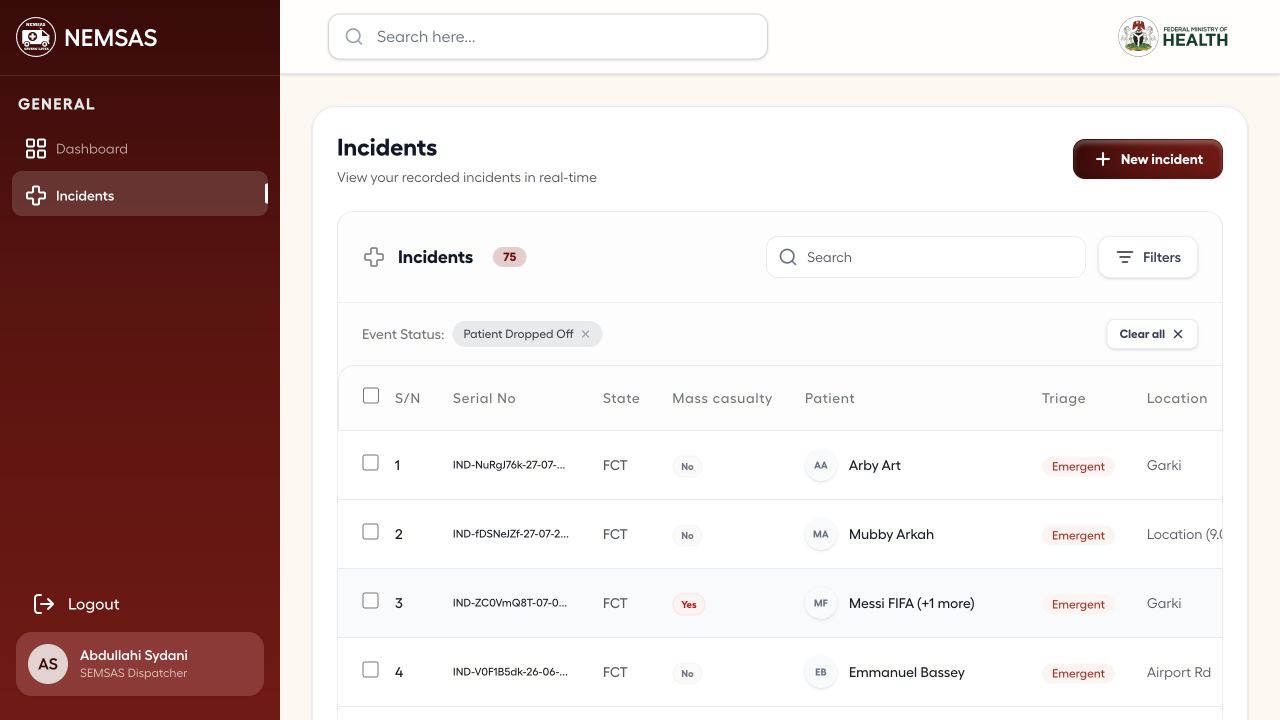
Select Incidents in the sidebar and compare incident identifiers, patient, triage, location, status and date.

Dispatcher incident register with demonstration records and current response statuses

1 — Incidents navigation · 2 — incident review fields.

Dispatcher incident register with demonstration records and current response statuses

Choose a response-status filter

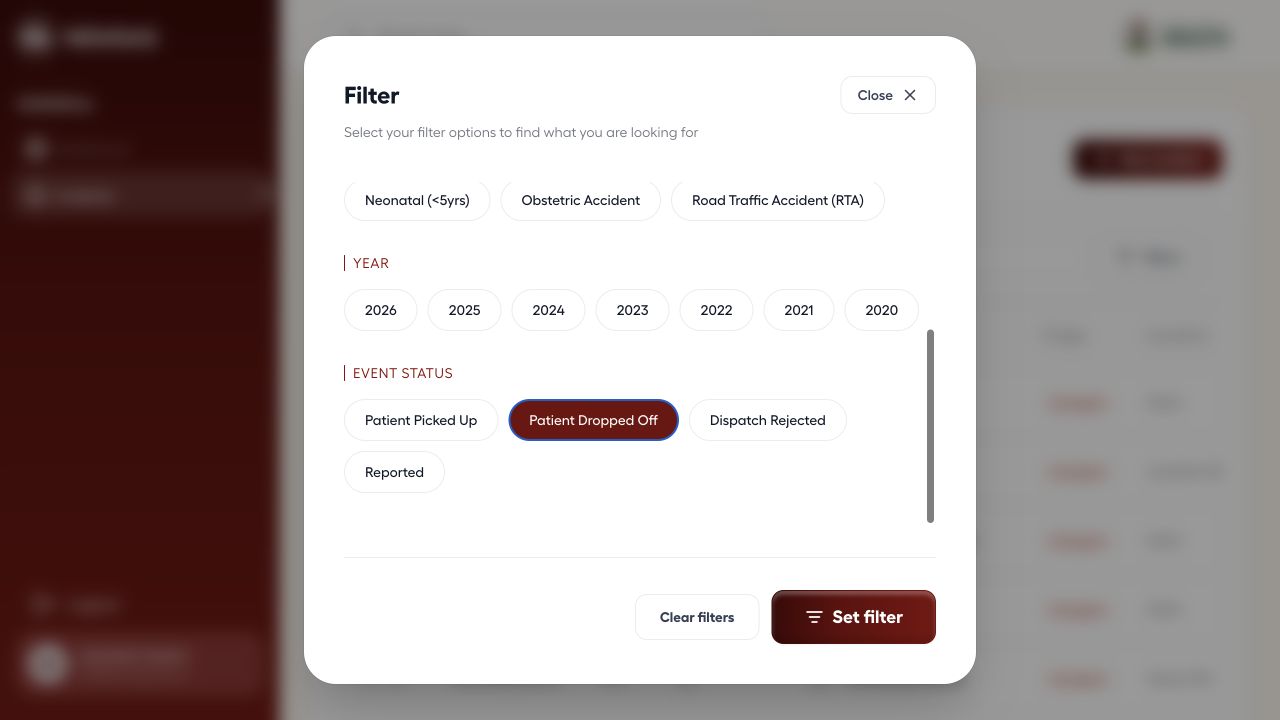
Select Filters and choose the incident category, year or event status that matches the records you need to monitor.

Dispatcher incident filter panel with Patient Dropped Off selected

1 — Category options · 2 — Year options · 3 — Event Status options.

Dispatcher incident filter panel with Patient Dropped Off selected

Review the filtered incidents

Apply the filter and confirm the active filter chip before comparing the returned records.

Dispatcher incident register filtered to Patient Dropped Off records

1 — active filter chip · 2 — filtered incident records.

Dispatcher incident register filtered to Patient Dropped Off records

Open the incident action

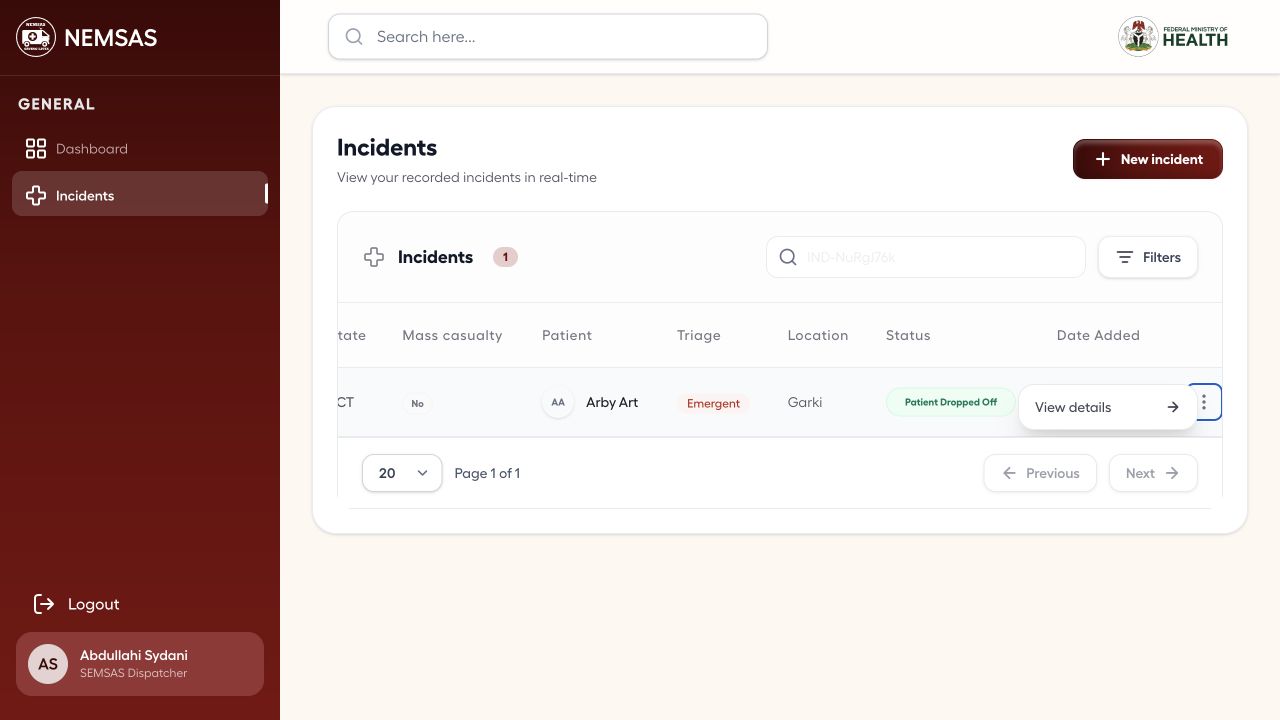
Open the action menu for the correct record to review its available details or follow-up action without changing the status.

Dispatcher incident row with its action menu open

1 — action menu · 2 — View details action.

Dispatcher incident row with its action menu open

Done. You have found the correct incident and can identify its current response status.

If something goes wrong

The incident does not appear.

Clear restrictive filters, check the spelling of the search term and confirm that the incident belongs to your assigned state.

Emergency coordination

Prepare and dispatch a new incident

Record the patient, location, emergency, response resources and map position before dispatch.

Dispatchers 8–12 min read Web

Before you start

  • Dispatcher access
  • Patient and caller details
  • Incident location, type and severity
  • An ambulance provider and receiving facility

Enter the patient details

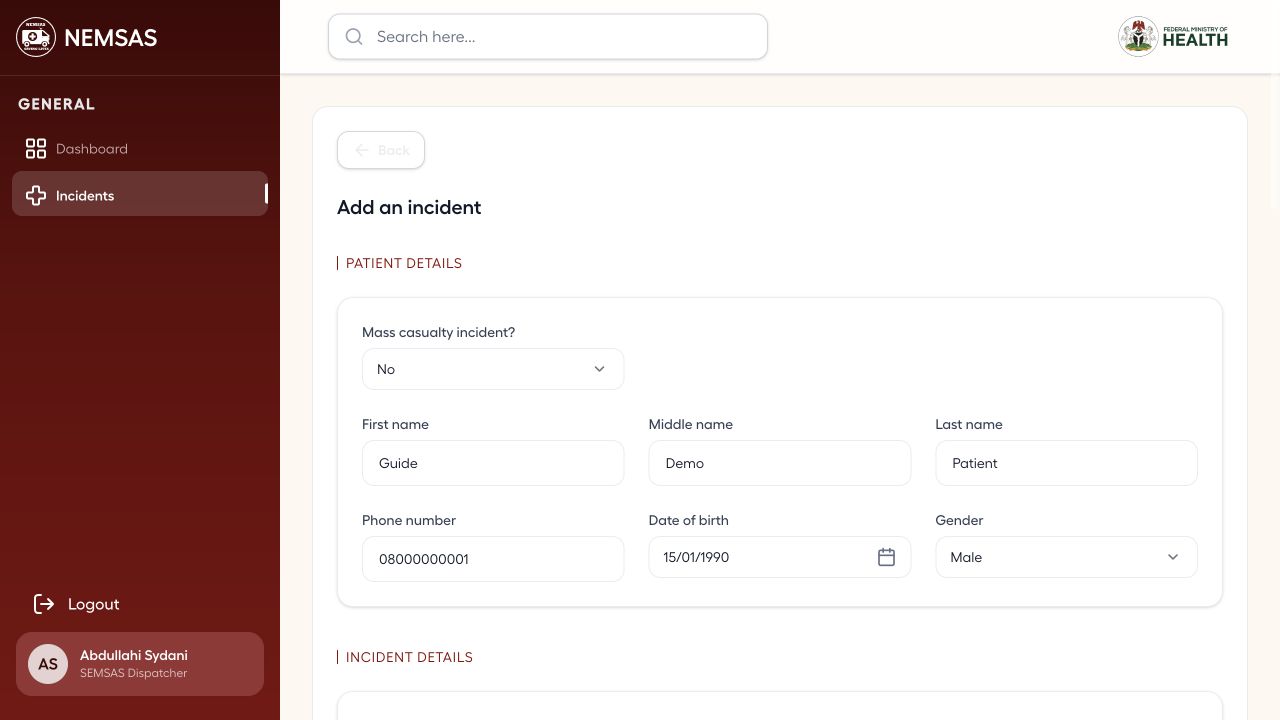
Select Add Incident, indicate whether this is a mass-casualty incident, then enter the available patient identity and contact details.

New incident form populated with demonstration patient identity and contact details

1 — Mass casualty incident selector · 2 — patient identity and contact fields.

New incident form populated with demonstration patient identity and contact details

Describe the incident and location

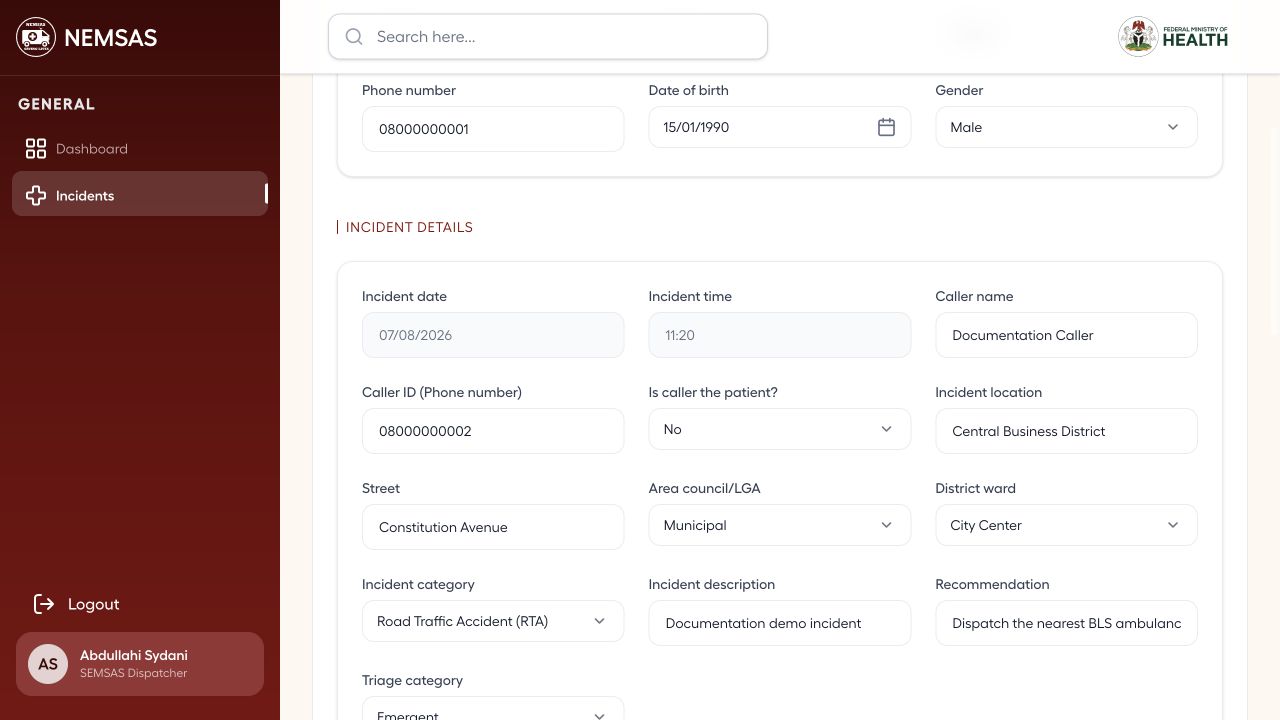
Record the date and time, caller, address, LGA, ward, emergency type, factual description, recommendation and severity.

New incident form populated with caller, location, emergency and severity details

1 — incident time, caller and location fields · 2 — category, description and severity fields.

New incident form populated with caller, location, emergency and severity details

Tip: Use a short factual description that helps the response team understand the immediate risk.

Choose the response resources

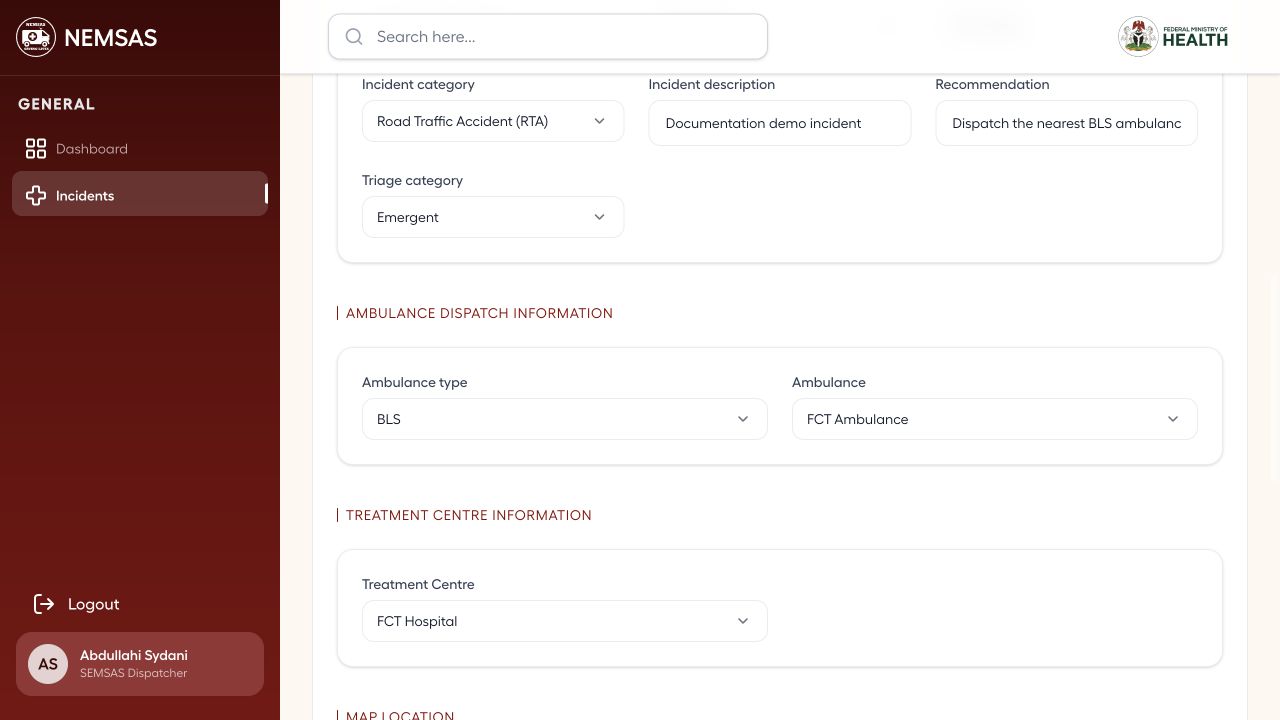
Select the required ambulance type, ambulance service provider and receiving emergency treatment centre.

Incident form configured with ambulance type, service provider and receiving treatment centre

1 — ambulance type and provider fields · 2 — Treatment Centre field.

Incident form configured with ambulance type, service provider and receiving treatment centre

Set the map location

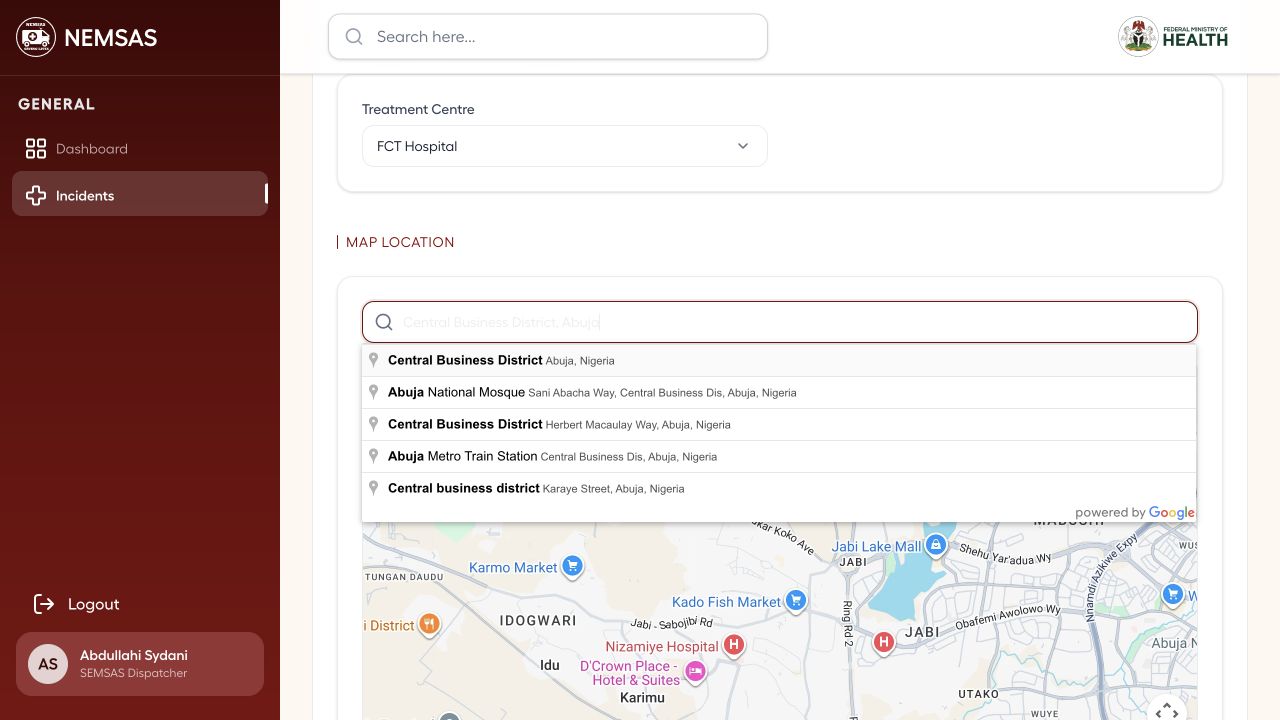
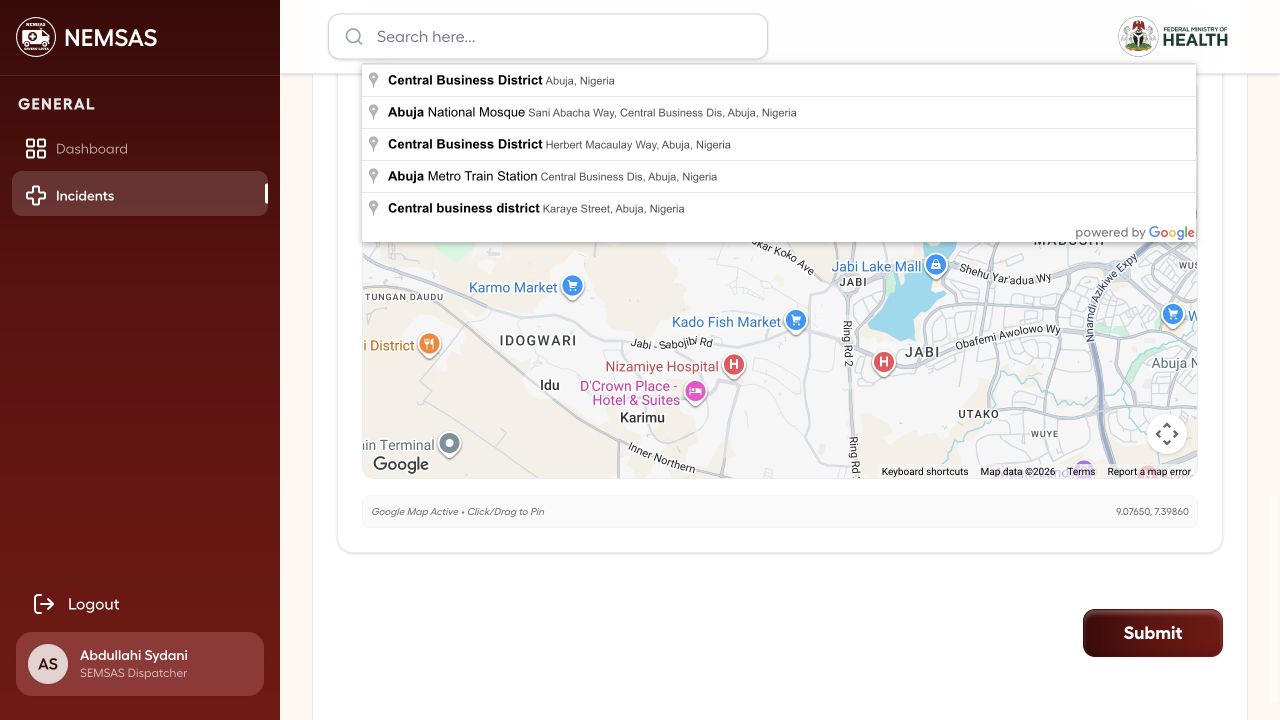
Search for the incident location, select the closest correct result and verify that the marker and coordinates match the address.

Incident location map with a selected result and visible place options

1 — location search field · 2 — location results · 3 — map preview.

Incident location map with a selected result and visible place options

Review before submission

Review every section, especially contact numbers, location, severity, provider and facility. Select Submit only when the record is ready to become operational.

Completed incident form at the final map and Submit section

1 — location coordinates · 2 — Submit button.

Completed incident form at the final map and Submit section

Important: Submission enters the incident into the live dispatch workflow. Do not use it for practice.

Done. The incident is ready for submission to the operational dispatch workflow.

If something goes wrong

A dependent location list is empty.

Select the parent state or LGA first, then reopen the next location field.

The map marker is incorrect.

Search with a more specific landmark or street and verify the coordinates before submission.

Facility operations

Read the ETC dashboard

Acknowledge the submission deadline and review activity for the assigned emergency treatment centre.

Emergency treatment centre users 3 min read Web

Before you start

  • ETC User access to the NIEMS Portal
  • Your facility's current reporting period

Acknowledge the submission notice

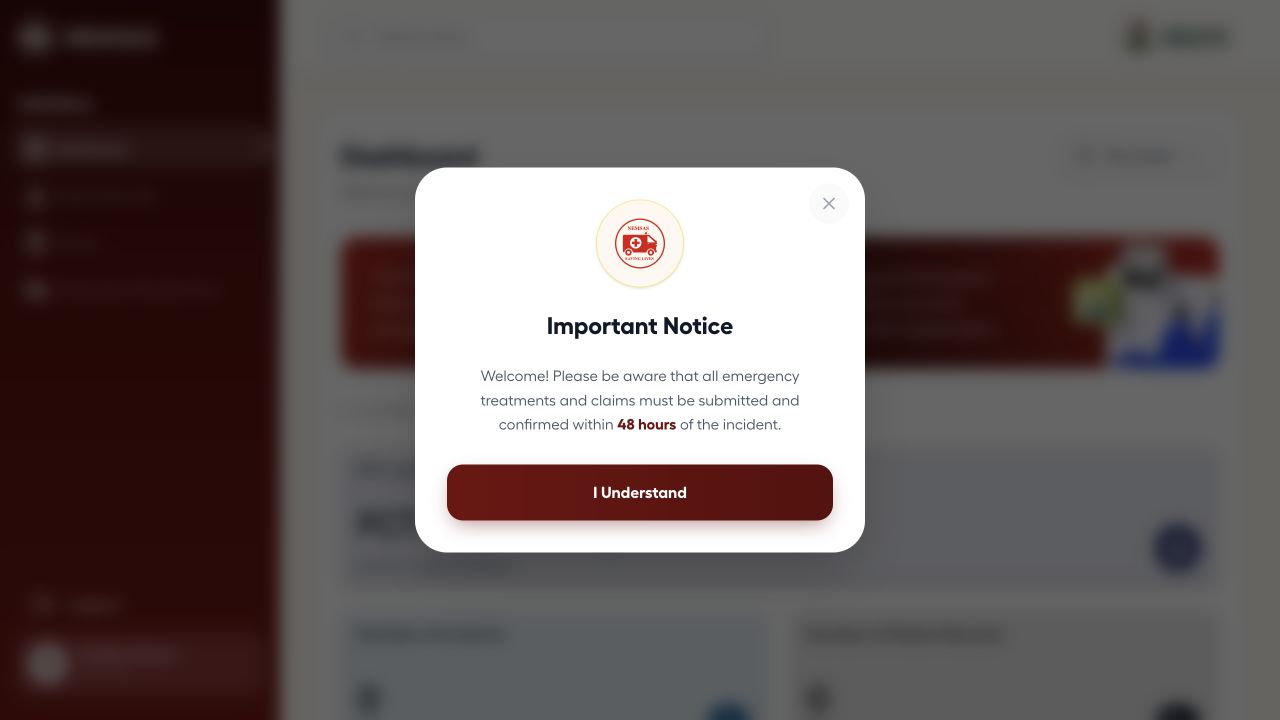
After sign-in, read the Important Notice and select I Understand. Emergency treatments and claims must be submitted and confirmed within 48 hours of the incident.

ETC dashboard Important Notice stating the 48-hour submission and confirmation requirement

1 — 48-hour notice · 2 — I Understand button.

ETC dashboard Important Notice stating the 48-hour submission and confirmation requirement

Review the facility indicators

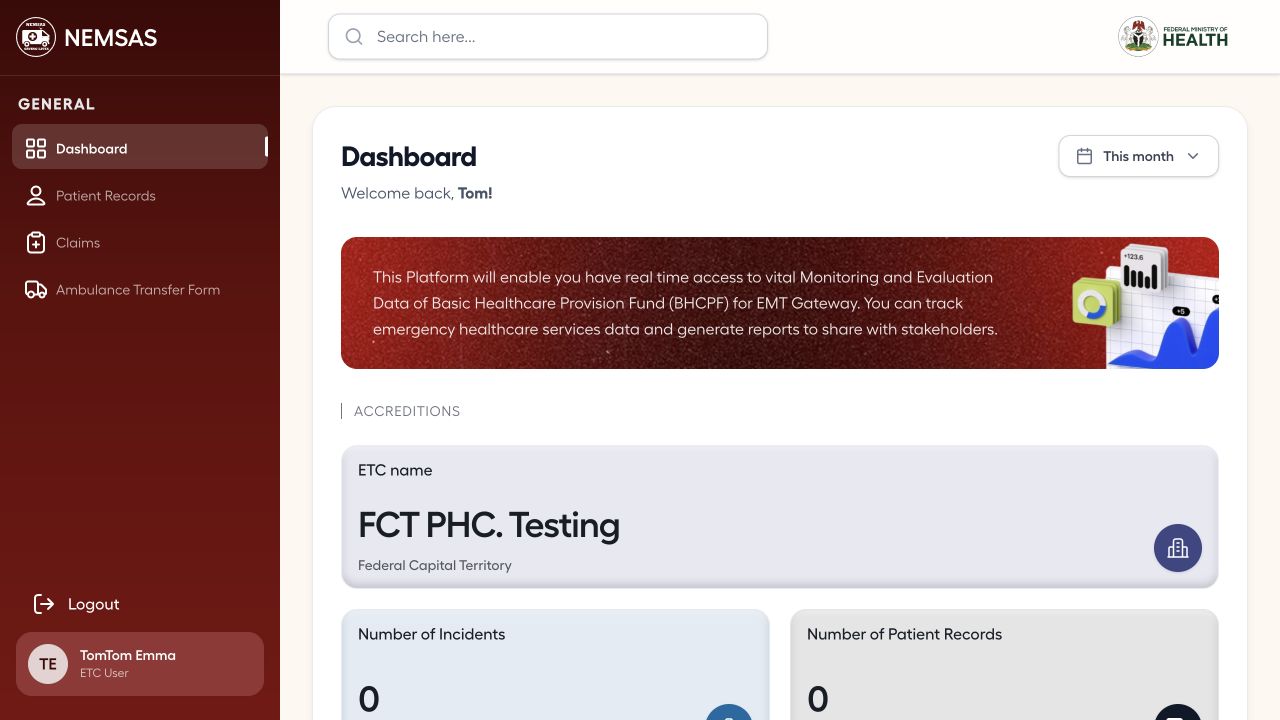
Confirm the ETC name, then review the incident, patient-record and claims indicators for the selected period.

ETC dashboard showing the assigned facility and operational summary indicators

1 — ETC name card · 2 — incident, patient-record and claims indicators.

ETC dashboard showing the assigned facility and operational summary indicators

Done. You can identify the assigned facility, submission deadline and current incident, patient and claim indicators.

If something goes wrong

The ETC name is incorrect.

Check the assigned account and ask an administrator to correct the facility association.

Patient handover

Review patient records and transfer forms

Search patients received by the facility and check for ambulance transfer forms awaiting confirmation.

Emergency treatment centre users 4 min read Web

Before you start

  • ETC User access
  • A patient or transfer identifier when available

Search patient records

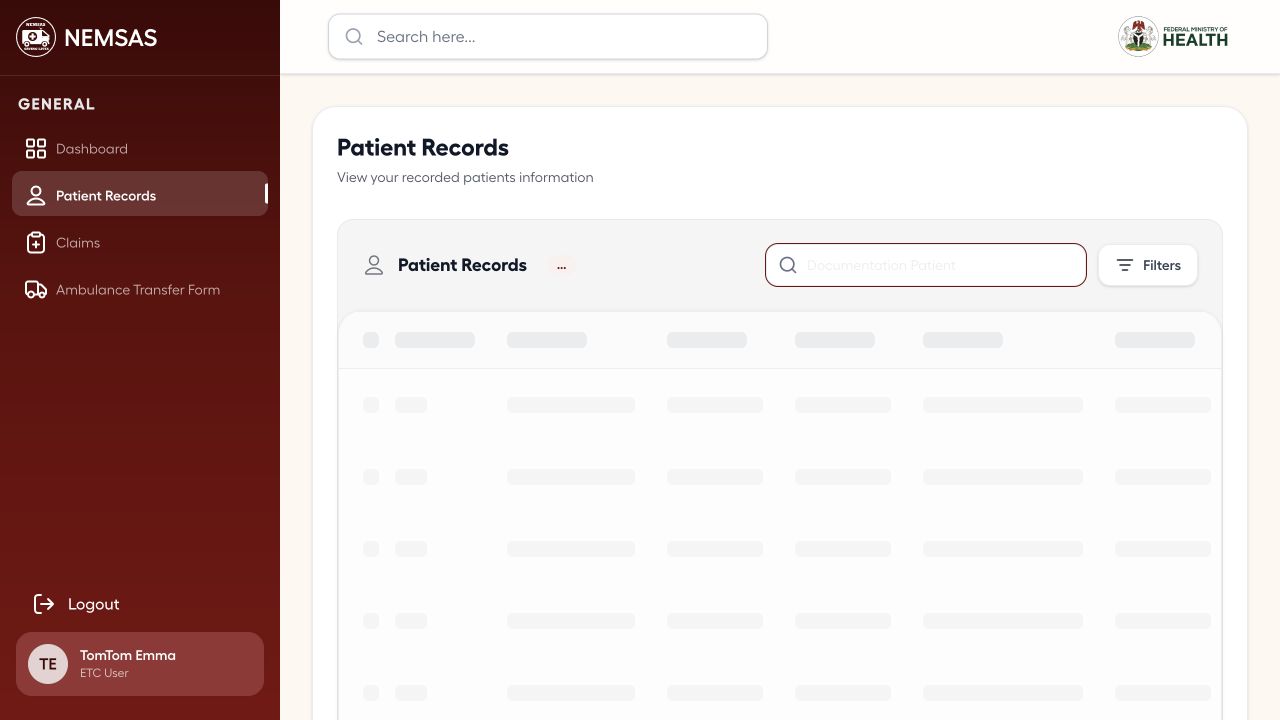
Open Patient Records and use search or Filters to locate a patient created from a confirmed ambulance transfer.

ETC Patient Records page with the search field active and facility-scoped patient table

1 — search field · 2 — Filters button.

ETC Patient Records page with the search field active and facility-scoped patient table

Check pending transfer forms

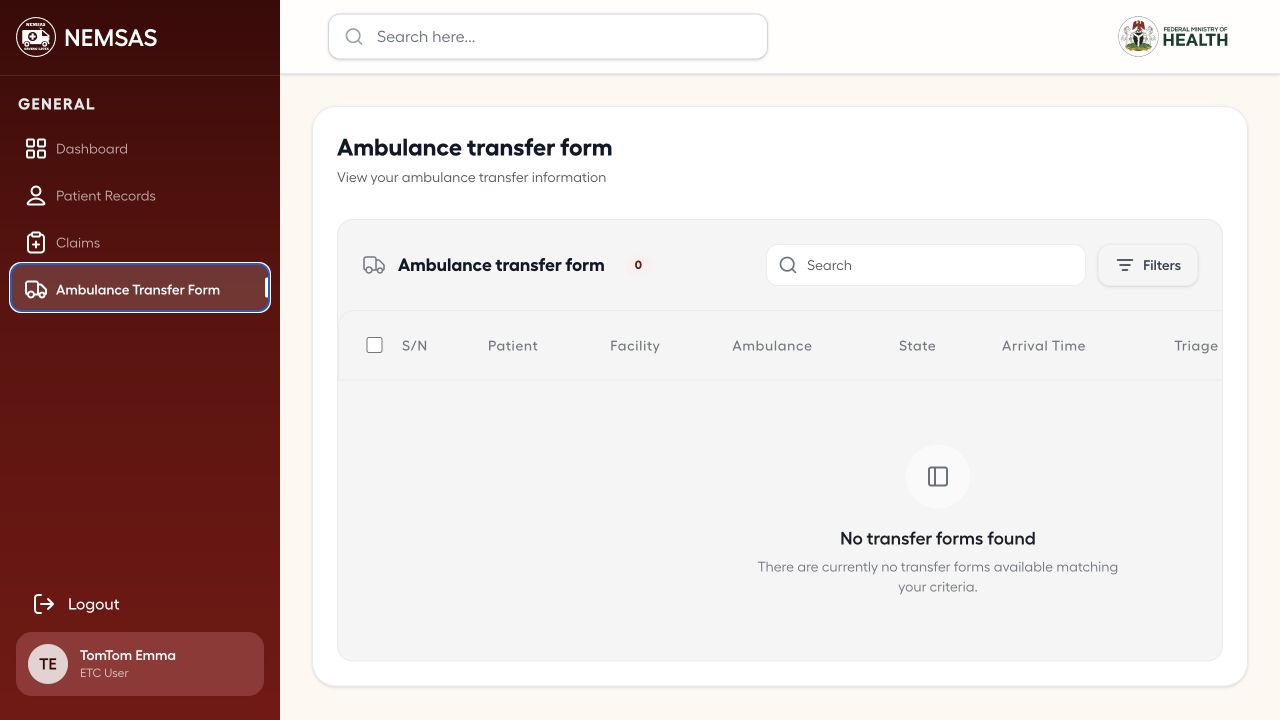
Open Ambulance Transfer Form and review the list for a patient handover awaiting confirmation. An empty state means no transfer form is currently available to the account.

ETC Ambulance Transfer Form page showing no transfer forms found

1 — no transfer forms message.

ETC Ambulance Transfer Form page showing no transfer forms found

Recognize a completed transfer

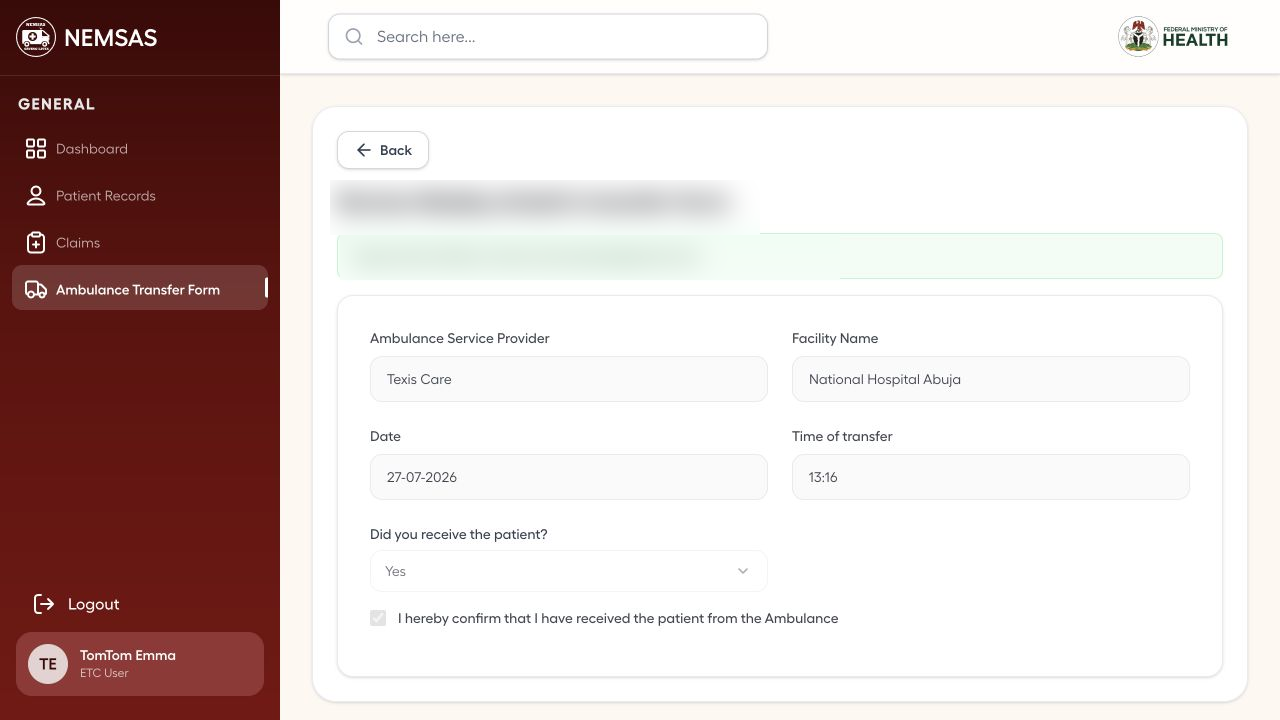
After an authorized ETC user confirms and signs a handover, the transfer appears as completed and the patient is added to Patient Records. Patient values in the example are obscured for privacy.

ETC Ambulance Transfer Form register with a completed transfer and patient values redacted

1 — completion notice · 2 — received-patient confirmation.

ETC Ambulance Transfer Form register with a completed transfer and patient values redacted

Important: Confirming and signing a transfer is consequential. Verify the patient and handover before completing it.

Done. You have located the applicable patient record or confirmed whether a transfer form is awaiting action.

If something goes wrong

No transfer form appears.

Confirm that the ambulance completed the handover and that you are signed in to the correct ETC. The list may legitimately be empty.

Facility claims

Prepare an ETC claim

Record eligible interventions and evidence for a patient before confirming the treatment and submitting the facility claim.

Emergency treatment centre users 8–12 min read Web

Before you start

  • A patient record for the completed transfer
  • Verified drugs, consumables, treatments, procedures and services
  • Supporting evidence in an accepted upload format

Enter the intervention details

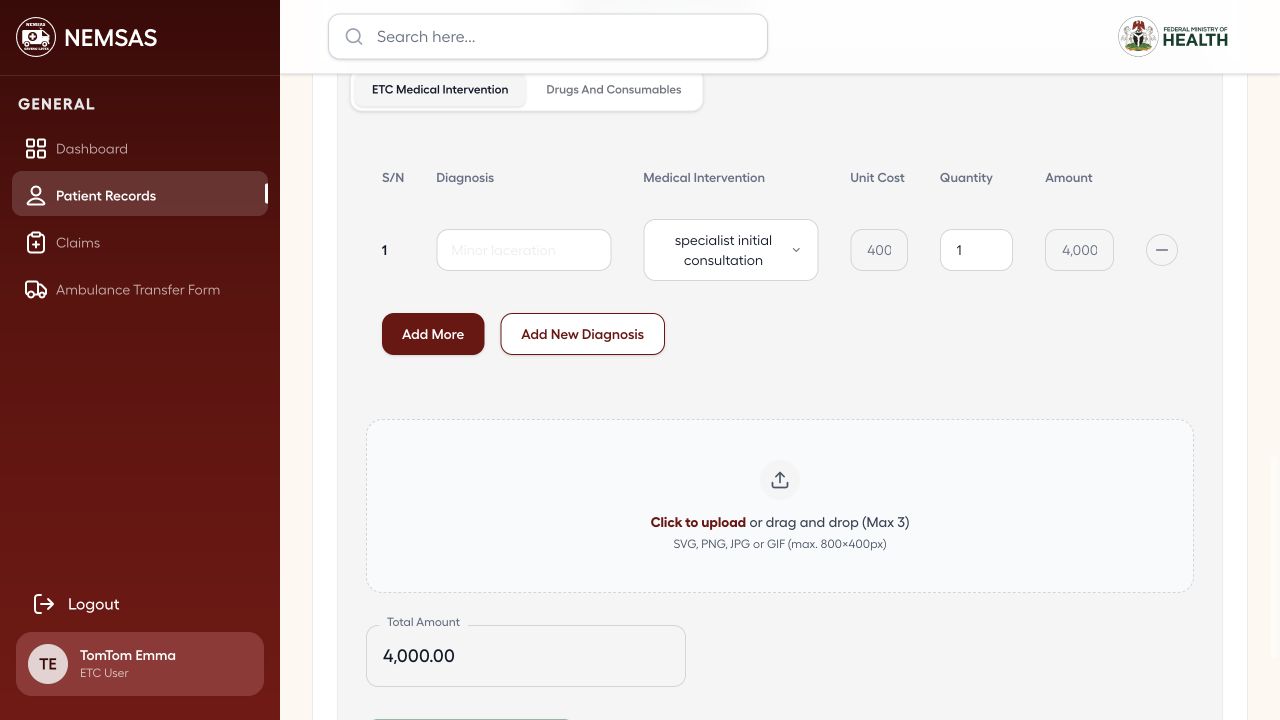
On the patient's ETC claim, select the medical intervention, enter the unit cost and quantity, and select Add so the calculated amount appears.

ETC claim form populated with a demonstration medical intervention, unit cost, quantity and calculated amount

1 — medical intervention field · 2 — unit cost and quantity fields · 3 — calculated amount.

ETC claim form populated with a demonstration medical intervention, unit cost, quantity and calculated amount

Add evidence and review the claim

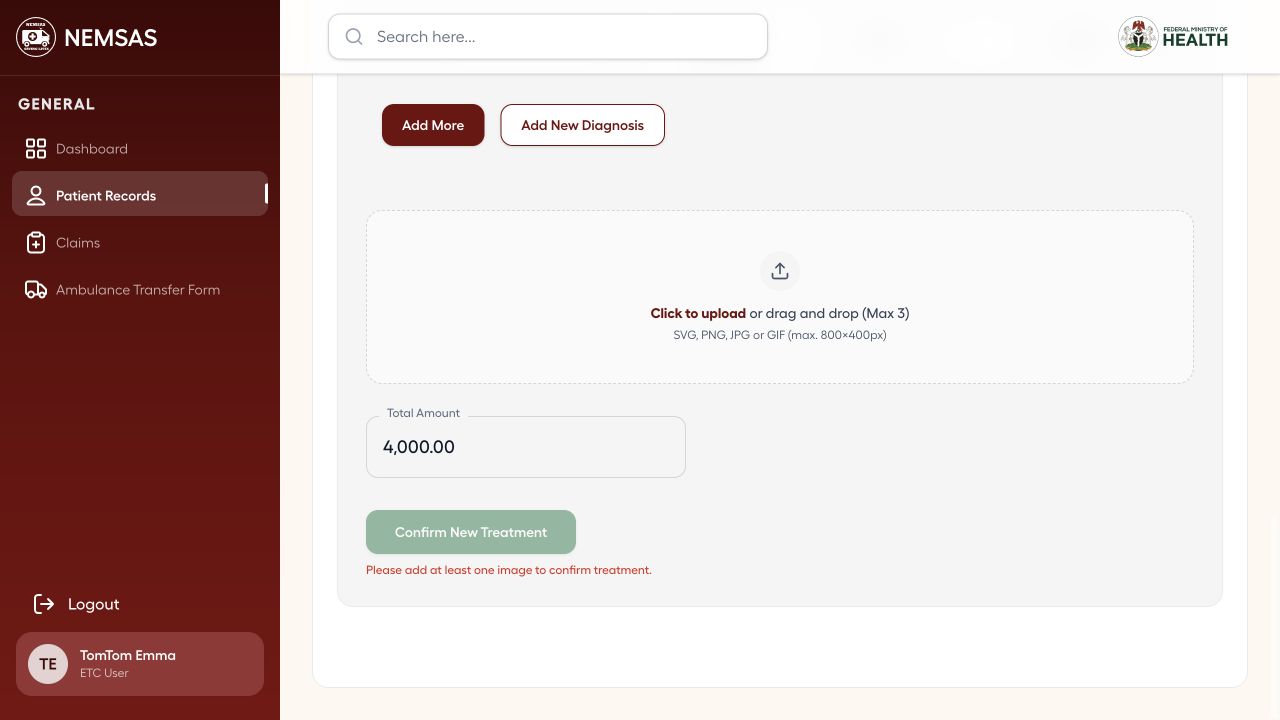
Attach the required evidence, review the item total and select Confirm New Treatment only when the recorded treatment is complete and accurate.

ETC claim form with evidence upload area, calculated total and Confirm New Treatment control

1 — evidence upload area · 2 — total amount · 3 — Confirm New Treatment button.

ETC claim form with evidence upload area, calculated total and Confirm New Treatment control

Important: A submitted ETC claim proceeds to the state claims officer for endorsement before national review.

Done. The intervention and evidence are entered and the claim is ready for final review before confirmation.

If something goes wrong

The amount appears incorrect.

Check the selected intervention, unit cost and quantity. Claim totals are calculated from the configured rate information.

State claims

Read the state claims dashboard

Review state-level emergency-service and claim indicators before opening ETC claims.

State claims officers 3 min read Web

Before you start

  • State claims-officer access
  • The reporting period you want to review

Review the state claims summary

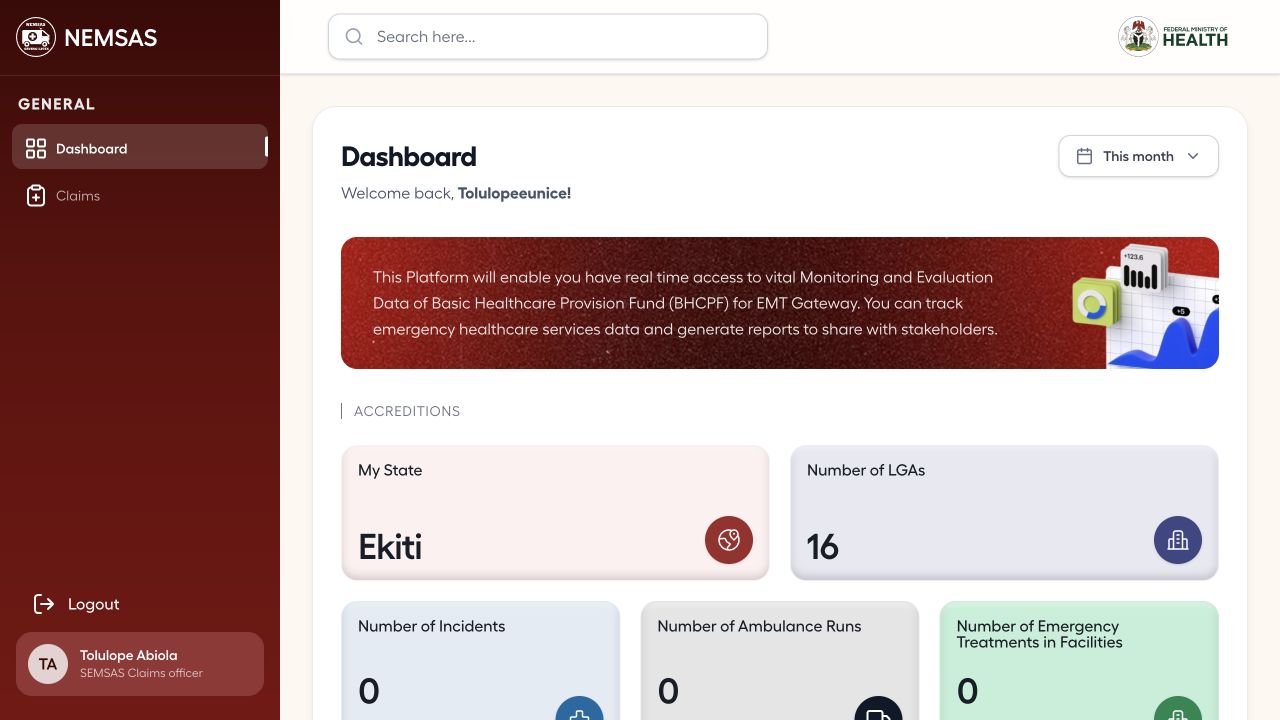
Open Dashboard, confirm My State and compare incidents, ambulance runs, emergency treatments and claim indicators for the selected period.

State claims officer dashboard showing the assigned state and claims-related operational indicators

1 — My State card · 2 — operational indicator cards · 3 — period selector.

State claims officer dashboard showing the assigned state and claims-related operational indicators

Done. You can summarize the assigned state's claims position and proceed to ETC claim review.

If something goes wrong

The dashboard shows another state.

Check the assigned account scope and ask an administrator to correct an incorrect state association.

State claims

Review and prepare an ETC claim endorsement

Find a state ETC claim, verify its record and prepare the endorsement that sends it to national review.

State claims officers 5–8 min read Web

Before you start

  • State claims-officer access
  • A submitted ETC claim for the assigned state
  • The applicable state endorsement criteria

Find the state ETC claim

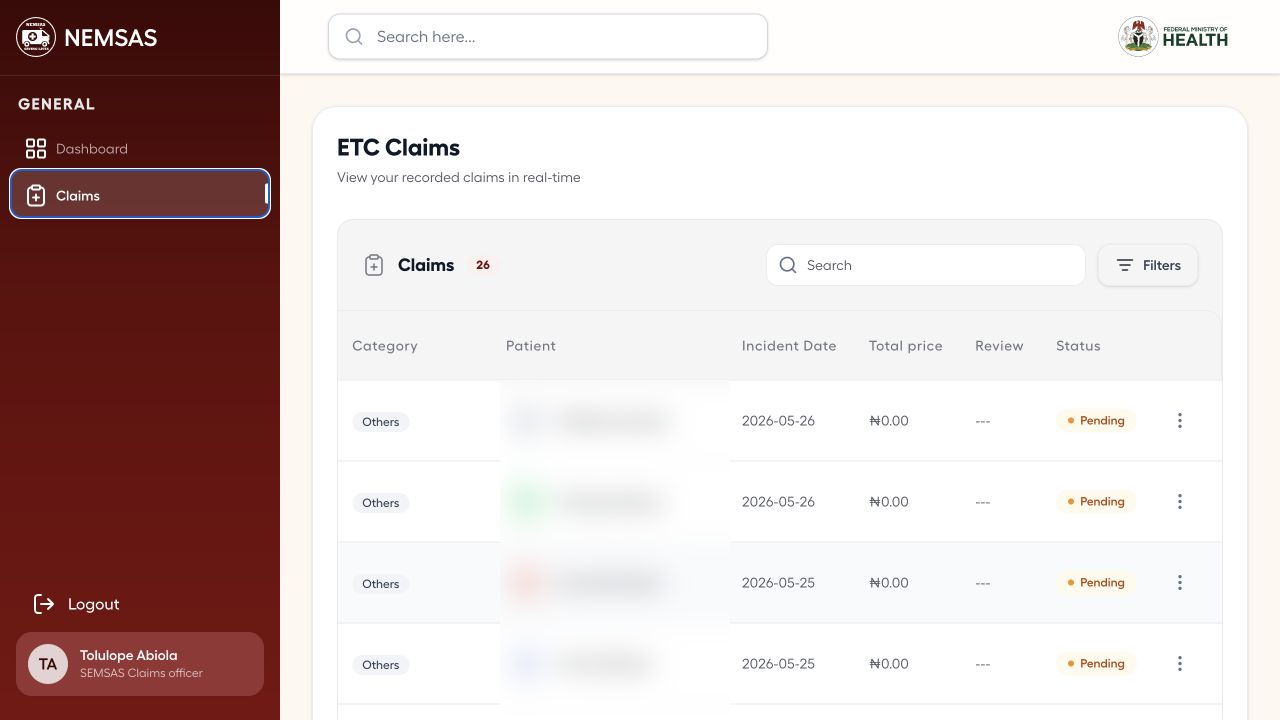
Open Claims and use search or Filters to locate the submitted ETC record. Patient values in the example are obscured for privacy.

State claims officer ETC claims list with patient values redacted and claim statuses visible

1 — search field · 2 — Filters button.

State claims officer ETC claims list with patient values redacted and claim statuses visible

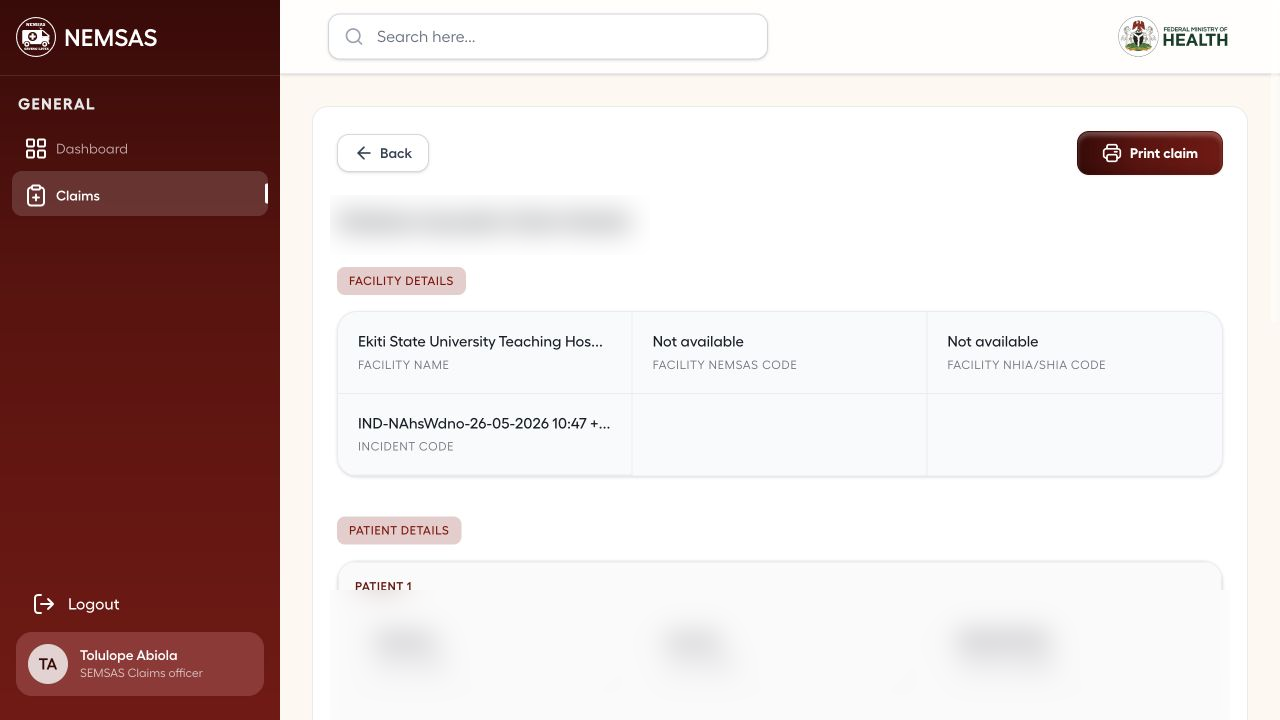
Open the claim details

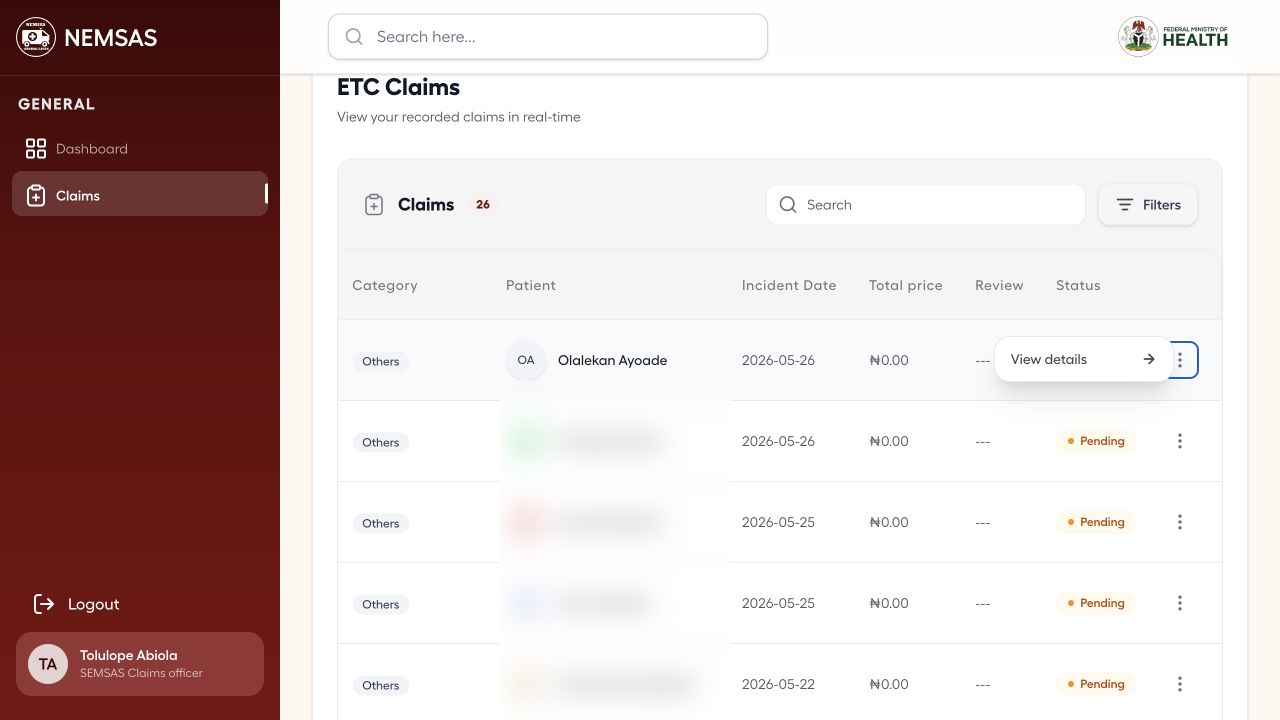
Open the action menu for the correct claim and select View details.

State ETC claim row with patient values redacted and View details action open

1 — View details action.

State ETC claim row with patient values redacted and View details action open

Verify the state claim details

Review the facility, incident, redacted patient section, interventions, evidence and calculated total before considering endorsement.
State ETC claim detail page with patient values redacted, interventions, evidence and calculated total

1 — facility and incident details · 2 — patient details.

State ETC claim detail page with patient values redacted, interventions, evidence and calculated total

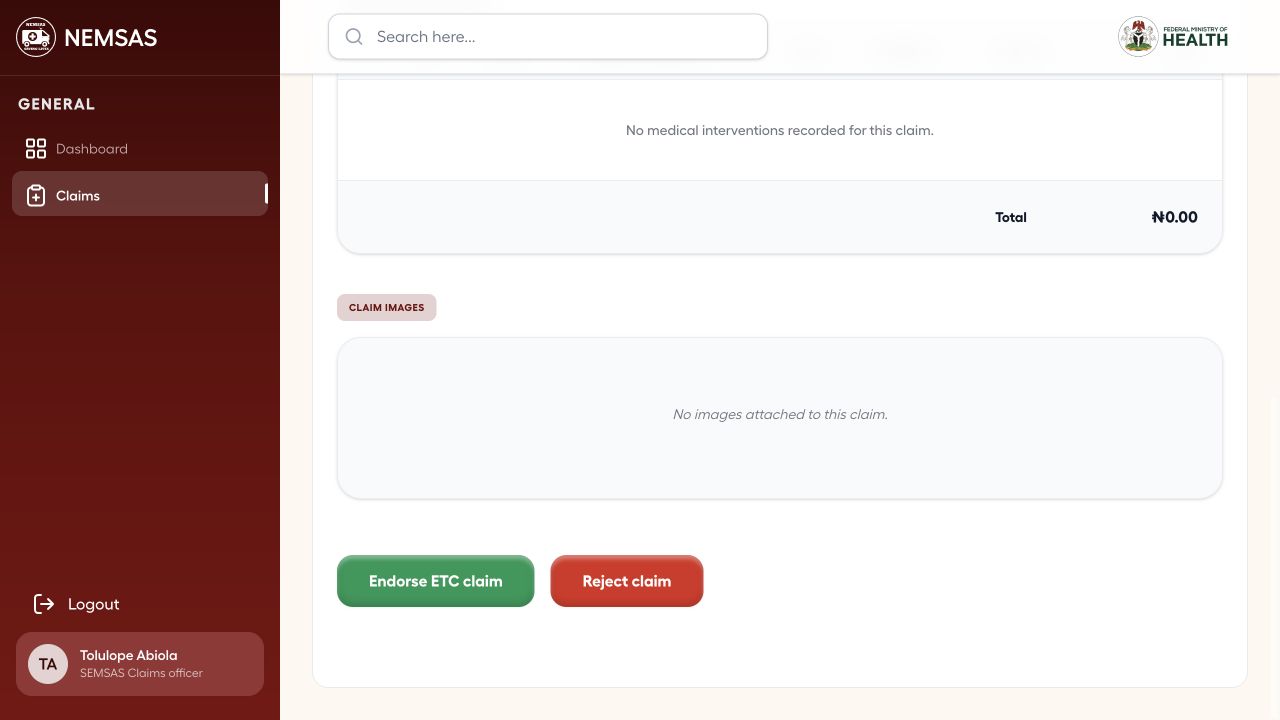
Review the endorsement controls

After verification, identify Endorse ETC claim or Reject claim. Do not select either control until the formal state review is complete.

State ETC claim details showing Endorse ETC claim and Reject claim controls

1 — Endorse ETC claim button · 2 — Reject claim button.

State ETC claim details showing Endorse ETC claim and Reject claim controls

Important: Endorsement sends the claim to the national claims manager.

Done. The state claim has been reviewed and the Endorse ETC claim control is identified without changing the status.

If something goes wrong

Endorse ETC claim is unavailable.

Check that the claim belongs to the assigned state, has the correct current status and is eligible for endorsement.
Claims

Read the national claims dashboard

Review national emergency-service and claim totals before opening the claims register.

National claims managers 3 min read Web

Before you start

  • National claims manager access
  • The reporting period you want to review

Review the national claims summary

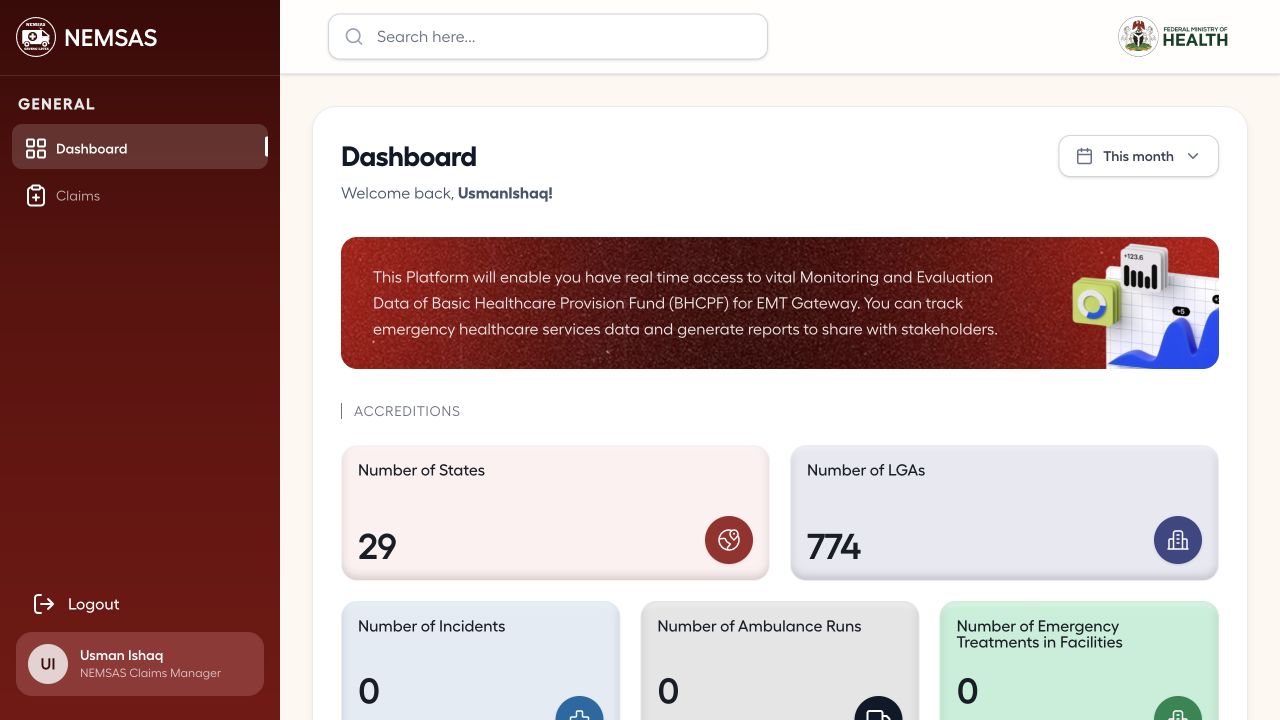
Open Dashboard and compare the ambulance and ETC claim totals with the national incident, ambulance-run and treatment indicators for the selected period.

National claims manager dashboard with state, LGA, incident, ambulance-run, treatment and claims indicators

1 — national operational indicators · 2 — period selector.

National claims manager dashboard with state, LGA, incident, ambulance-run, treatment and claims indicators

Done. You can summarize the national claims position and proceed to the relevant claim type.

If something goes wrong

A claim total differs from the register.

Confirm the selected reporting period and claim type, then reload the dashboard before escalating the discrepancy.

Claims

Review an endorsed ETC claim

Locate a state-endorsed ETC claim, verify its evidence and review the national decision controls.

National claims managers 5–8 min read Web

Before you start

  • National claims manager access
  • An endorsed ETC claim
  • The applicable verification and decision criteria

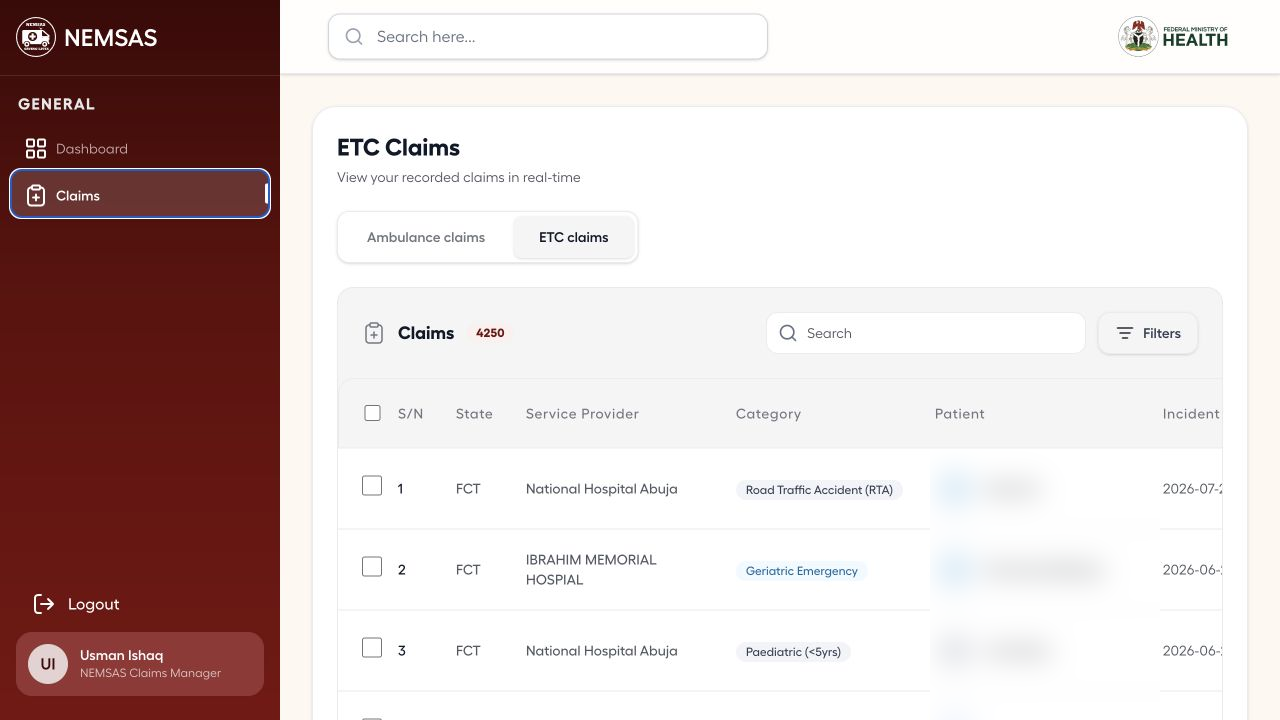
Open the ETC claims list

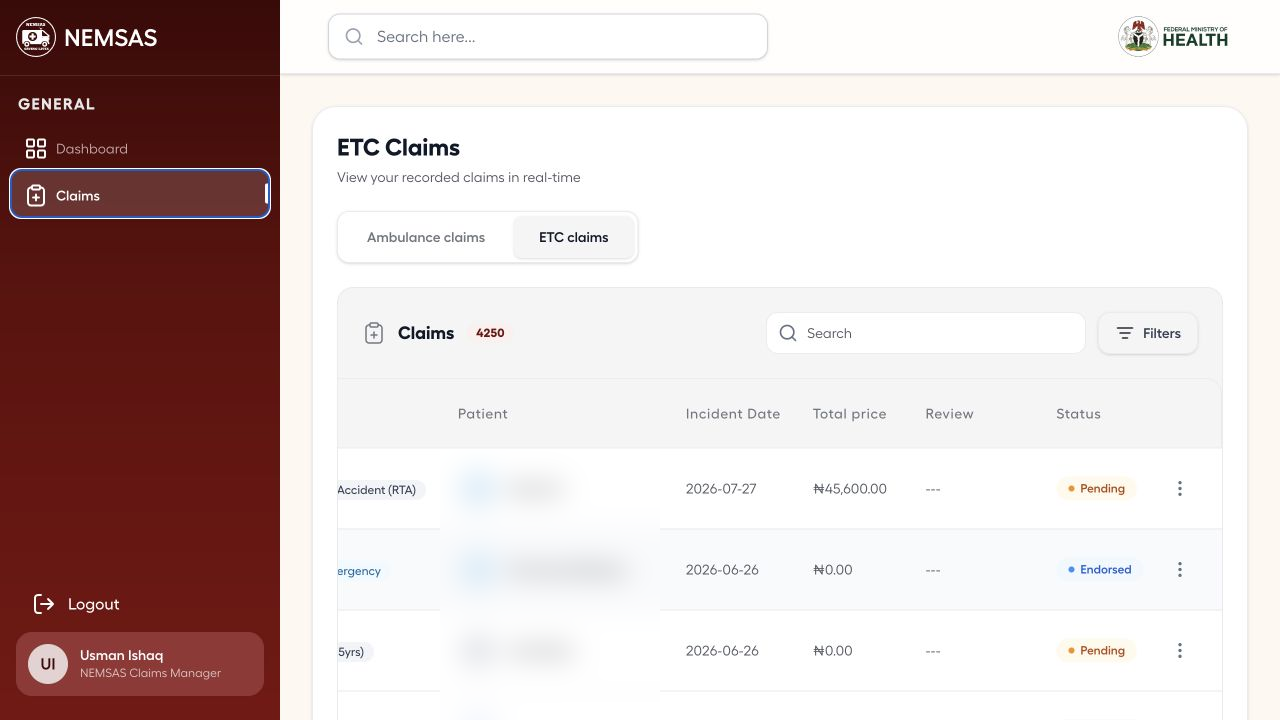
Open Claims, select ETC claims and use search or Filters to locate the endorsed record. Patient values in the example are obscured for privacy.

National claims manager ETC claims list with patient fields redacted and review statuses visible

1 — ETC claims tab · 2 — search field · 3 — Filters button.

National claims manager ETC claims list with patient fields redacted and review statuses visible

Compare the review status

Use the Review and Status columns to distinguish pending, endorsed and completed records before opening the claim.

ETC claims list with patient fields redacted and different review and claim statuses visible

1 — Review column · 2 — Status column.

ETC claims list with patient fields redacted and different review and claim statuses visible

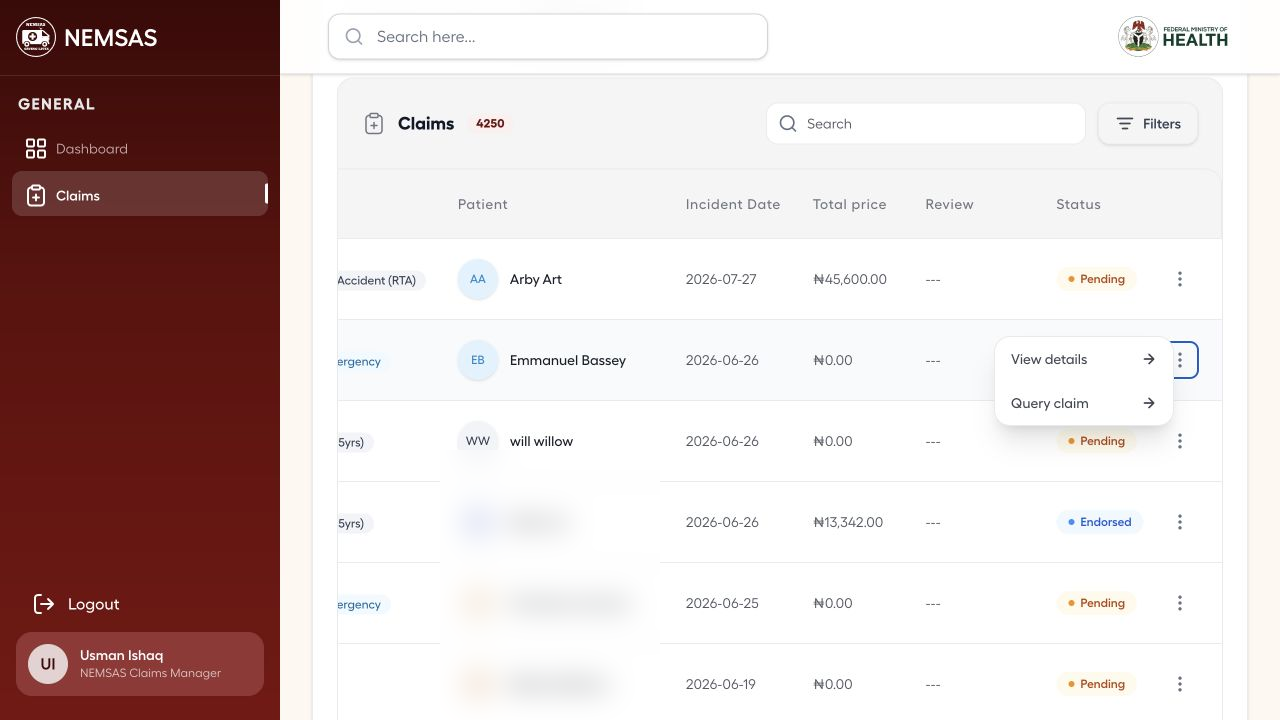
Open the claim action

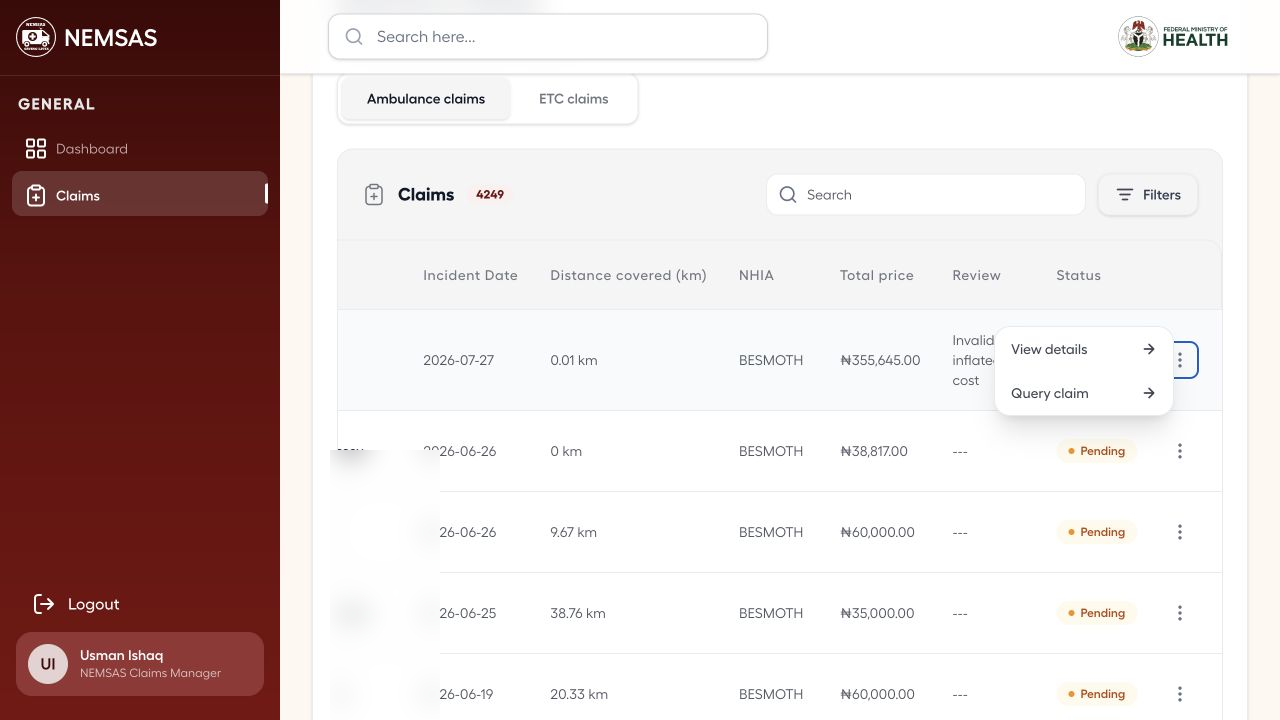
Open the action menu on the correct row and choose View details. Use Query claim only after completing the applicable review process.

ETC claim row with redacted patient fields and View details and Query claim actions open

1 — View details action · 2 — Query claim action.

ETC claim row with redacted patient fields and View details and Query claim actions open

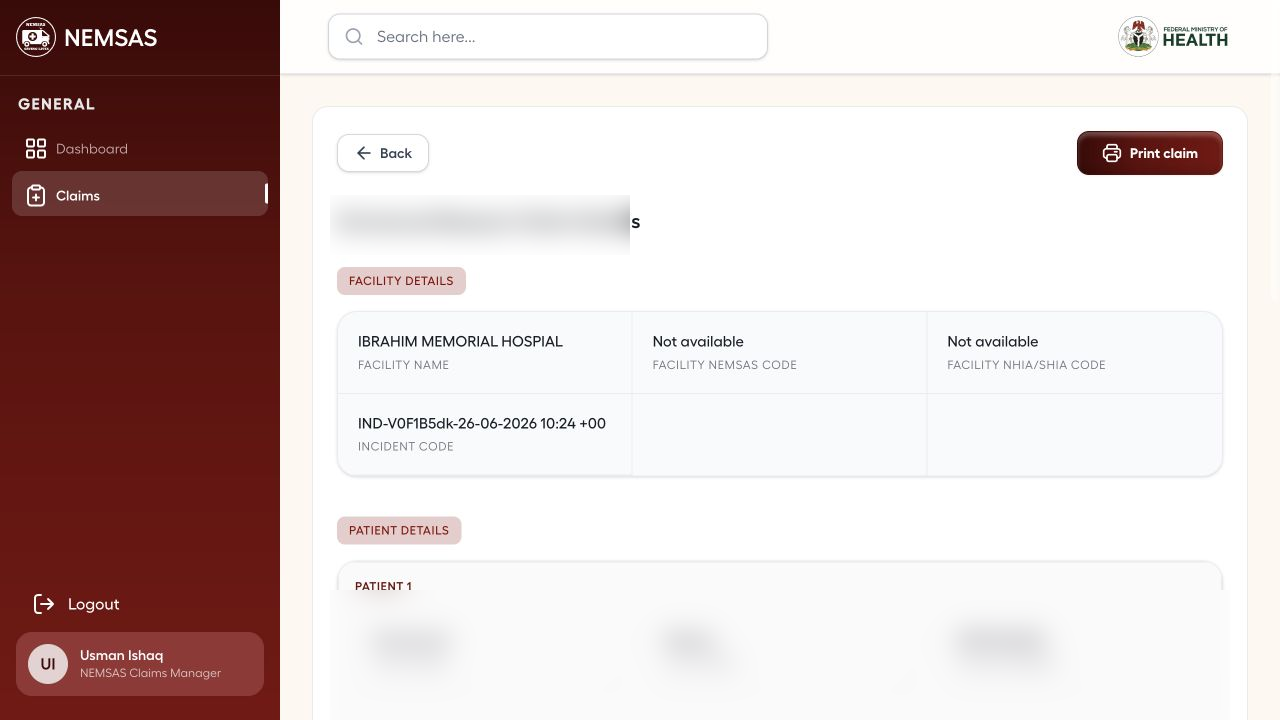
Verify the endorsed claim details

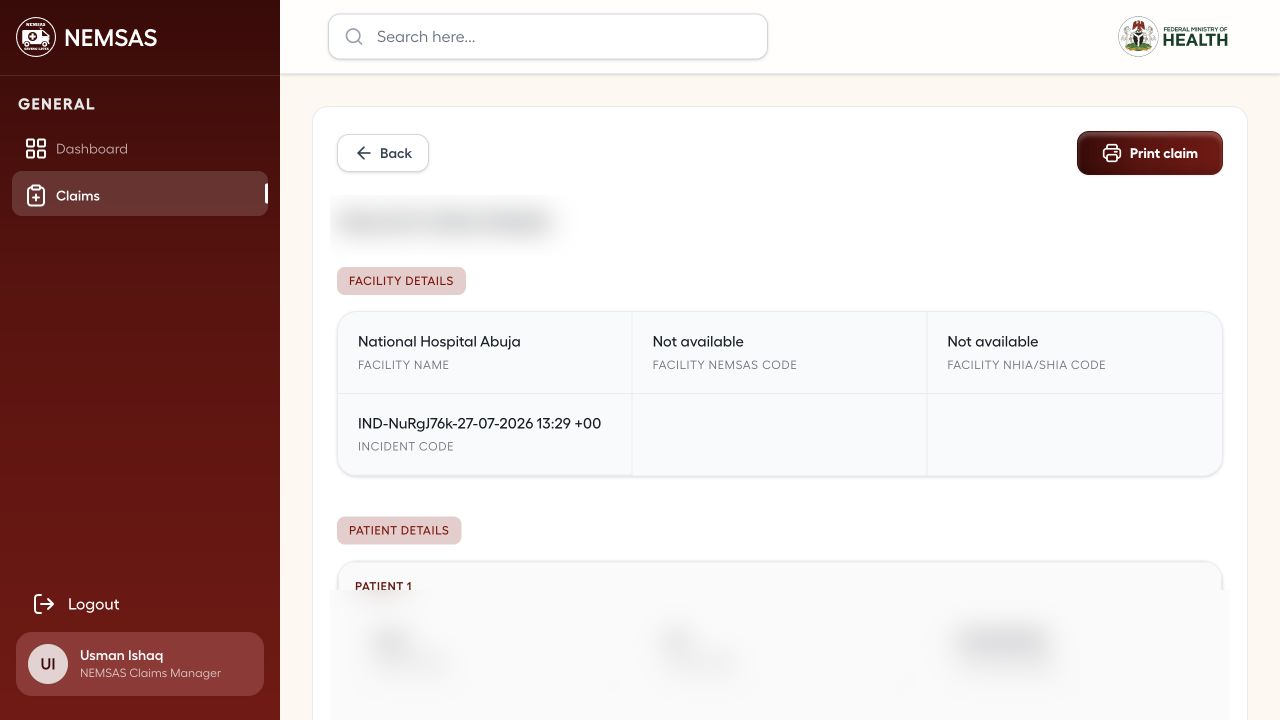
Review the facility, incident, redacted patient section, interventions, evidence and system-calculated total before considering a decision.

Endorsed ETC claim detail page with patient values redacted, interventions, evidence and calculated total

1 — facility and incident details · 2 — patient details.

Endorsed ETC claim detail page with patient values redacted, interventions, evidence and calculated total

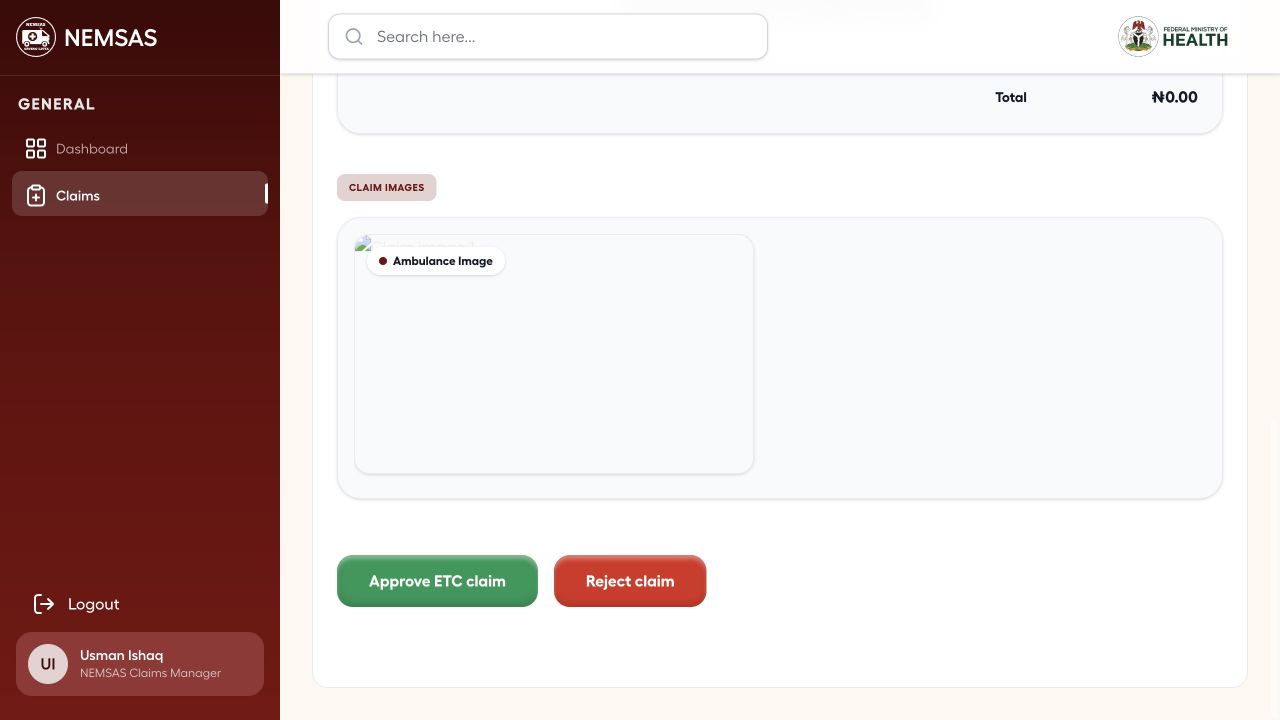
Review the decision controls

Select Approve to release payment, or Reject and enter a reason so the facility can correct and resubmit.

ETC claim details showing supporting evidence area and national approval and rejection controls

1 — Approve ETC claim button · 2 — Reject claim button.

ETC claim details showing supporting evidence area and national approval and rejection controls

Done. The endorsed claim and its decision controls have been reviewed without changing the claim status.

If something goes wrong

No endorsed ETC claim appears.

Clear filters and confirm that the state claims officer has endorsed the record. Only endorsed ETC claims proceed to national review.

Claims

Review an ambulance claim

Find a submitted ambulance claim and verify its evidence before making a decision.

National claims managers 5–8 min read Web

Before you start

  • National claims manager access
  • The claim or incident identifier
  • Applicable review rules and supporting evidence

Find the claim

Open Claims and use the ambulance claims list, search and filters to locate the correct incident and submission status. Patient values in the example are obscured for privacy.

National ambulance claims list with patient values redacted and review and claim statuses visible

1 — Ambulance claims tab · 2 — search field · 3 — Filters button.

National ambulance claims list with patient values redacted and review and claim statuses visible

Open the claim details

Open the row action menu and select View details for the claim you want to review.

Ambulance claim row action menu with View details and Query claim

1 — View details action.

Ambulance claim row action menu with View details and Query claim

Verify the evidence and decision controls

Review the facility, incident, redacted patient section, intervention, image evidence, rate components and total. Choose Approve, Query or Reject only after the applicable review process.

Ambulance claim detail page with patient values redacted, evidence, calculated total and decision controls

1 — facility and incident details · 2 — patient details.

Ambulance claim detail page with patient values redacted, evidence, calculated total and decision controls

Review the approval controls

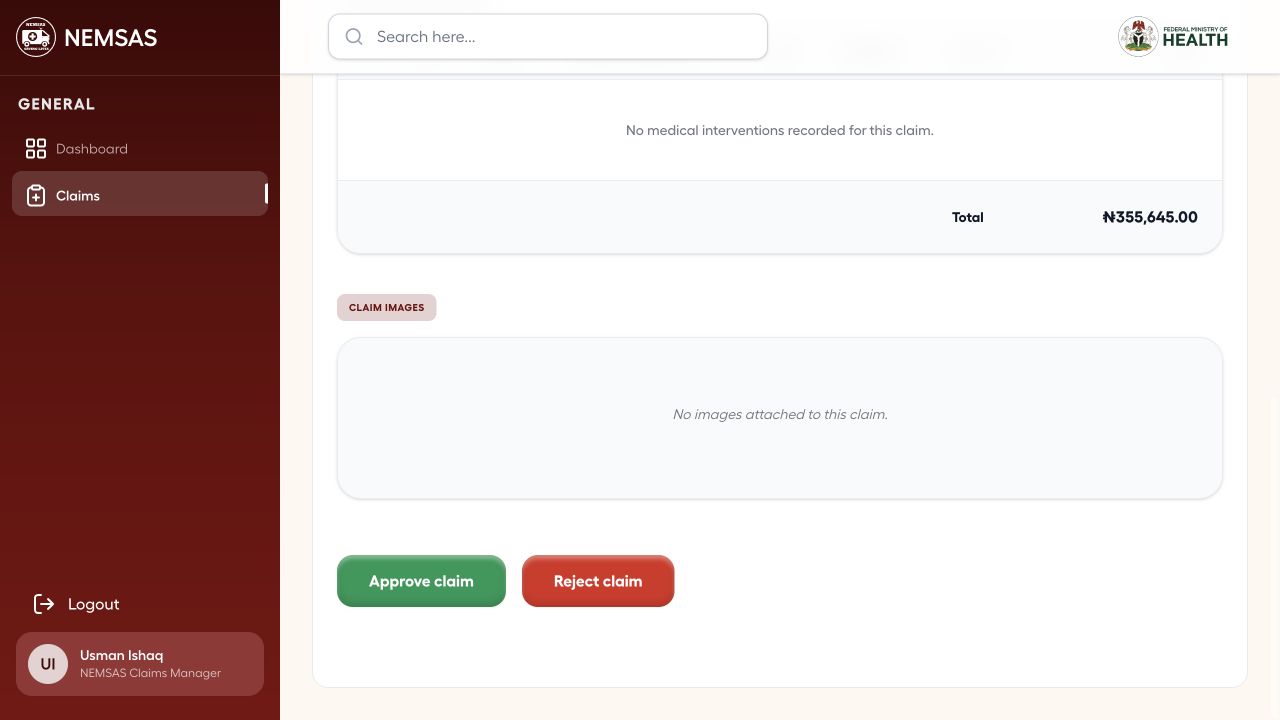
After verifying the claim, identify Approve claim or Reject claim at the end of the detail page. Do not select either control until the formal decision is complete.

Ambulance claim details showing the calculated total and Approve claim and Reject claim controls

1 — Approve claim button · 2 — Reject claim button.

Ambulance claim details showing the calculated total and Approve claim and Reject claim controls

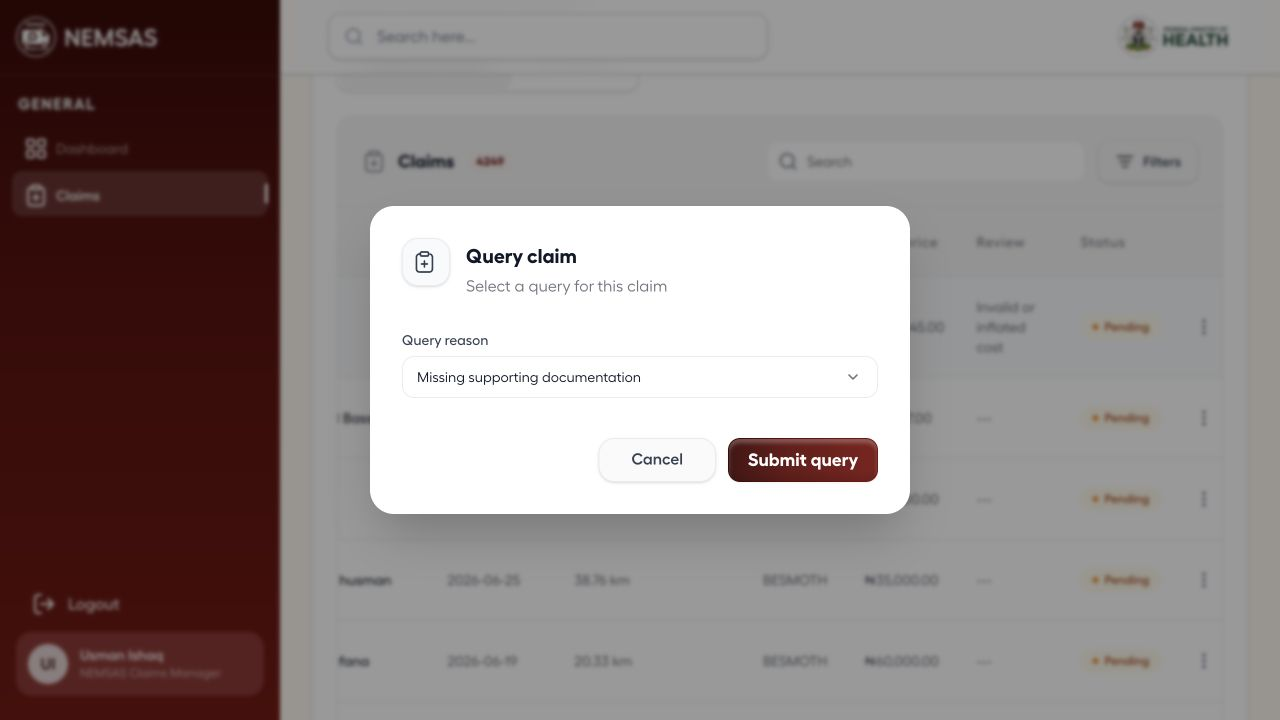
Prepare a claim query

When required information is missing, open Query claim and select the reason that best describes the issue. Review it before Submit query.

Query claim dialog with a demonstration query reason selected and Submit query visible

1 — query reason field · 2 — Submit query button.

Query claim dialog with a demonstration query reason selected and Submit query visible

Important: Queried claims are resolved outside the platform; the claimant cannot respond to a query in the current interface.

Done. The claim evidence and system-calculated total have been reviewed and the appropriate decision control is identified.

If something goes wrong

Supporting evidence is missing.

Do not assume the claim is complete. Follow the claims process to query the record or request the evidence outside the platform.

Decision controls are unavailable.

Check the claim status and your assigned role. Completed claims or roles without decision rights may be read-only.

Getting started

Sign in to NEMSAS Connect

Access NEMSAS Connect and confirm that the workspace matches your assigned role.

All NEMSAS Connect users 2 min read Web

Before you start

  • An active NEMSAS Connect account
  • Your assigned sign-in details

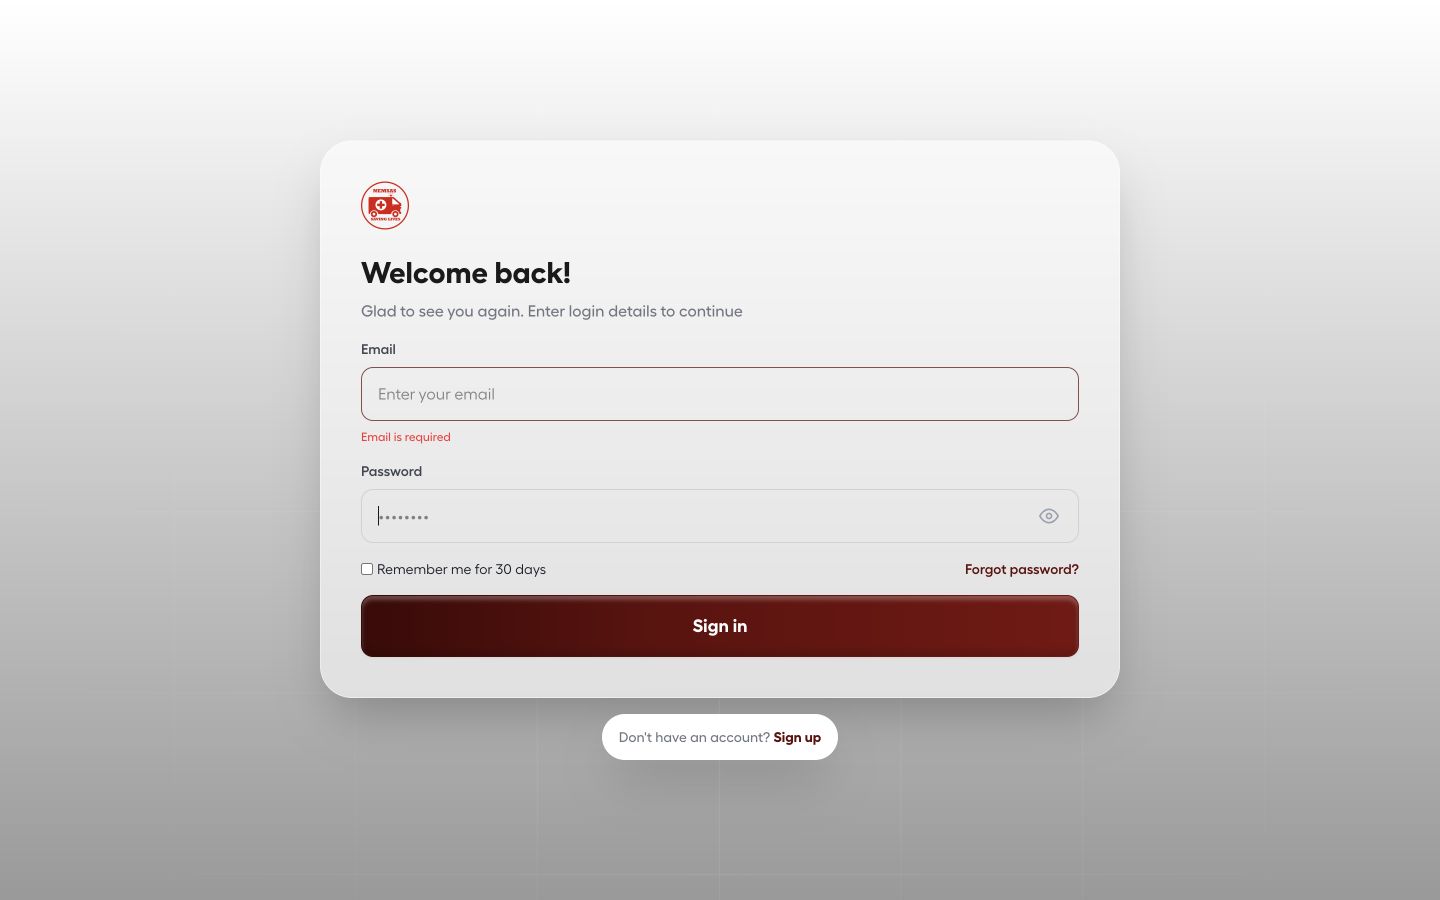
Open the Connect sign-in page

Open the NEMSAS Connect address and confirm that the page shows Email, Password, Remember me for 30 days and Sign in.

NEMSAS Connect sign-in page with email, password, remember-me and Sign in controls

1 — email and password fields · 2 — Remember me checkbox · 3 — Sign in button.

NEMSAS Connect sign-in page with email, password, remember-me and Sign in controls

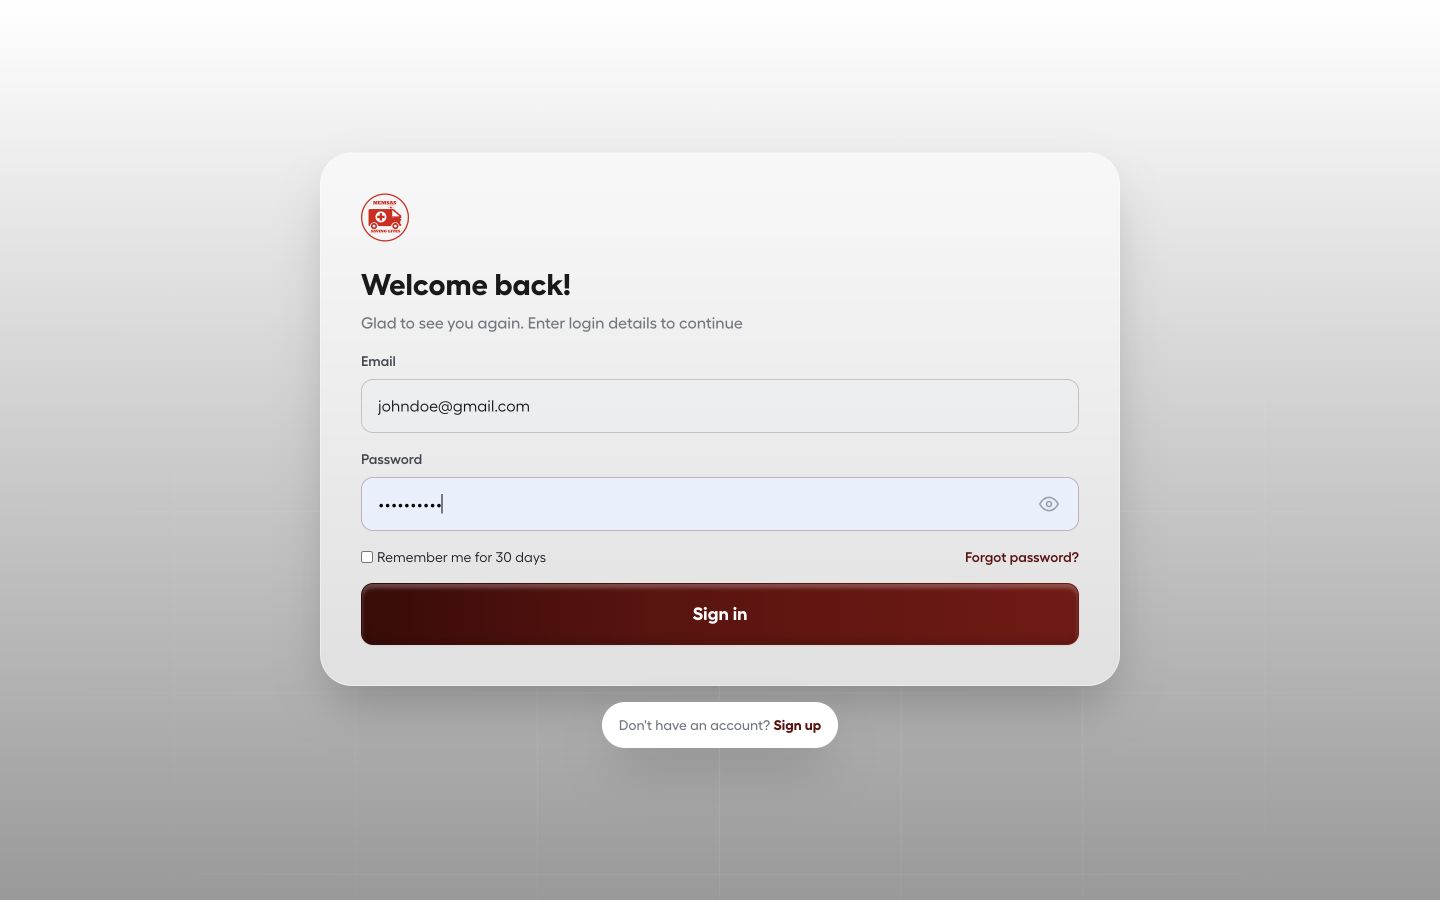
Enter your sign-in details

Enter the assigned email and password. Leave Remember me clear on a shared device, then select Sign in.

NEMSAS Connect sign-in form populated with a demonstration account and masked password

1 — email and password fields · 2 — Remember me checkbox · 3 — Sign in button.

NEMSAS Connect sign-in form populated with a demonstration account and masked password

Done. You are signed in and can see the Connect workspaces available to your role.

If something goes wrong

The sign-in details are not accepted.

Check the email and password carefully. If the account is still inaccessible, use the password-reset guide or contact the administrator.

Partner User Management is missing.

That workspace is restricted to Connect administrators and is not shown to Partner accounts.

Account recovery

Request a Connect password reset

Prepare a password-reset request for the email registered to your account.
All NEMSAS Connect users 2 min read Web

Before you start

  • Access to the registered email address

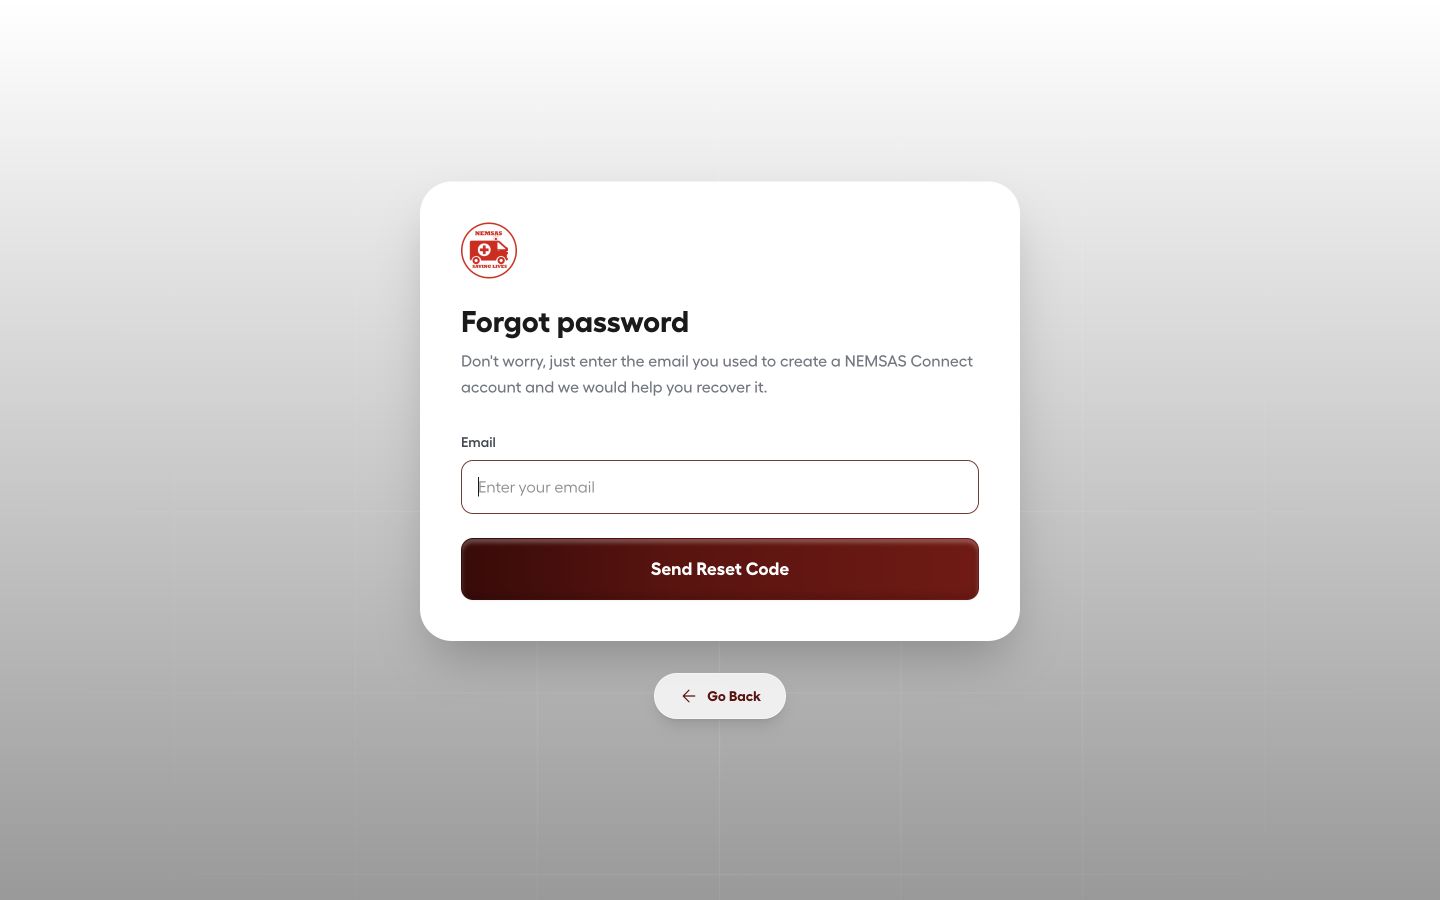
Open password recovery

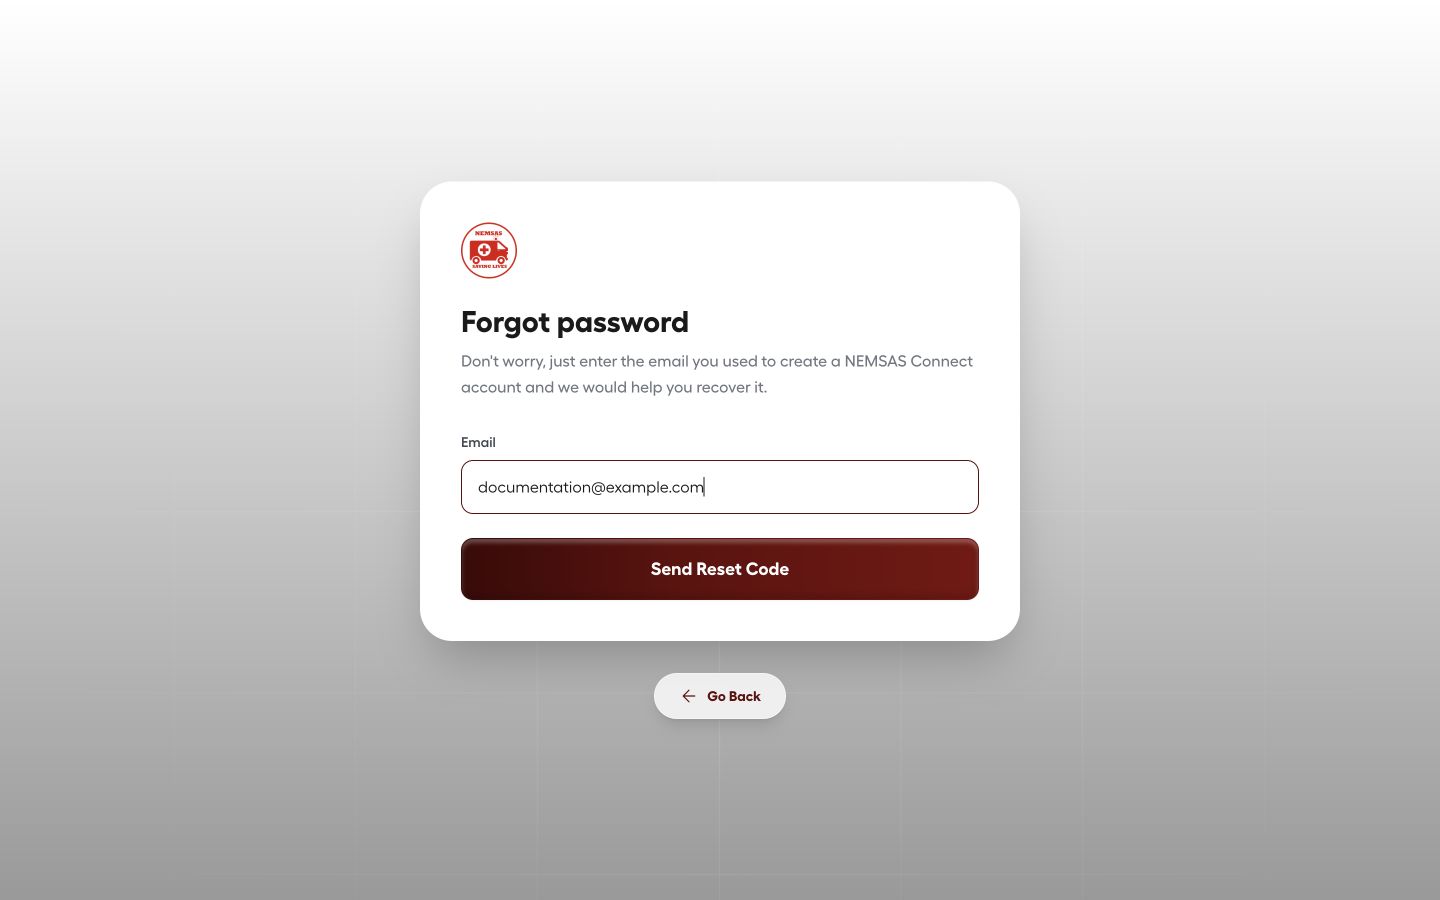
From the Connect sign-in page, select Forgot password? to open the recovery form.

NEMSAS Connect Forgot password form with email and Send Reset Code controls

NEMSAS Connect Forgot password form with email and Send Reset Code controls

Enter the registered email

Enter the email registered to the account and review it before selecting Send Reset Code.

NEMSAS Connect Forgot password form populated with a demonstration email

1 — registered email field · 2 — Send Reset Code button.

NEMSAS Connect Forgot password form populated with a demonstration email

Note: Selecting Send Reset Code emails a recovery code to the registered address.

Done. The reset request is ready to send. The remaining code and password steps begin after Send Reset Code is selected.

If something goes wrong

The reset email does not arrive.

Check the spam folder and confirm that the email matches the account. Contact an administrator if it remains unavailable.
Partner registration

Prepare a Connect partner account

Choose an individual or organization account and complete the appropriate registration details.

Prospective Connect partners 5–8 min read Web

Before you start

  • A working email address and phone number
  • Organization details when registering an organization
  • A strong new password

Choose the account type

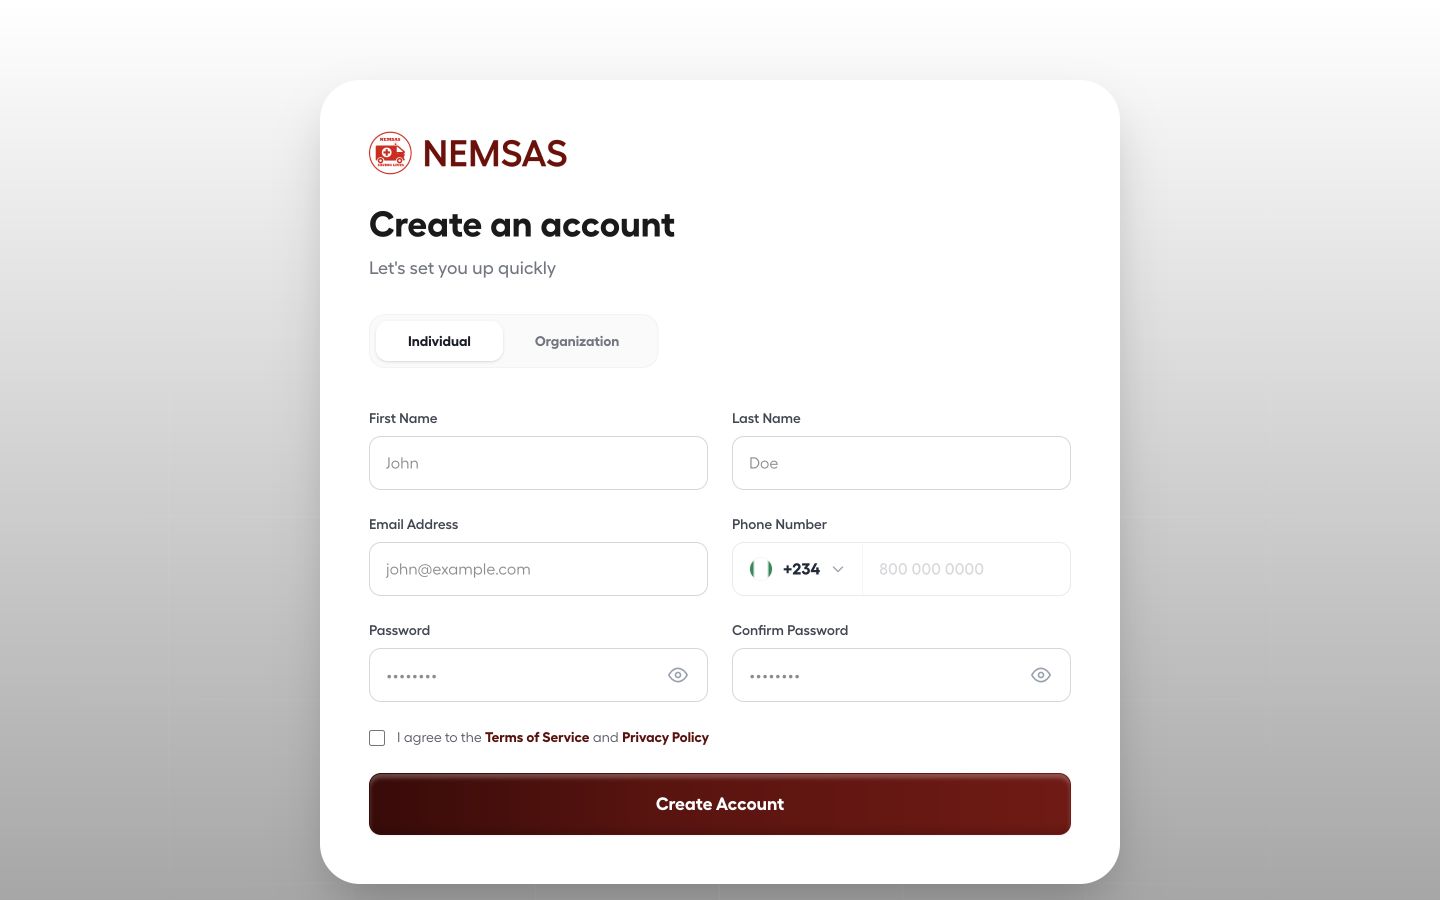
Open Sign up and select Individual or Organization. The fields change according to the account type.

NEMSAS Connect registration page with Individual and Organization account type options

1 — account type selector.

NEMSAS Connect registration page with Individual and Organization account type options

Complete an individual registration

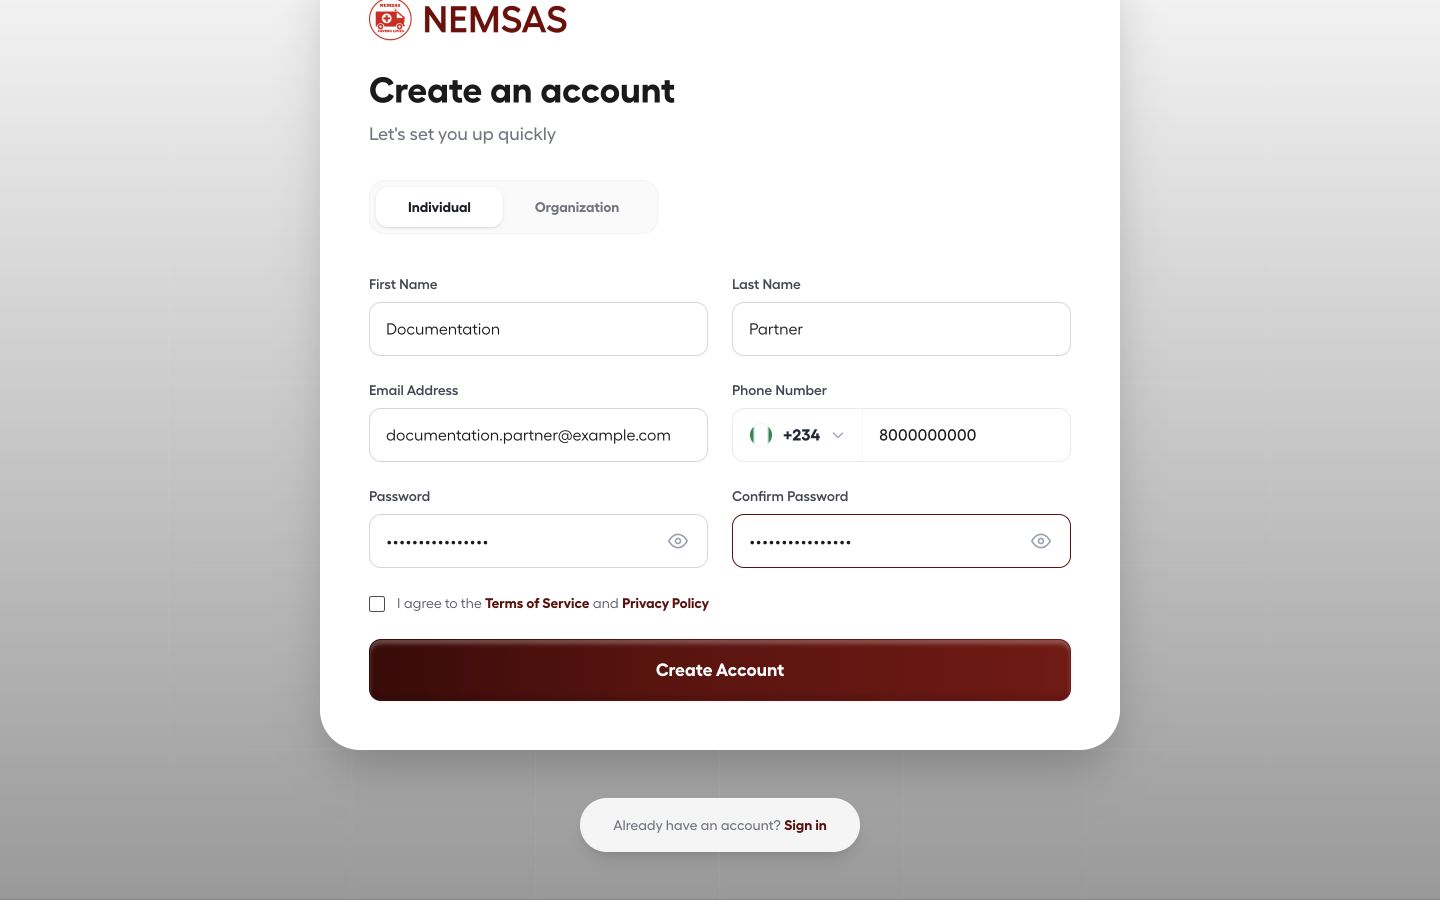
For an individual account, enter the person's name, email, phone number, password and matching confirmation.

Individual Connect registration form populated with non-sensitive demonstration details and masked passwords

1 — name fields · 2 — email and phone fields · 3 — password fields.

Individual Connect registration form populated with non-sensitive demonstration details and masked passwords

Complete an organization registration

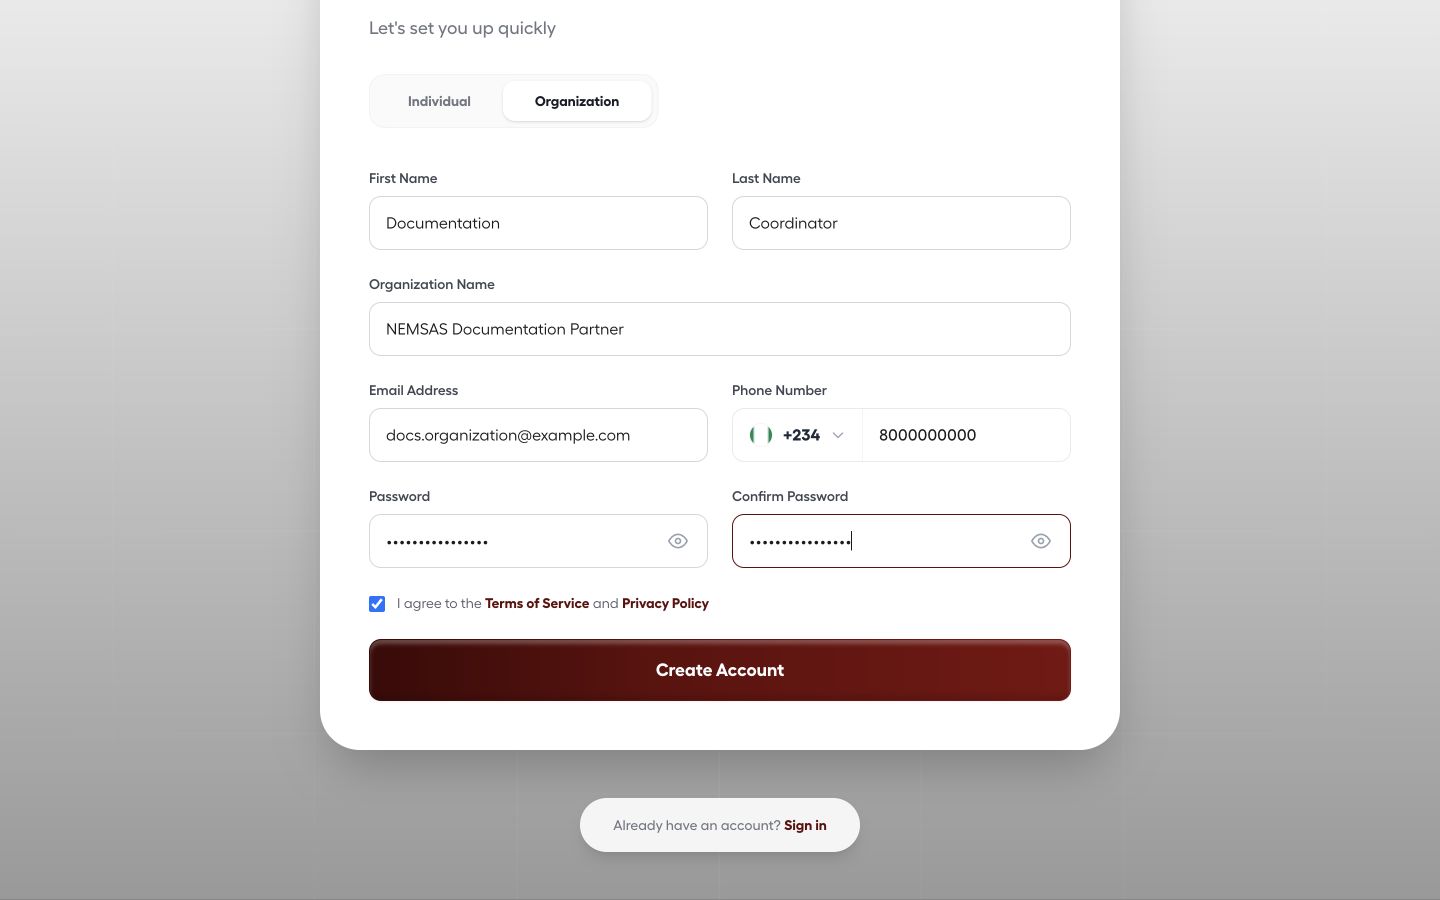
For an organization account, enter the organization and representative details, email, phone number and matching password fields. Review everything before Create Account.

Organization Connect registration form populated with non-sensitive demonstration organization and representative details

1 — representative and organization fields · 2 — contact and password fields · 3 — Create Account button.

Organization Connect registration form populated with non-sensitive demonstration organization and representative details

Important: Create Account starts registration and verification. Confirm the account type and contact details first.

Done. The selected registration form is complete and ready for Create Account. Verification begins only after the account is created.

If something goes wrong

The Terms of Service or Privacy Policy does not open.

Ask the programme administrator for the applicable documents before creating an account.

The passwords do not match.

Re-enter the same new password in both password fields and follow the visible strength requirements.

NEMSAS Connect

Monitor national ambulance coverage

Read national ambulance and facility coverage and compare state distribution.

Connect administrators and partners 5 min read Web

Before you start

  • Access to NEMSAS Connect
  • Permission to view the national dashboard

Read the summary metrics

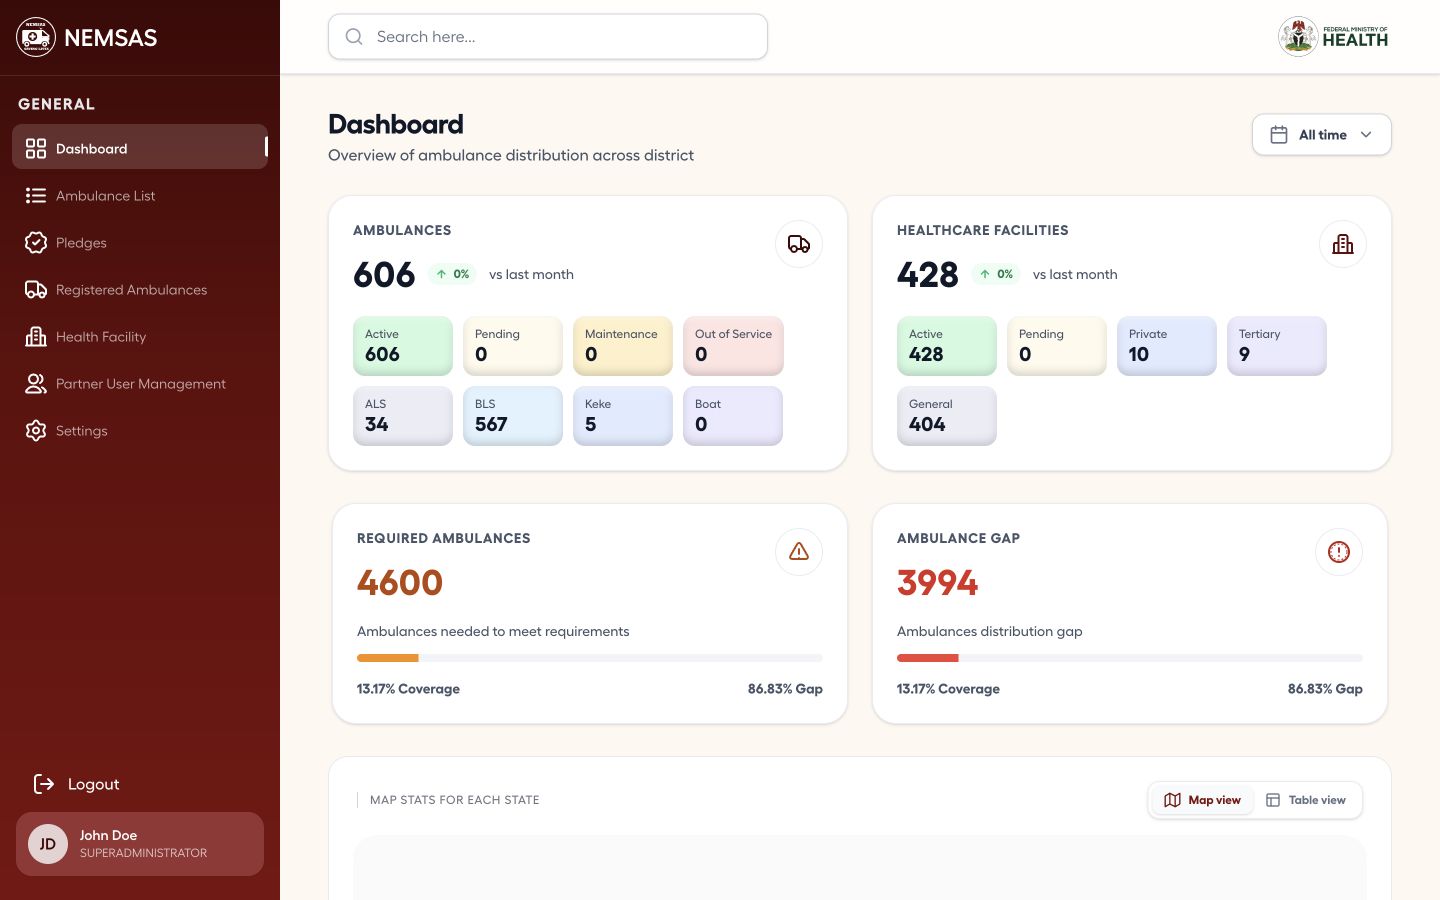
Open Dashboard and compare ambulance and facility totals with the national requirement and remaining ambulance gap.

NEMSAS Connect administrator dashboard with ambulance, facility, requirement and gap metrics

1 — ambulance and facility totals · 2 — required ambulances · 3 — ambulance gap.

NEMSAS Connect administrator dashboard with ambulance, facility, requirement and gap metrics

Inspect the state map

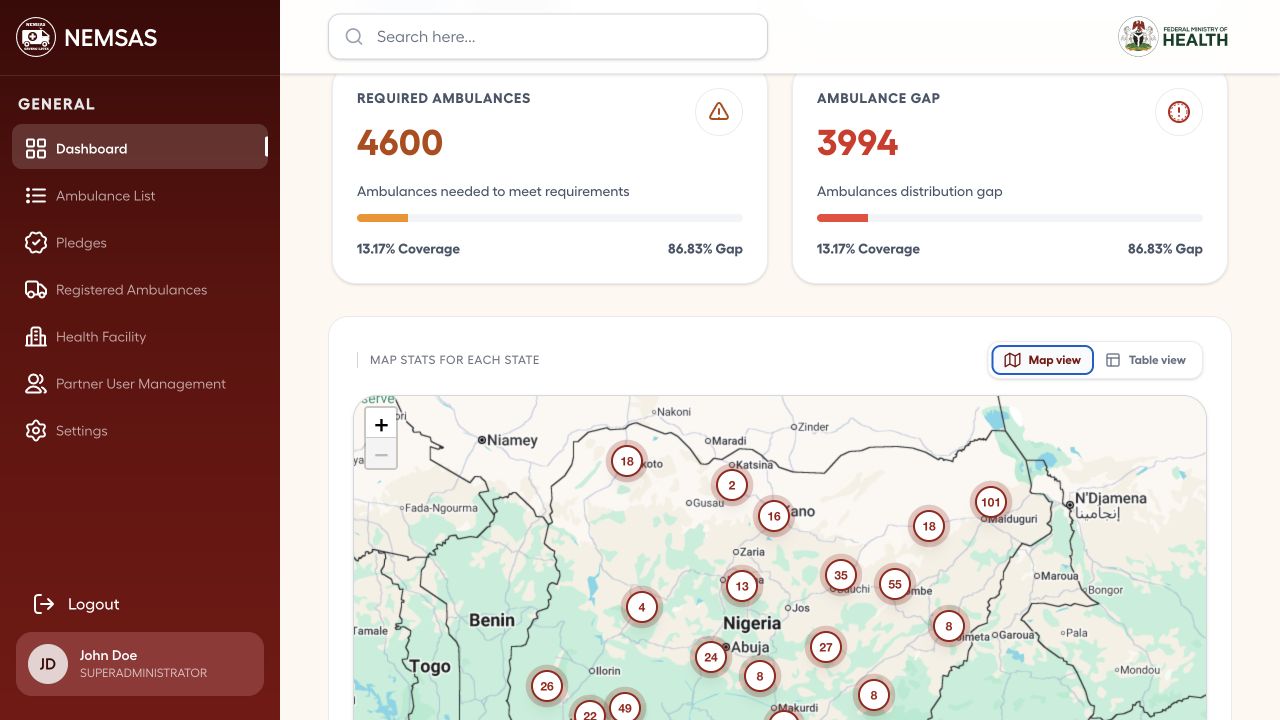
Use Map view under Map stats for each state. Each marker shows the recorded ambulance count for a state.

NEMSAS Connect state map with ambulance count markers

1 — Map view button · 2 — state ambulance-count marker.

NEMSAS Connect state map with ambulance count markers

Compare states in the table

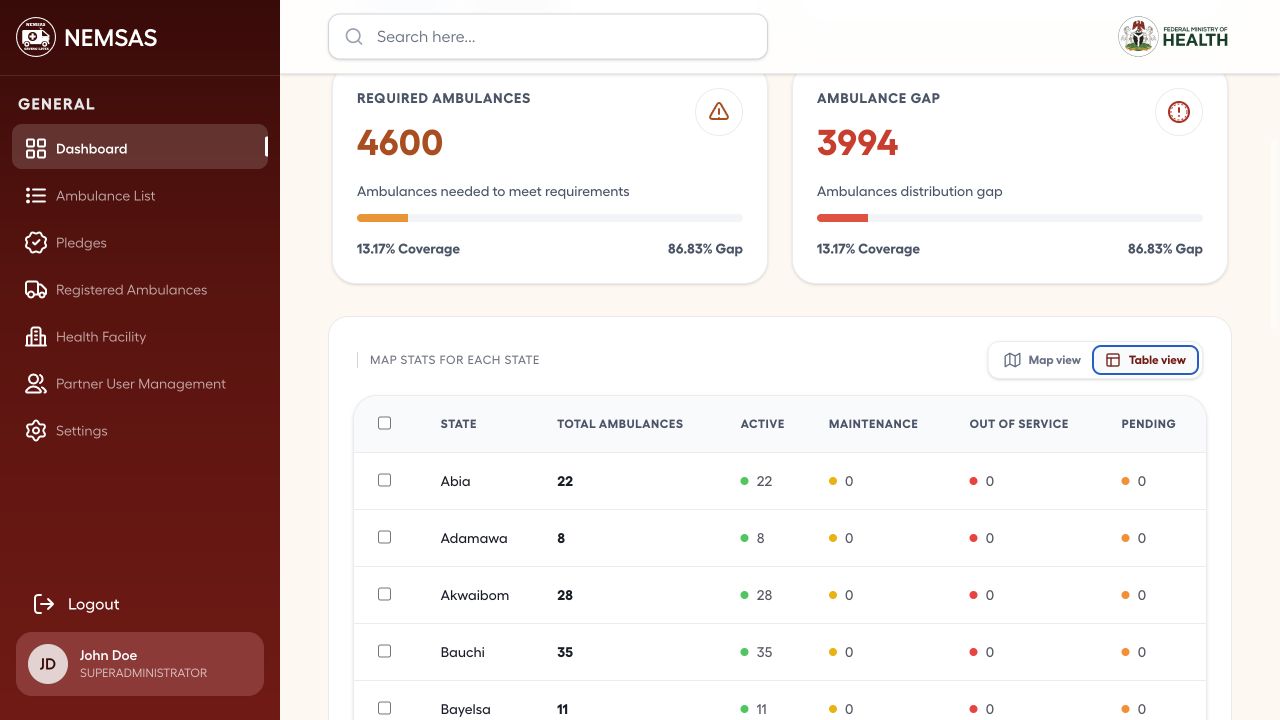
Select Table view to compare total, active, maintenance, out-of-service and pending ambulances by state.

NEMSAS Connect state table comparing ambulance totals and operational statuses

1 — Table view button · 2 — state status table.

NEMSAS Connect state table comparing ambulance totals and operational statuses

Done. You can describe the current coverage level and identify distribution gaps by state.

If something goes wrong

The map does not finish loading.

Reload the dashboard. If the summary cards load but the map does not, use Table view and check the connection.

The map and table appear inconsistent.
Reload the page and confirm both views use the same data period. Escalate a persistent discrepancy.

NEMSAS Connect

Find and review approved ambulances

Search the approved fleet and open a vehicle's operational details.

Connect administrators and partners 4 min read Web

Before you start

  • Access to NEMSAS Connect
  • An ambulance name, plate number, driver or location

Open the approved fleet

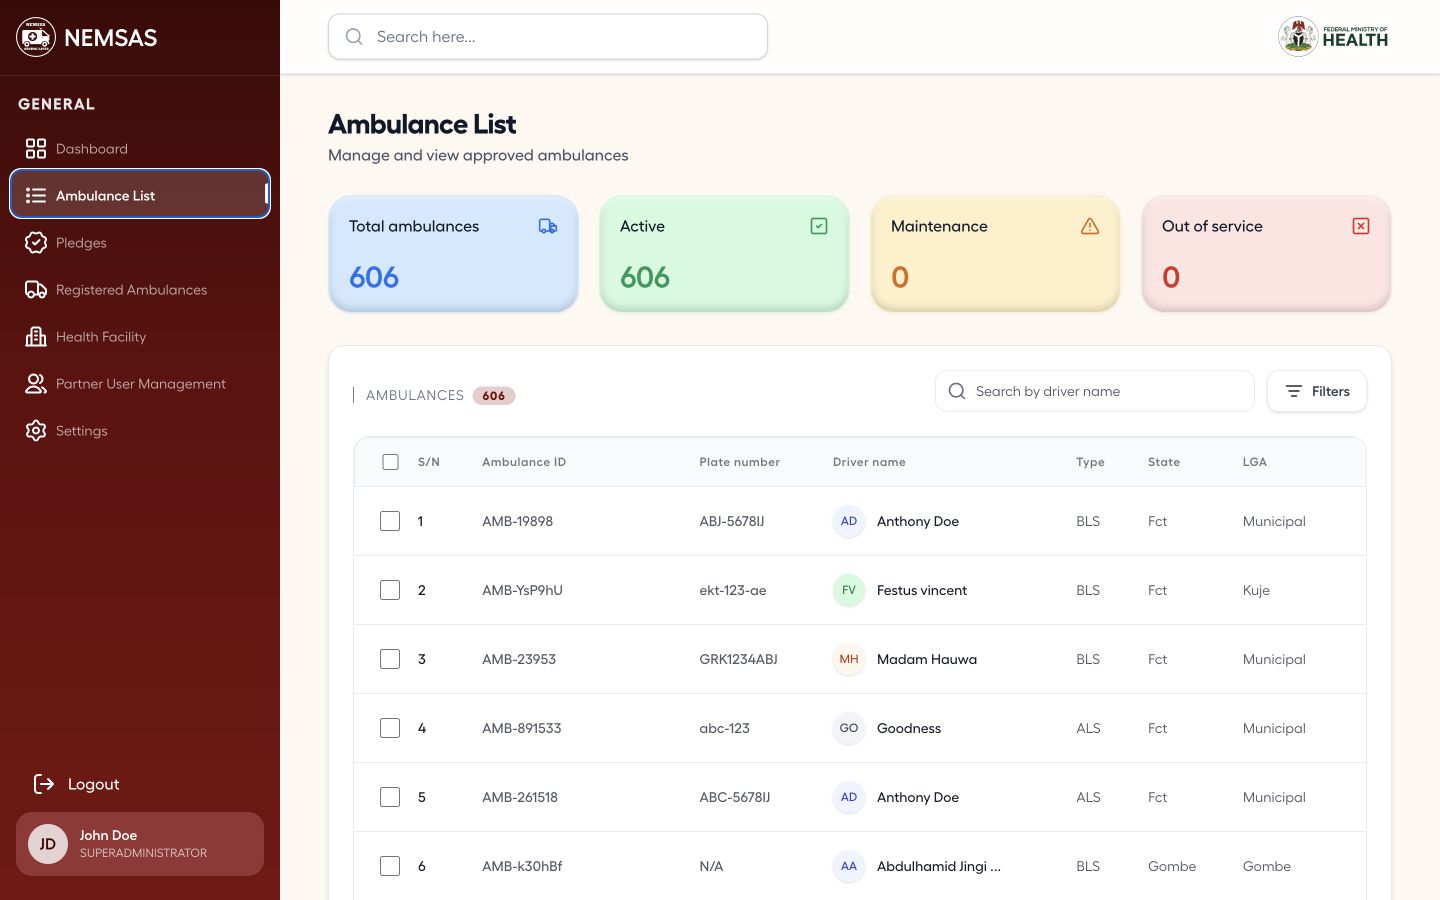
Open Ambulance List and review the total, active, maintenance and out-of-service cards before narrowing the list.

NEMSAS Connect administrator Ambulance List with fleet status cards and approved vehicle rows

1 — fleet status cards.

NEMSAS Connect administrator Ambulance List with fleet status cards and approved vehicle rows

Configure the fleet filters

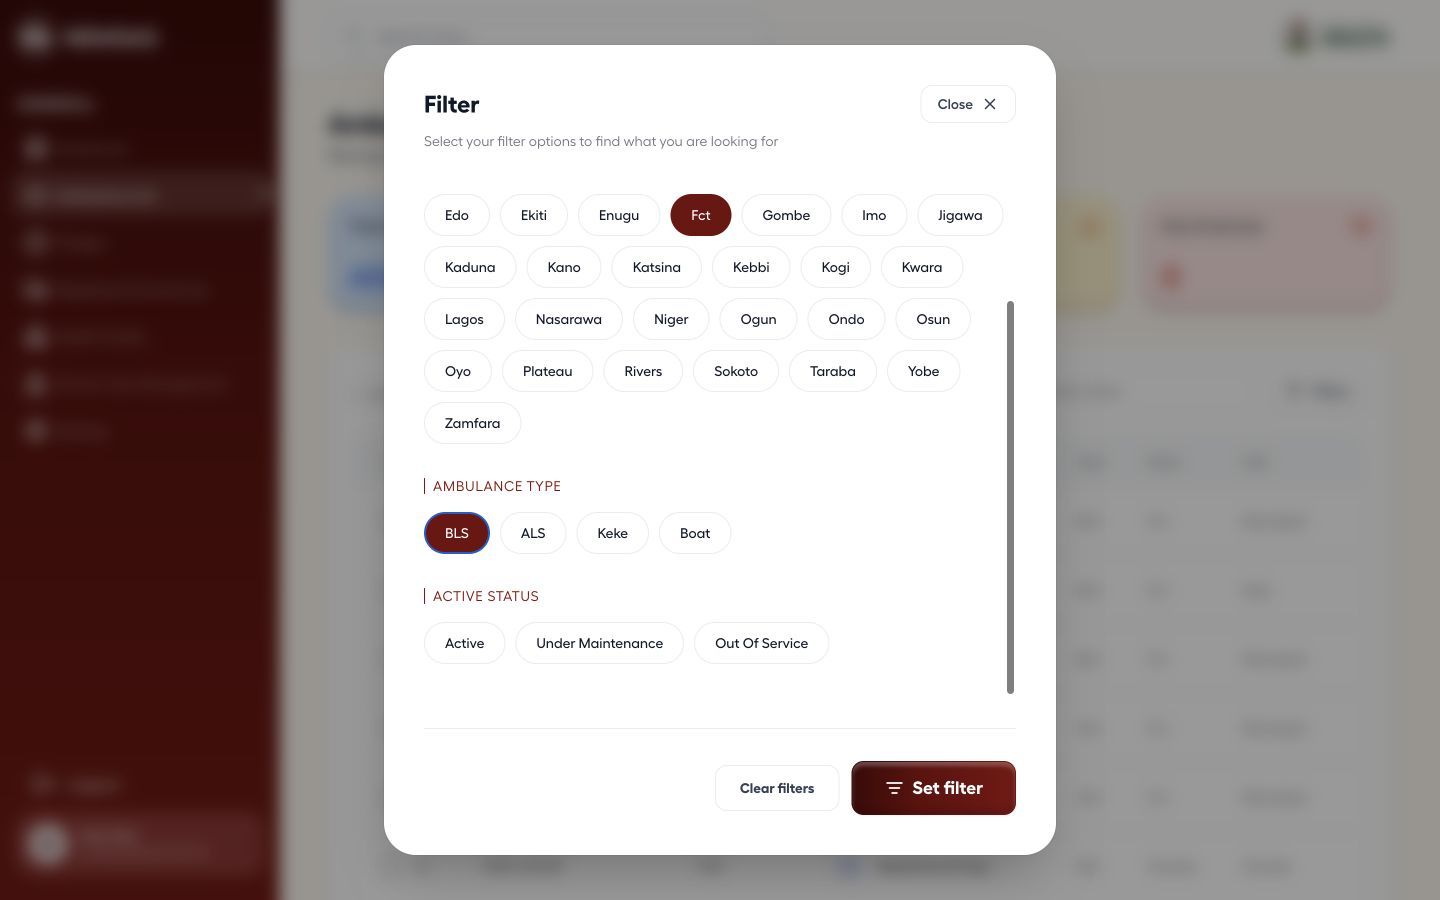
Select Filters and choose the State, ambulance type and active status that match the vehicle you need.

Ambulance List filter panel configured with demonstration state, ambulance type and active status

1 — state option · 2 — ambulance type option · 3 — active status options.

Ambulance List filter panel configured with demonstration state, ambulance type and active status

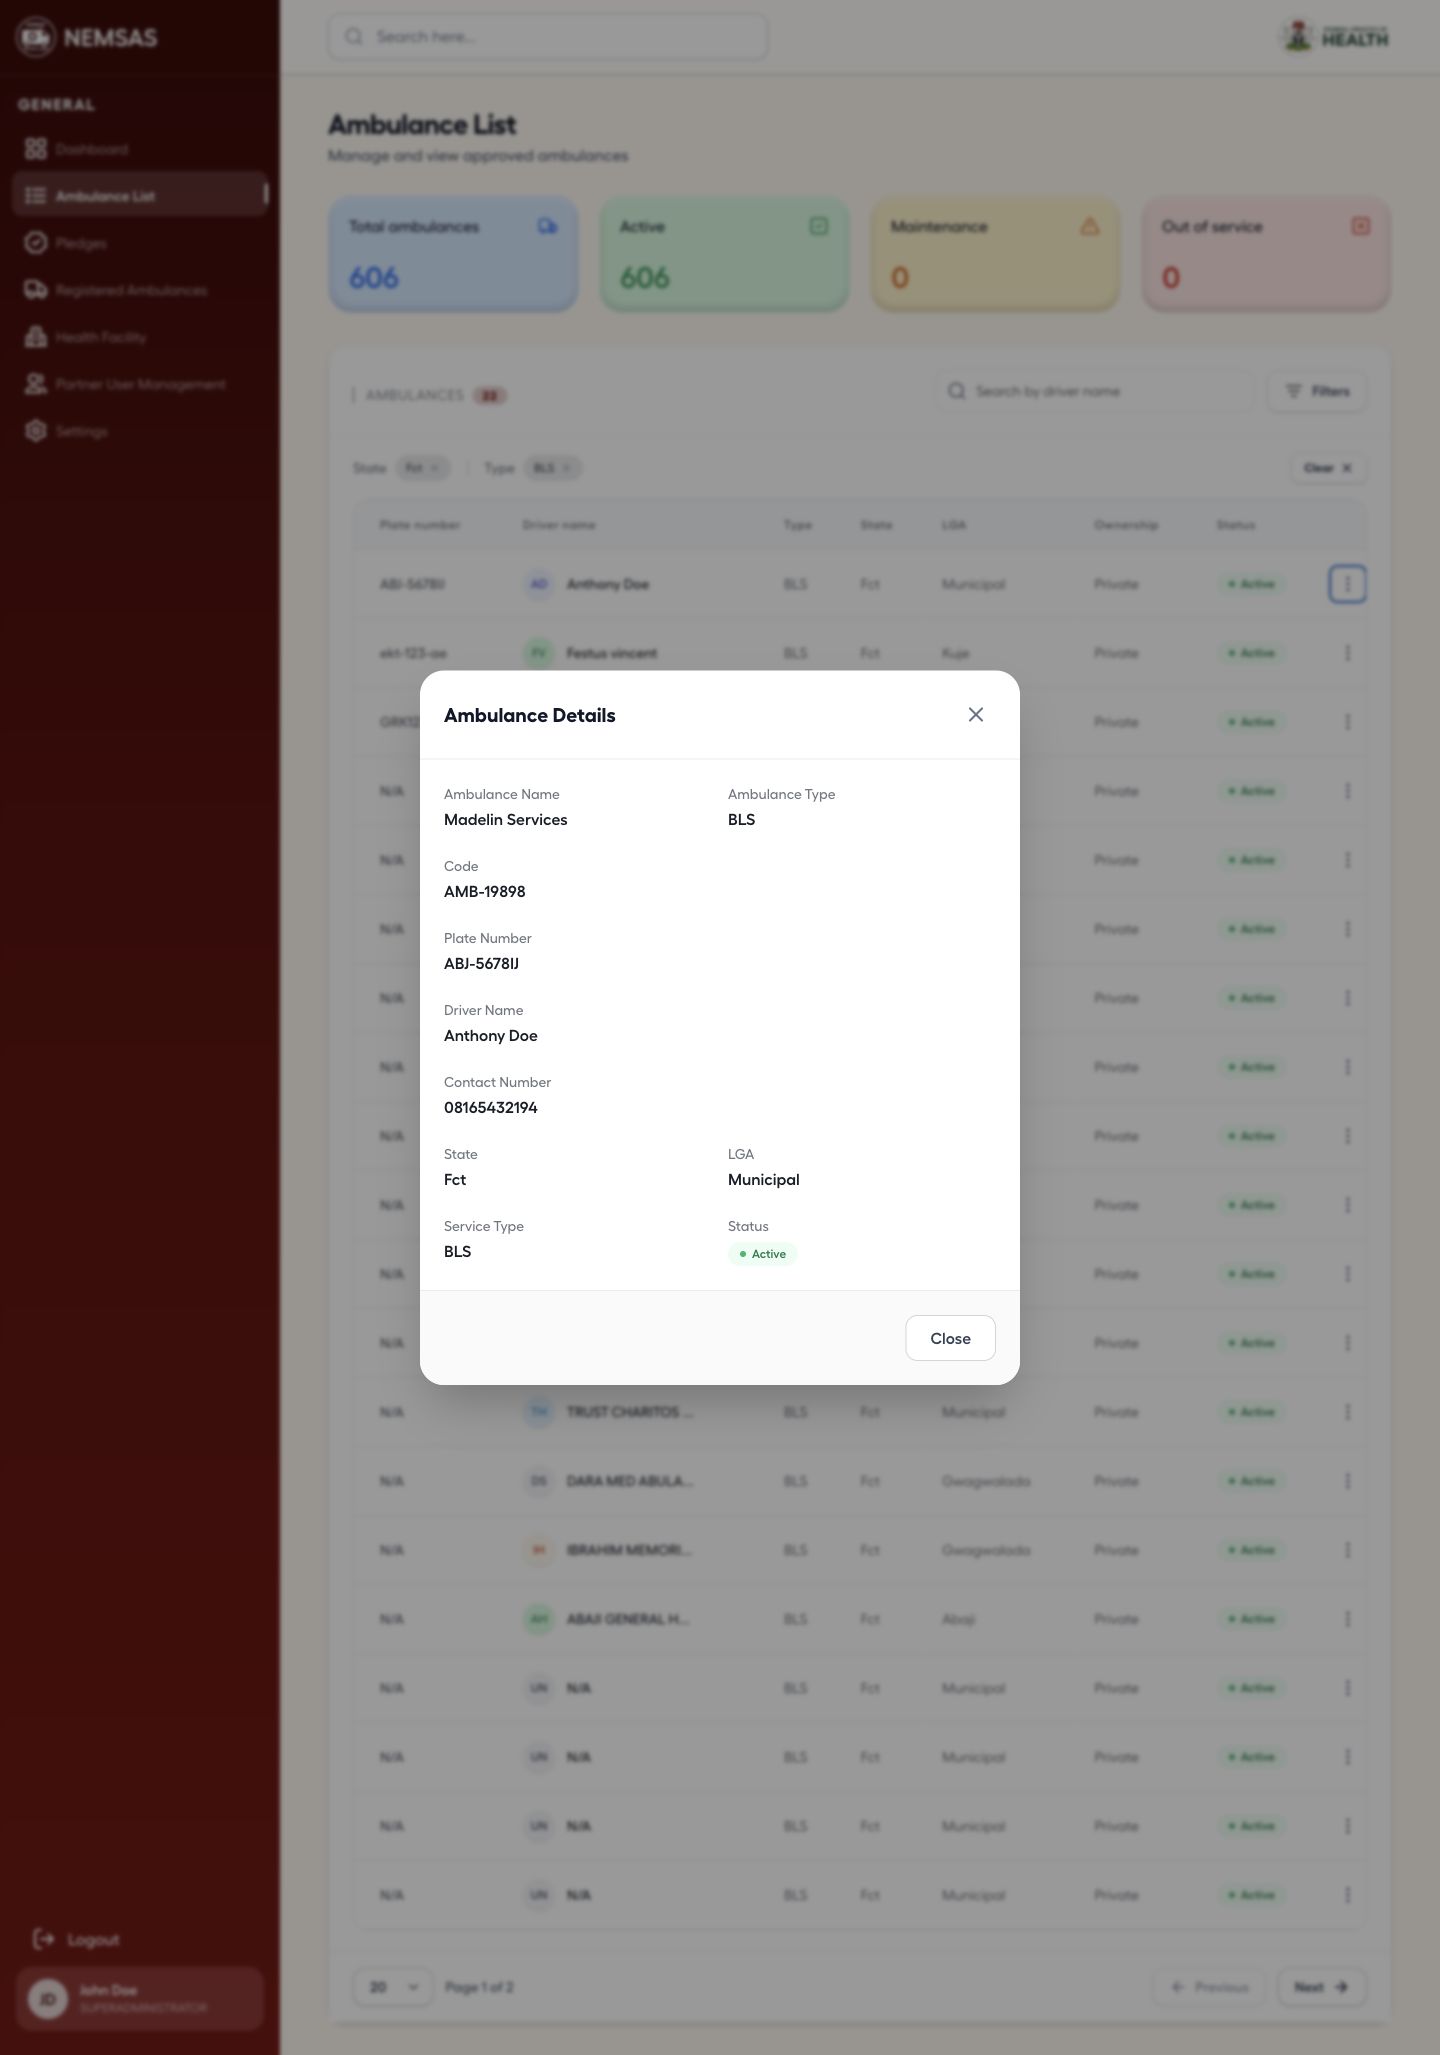
Verify the ambulance details

Apply the filters, open View details for the correct row, then check the vehicle identity, accreditation, plate, driver, contact, location and operational status.

Approved ambulance detail panel showing vehicle, driver, location and operational status

1 — vehicle identity and accreditation · 2 — driver and contact details · 3 — location and operational status.

Approved ambulance detail panel showing vehicle, driver, location and operational status

Note: Administrators may also see Update status. Do not change a vehicle status without an approved operational instruction.

Done. You have confirmed the ambulance identity, accreditation, driver, location and operational status.

If something goes wrong

The ambulance is not listed.

Clear restrictive filters and search by another identifier. Pending or rejected registrations appear under Registered Ambulances instead.

NEMSAS Connect

Track registered ambulances

Compare submitted ambulance registrations by approval status.

Connect administrators and partners 3 min read Web

Before you start

  • Access to NEMSAS Connect

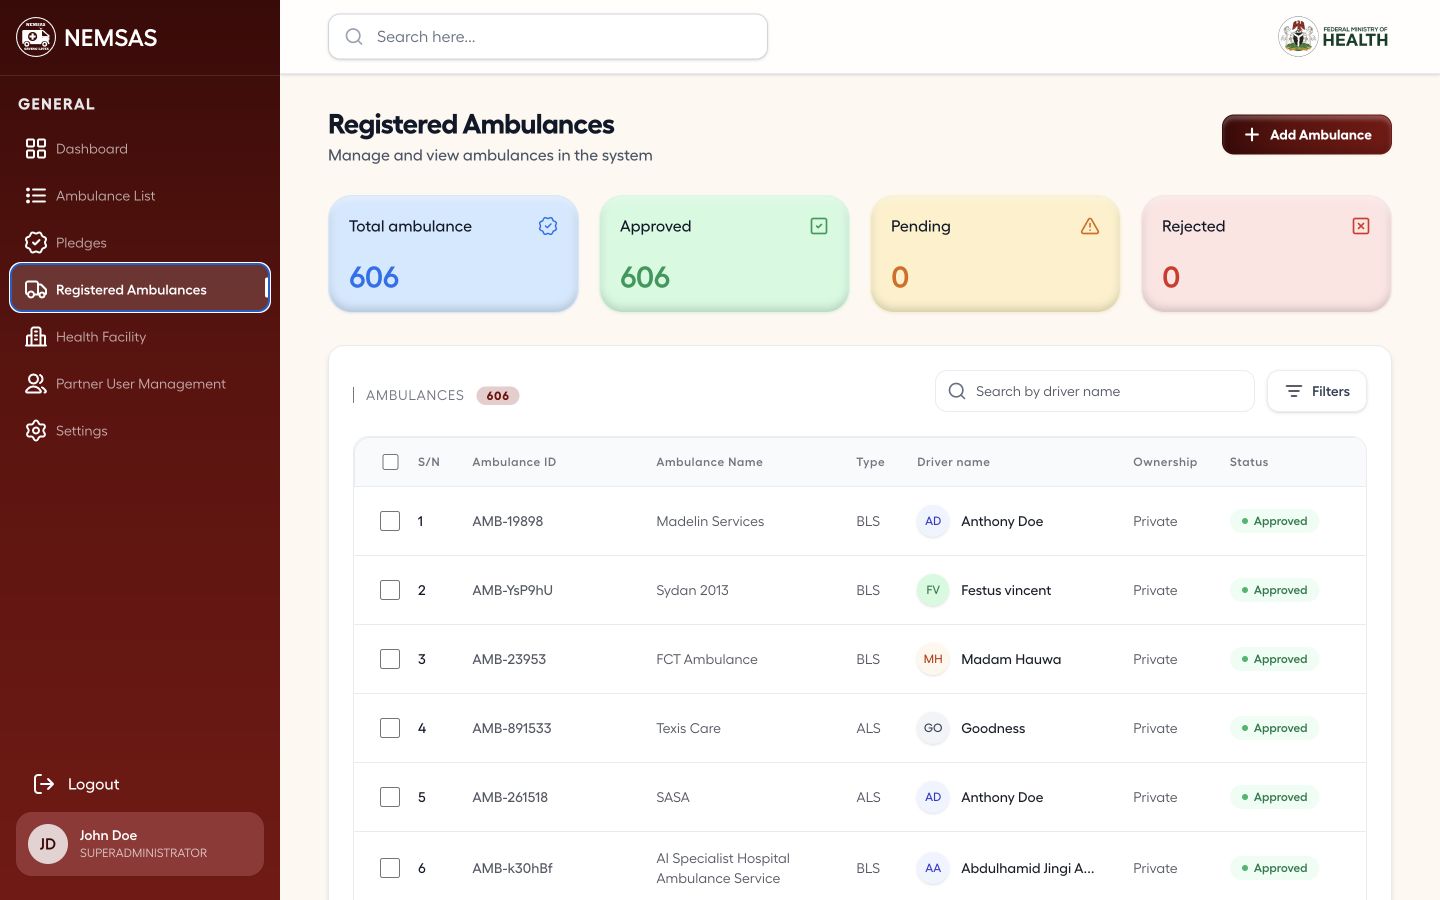
Review registration statuses

Open Registered Ambulances. Compare Total ambulances, Approved, Pending and Rejected, then search or filter the table.

Registered Ambulances page with approval summary cards, search, filters and submitted vehicles

1 — registration status cards · 2 — search field · 3 — Filters button.

Registered Ambulances page with approval summary cards, search, filters and submitted vehicles

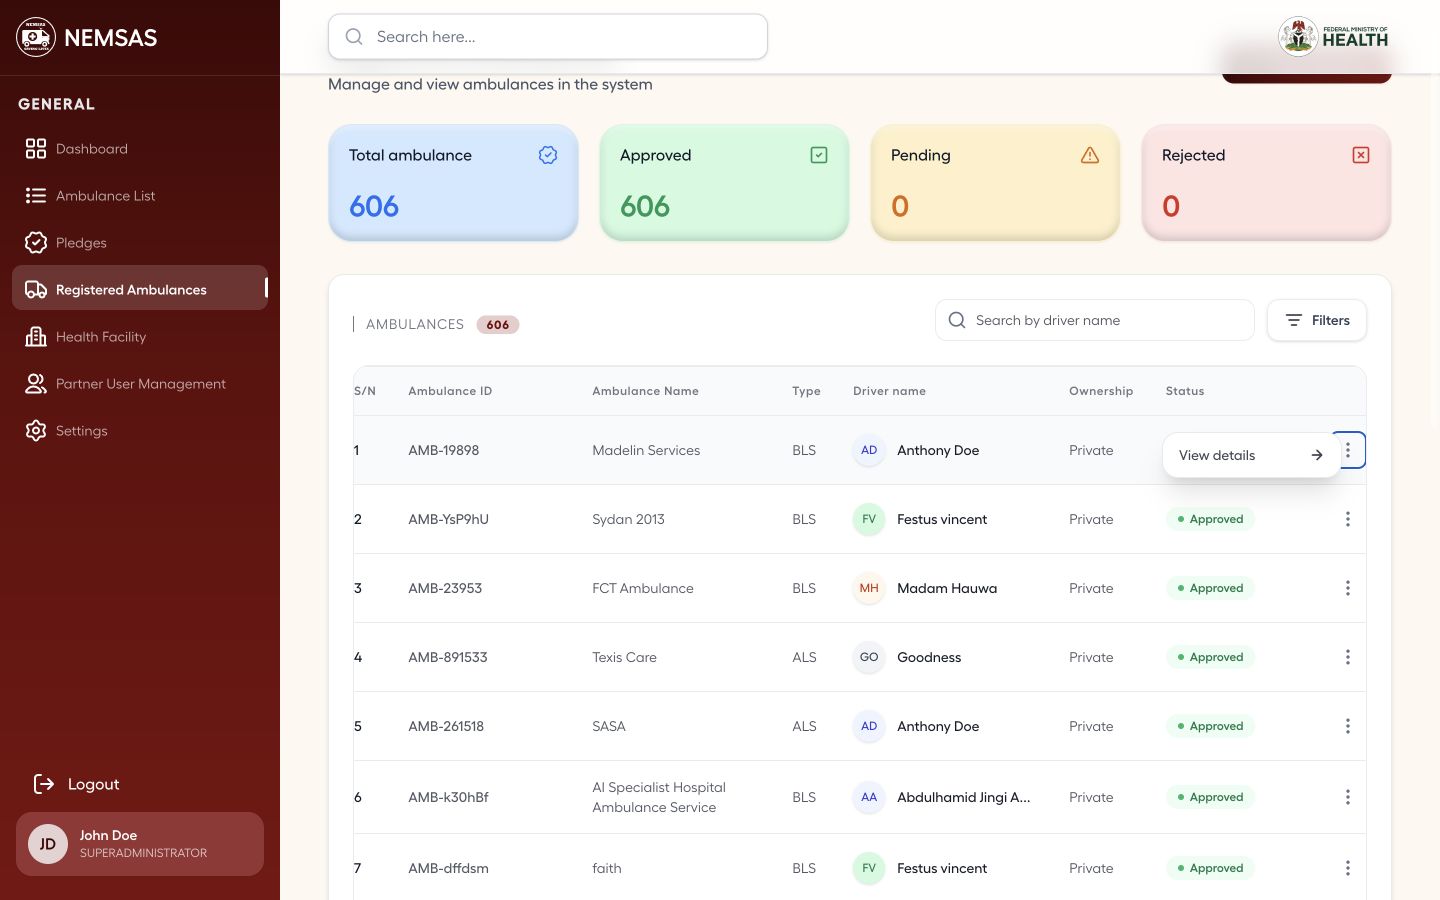
Open the available row actions

Open a row action to inspect the controls available for that registration. Pending decision controls appear only when an eligible record exists.

Registered Ambulances row with its available action menu open

1 — row action button · 2 — View details action.

Registered Ambulances row with its available action menu open

Done. You can identify the total, approved, pending and rejected ambulance registrations.

If something goes wrong

A newly prepared registration is absent.
Confirm that the form was submitted. Moving through unsaved wizard stages does not create a registration.

NEMSAS Connect

Track registered health facilities

Review accredited health facilities and their registration status.

Connect administrators and partners 3 min read Web

Before you start

  • Access to NEMSAS Connect

Review the facility register

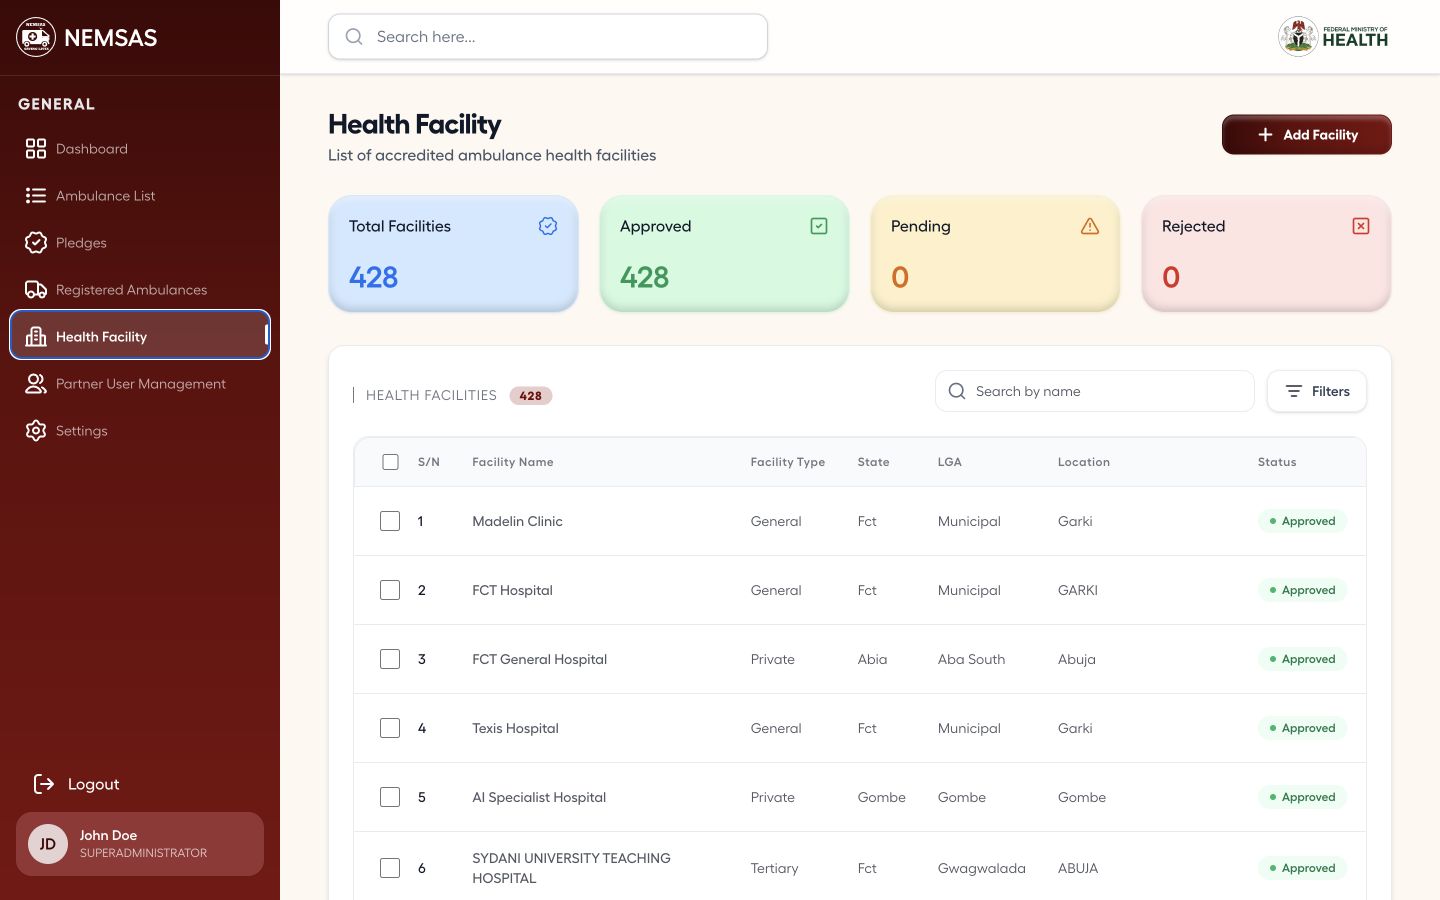
Open Health Facility. Compare Total Facilities, Approved, Pending and Rejected, then use search or Filters to locate a facility.

NEMSAS Connect administrator Health Facility page with status cards and accredited facility table

1 — facility summary cards · 2 — search and Filters controls.

NEMSAS Connect administrator Health Facility page with status cards and accredited facility table

Done. You can compare facility totals and locate a registered health facility.

If something goes wrong

A facility cannot be found.

Clear restrictive filters and search by facility name or location. Confirm that the request was submitted.

Account settings

Update your Connect settings

Review personal details and prepare a secure password change.

Connect administrators and partners 4 min read Web

Before you start

  • An active NEMSAS Connect session
  • Your current password when changing security details

Review your personal information

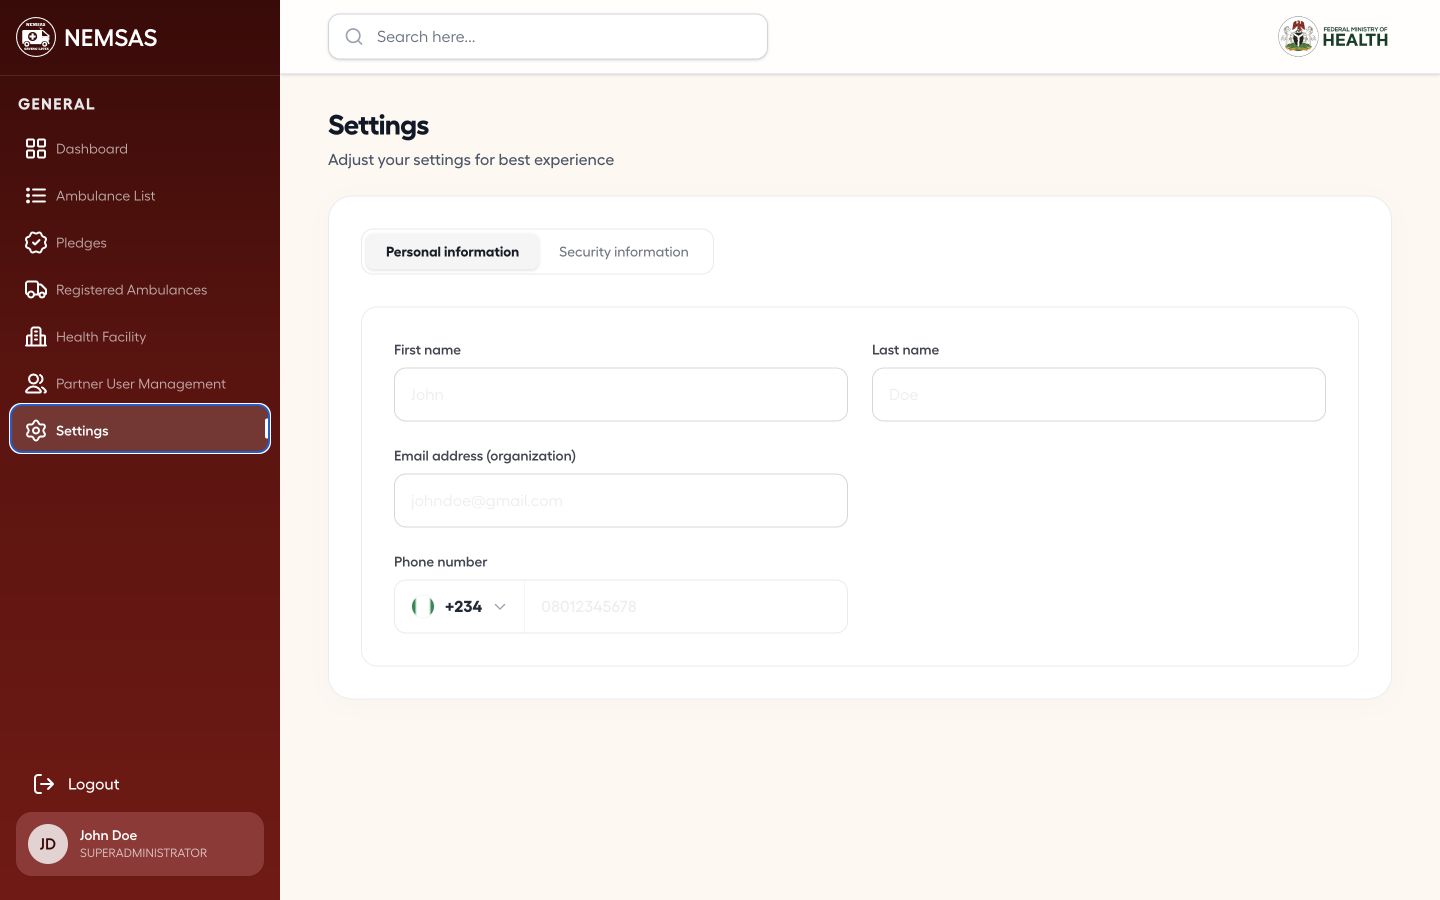
Open Settings and use Personal information to review your name, organization email and phone number. Correct only details that belong to your account.
NEMSAS Connect administrator Settings page with personal information fields

1 — name fields · 2 — organization email field · 3 — phone number field.
NEMSAS Connect administrator Settings page with personal information fields

Prepare a password change

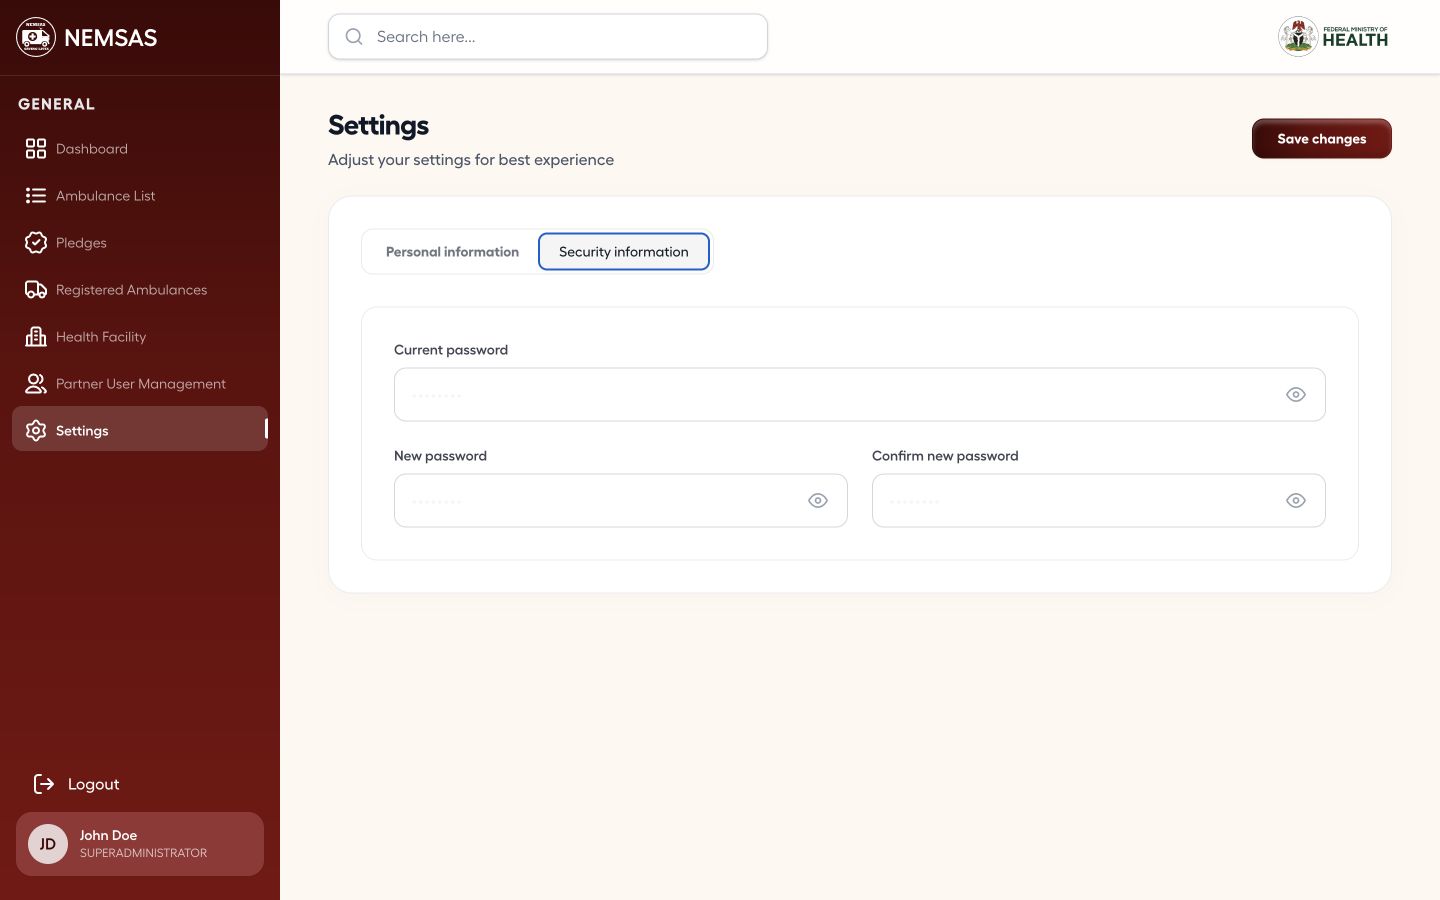
Select Security information. Enter the current password, a new unique password and the same new password again, then select Save changes.

NEMSAS Connect administrator Security information tab with current, new and confirmation password fields

1 — current password field · 2 — new password fields · 3 — Save changes button.

NEMSAS Connect administrator Security information tab with current, new and confirmation password fields

Done. Your account settings are ready to be saved after you verify the changes.

If something goes wrong

Save changes is unavailable.

Complete every required field and correct any validation messages before trying again.

Pledges

Find and review pledges

Locate an ambulance pledge and review its donor, destination, dates and fulfilment status.

Connect administrators and partners 4 min read Web

Before you start

  • Access to NEMSAS Connect
  • A donor name, pledge identifier or destination

Search the pledge register

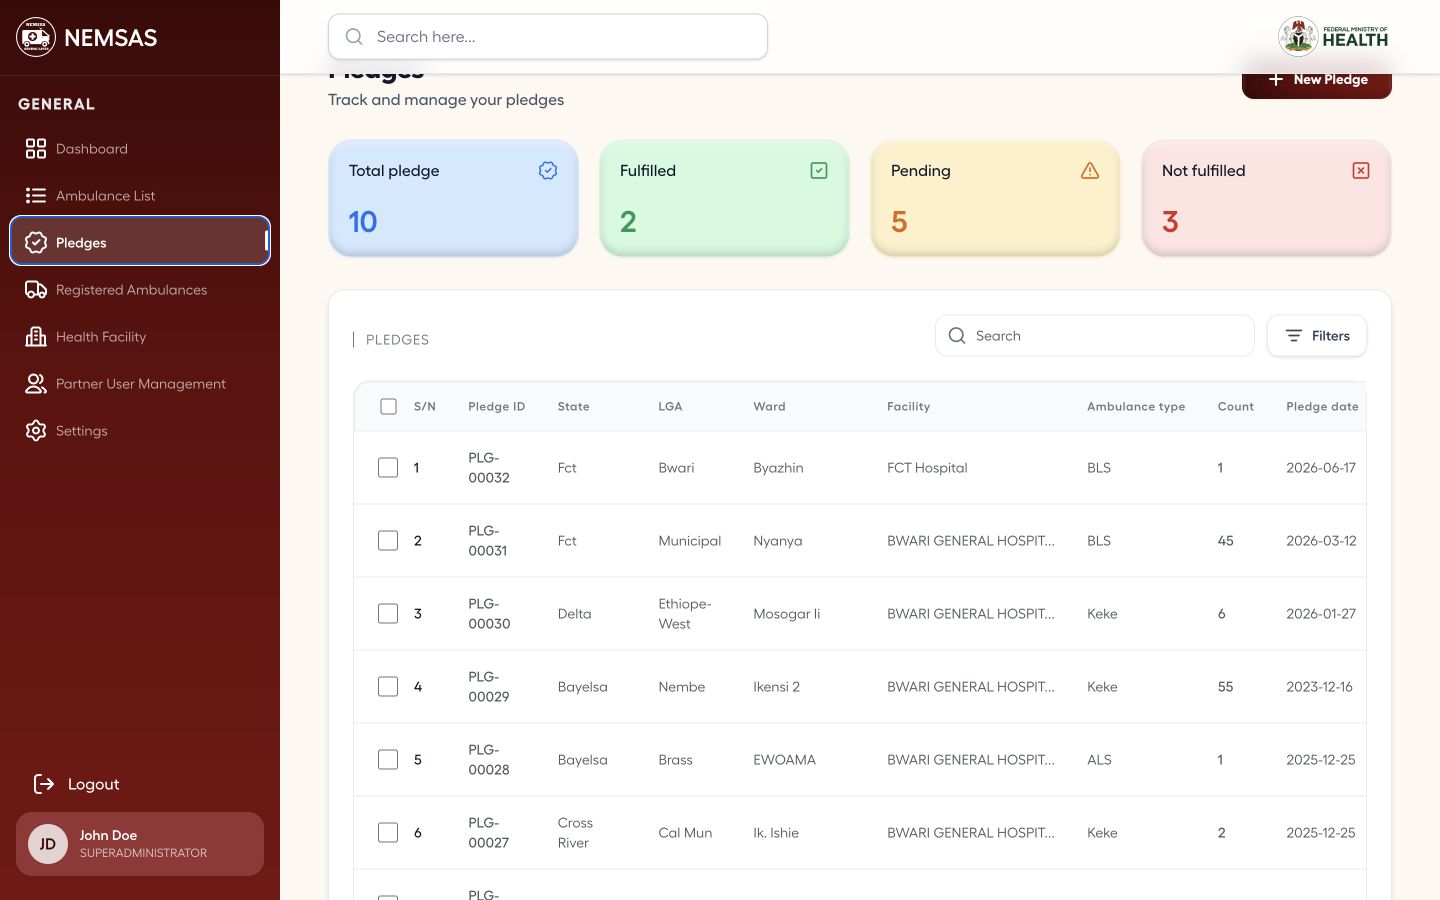
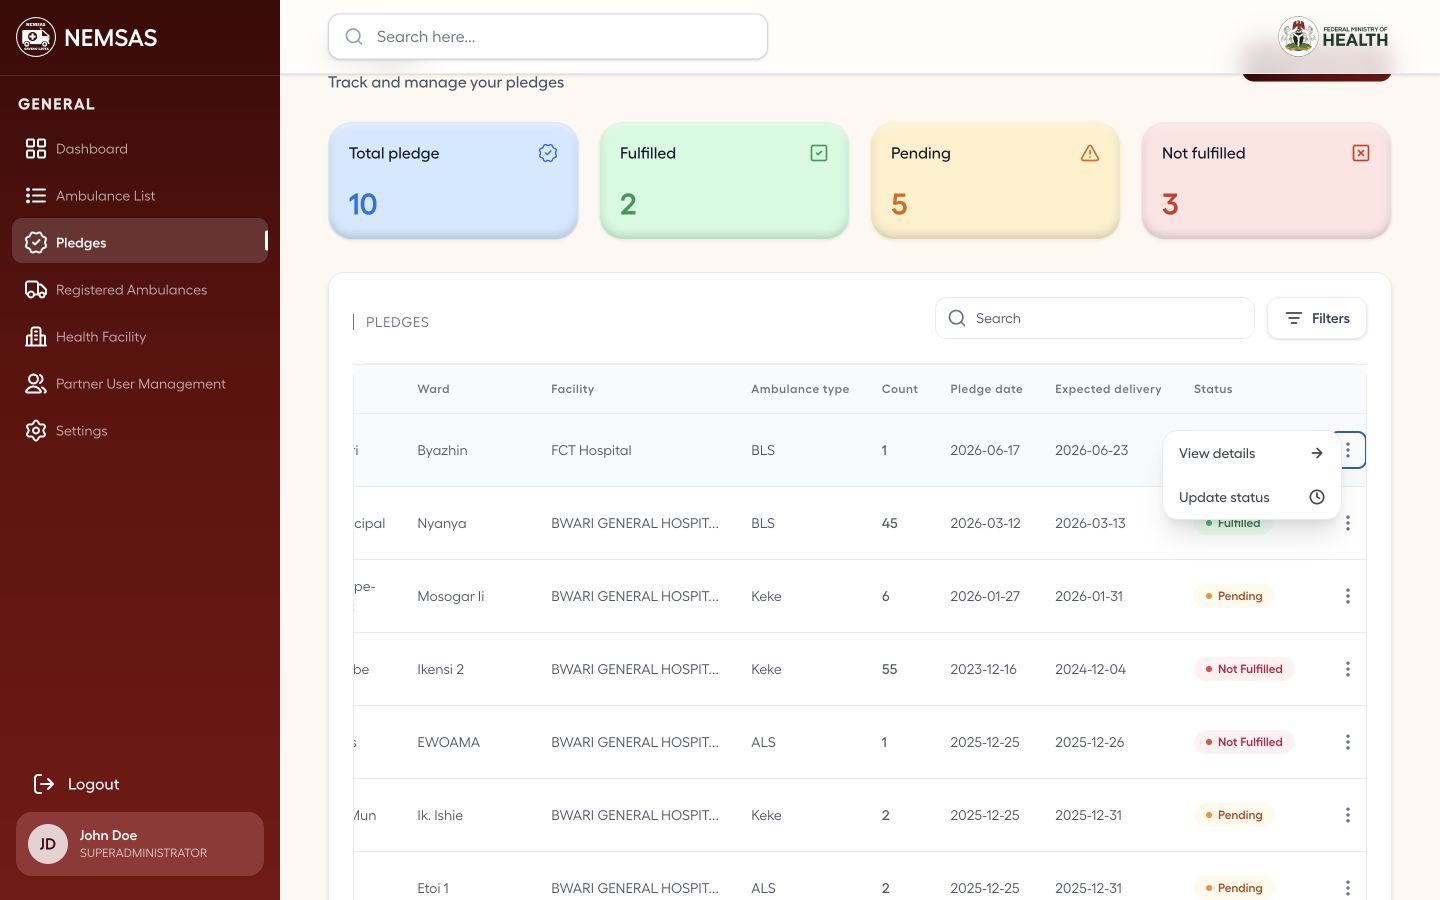
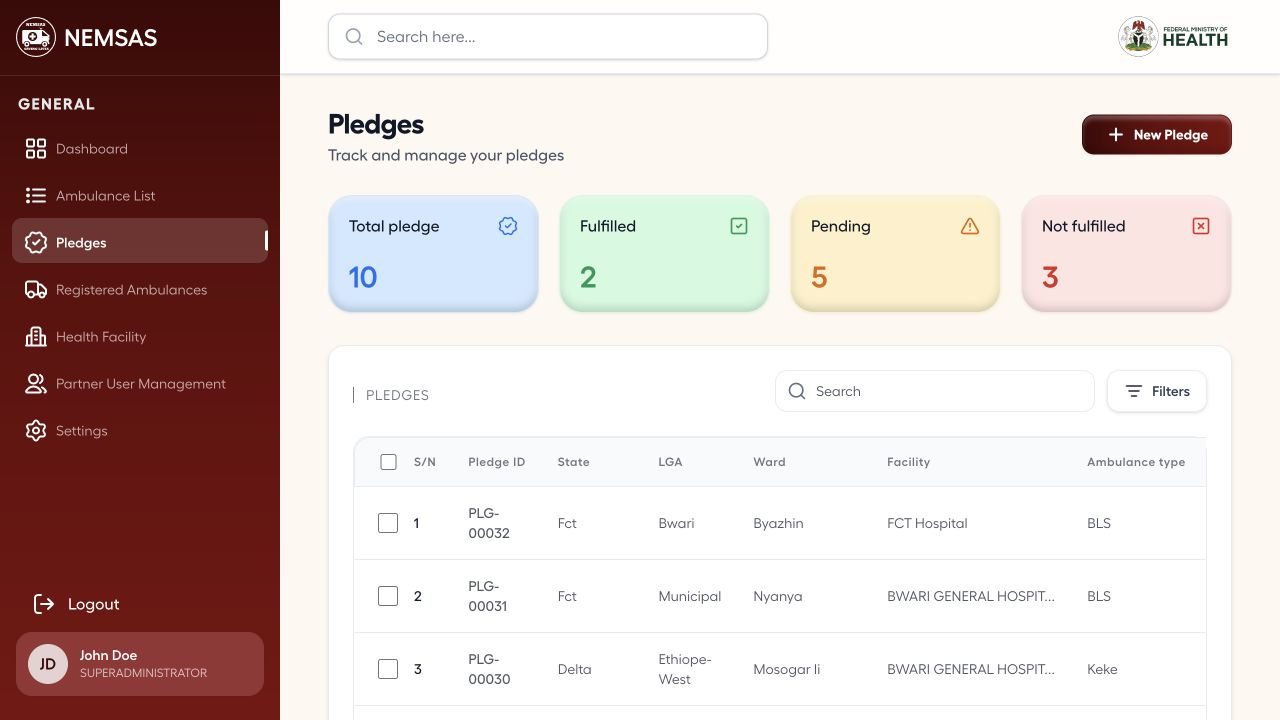
Open Pledges and compare the total, fulfilled, pending and not-fulfilled cards. Use search and Filters to narrow the list.

NEMSAS Connect Pledges page with status cards, search, filters and pledge rows

1 — pledge summary cards · 2 — search and Filters controls.

NEMSAS Connect Pledges page with status cards, search, filters and pledge rows

Open the pledge action

Open the action menu on the matching row and select View details.

NEMSAS Connect pledge row with View details action open

1 — View details action.

NEMSAS Connect pledge row with View details action open

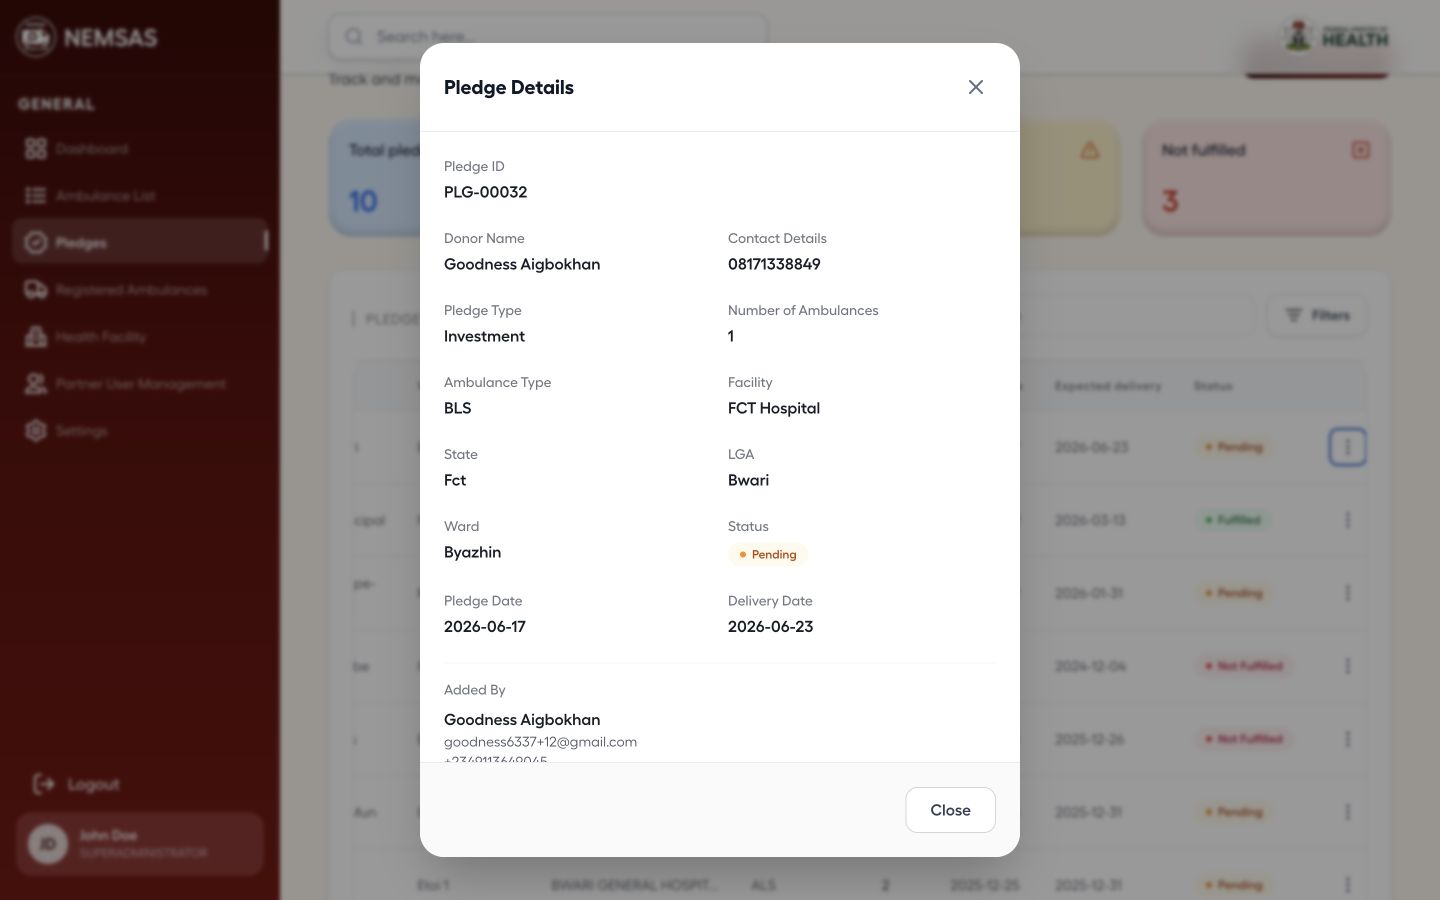
Verify the pledge details

Review the donor, contact, pledge type, ambulance count and type, destination, pledge date, delivery date, status and creator.

NEMSAS Connect pledge details with donor, ambulance, destination, dates and status

1 — donor and contact details · 2 — pledge record details · 3 — creator details.

NEMSAS Connect pledge details with donor, ambulance, destination, dates and status

Done. You have confirmed the pledge identity, destination, delivery dates and current status.

If something goes wrong

The pledge is not found.

Clear restrictive filters and search by the donor, pledge identifier or facility. Confirm that the pledge was submitted.

Pledge administration

Review pledge status options

Review the fulfilment statuses available to an administrator before making a verified update.

Connect administrators 3 min read Web

Before you start

  • Connect administrator access
  • Verified evidence of the pledge's current fulfilment state

Review the available status options

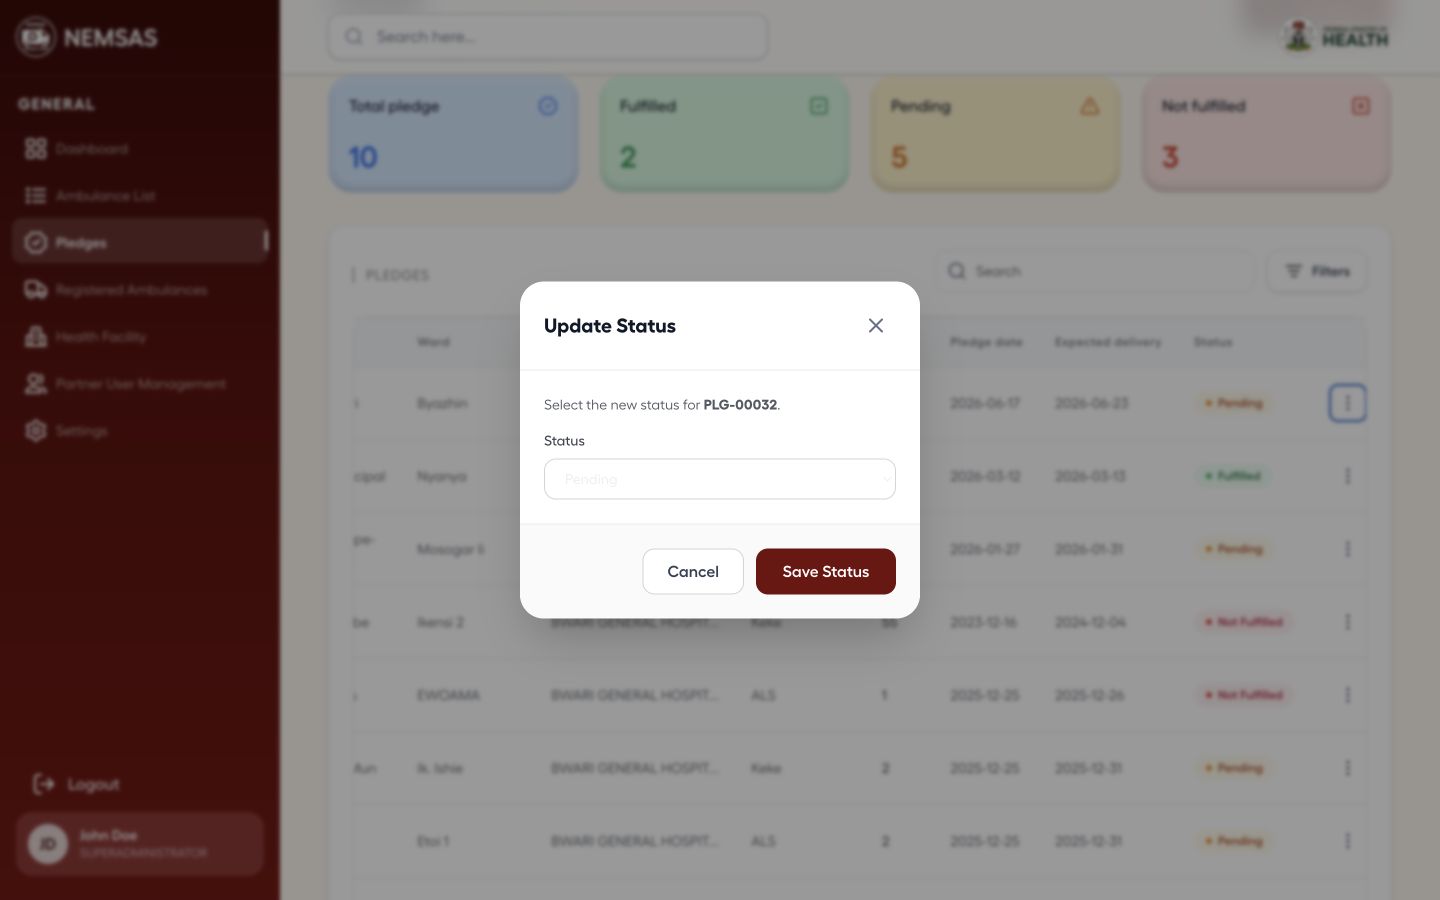
Open Update Status for the correct pledge and review Pending, Fulfilled and Not Fulfilled. Select and save a status only after comparing the record with verified evidence.

Update pledge status dialog with Pending, Fulfilled and Not Fulfilled options

1 — Status selector · 2 — Save Status button.

Update pledge status dialog with Pending, Fulfilled and Not Fulfilled options

Important: Saving changes the official pledge status. Verify the evidence and selected record first.

Done. You can distinguish Pending, Fulfilled and Not Fulfilled and know where an authorized update is made.

If something goes wrong

Update Status is unavailable.

Confirm that you are signed in as a Connect administrator and that the record is eligible for a status change.

Partner user management

Review Connect partner users

Search partner accounts and review their role, contact and verification details.

Connect administrators 4 min read Web

Before you start

  • Connect administrator access
  • A partner name, email or organization

Search the partner-user register

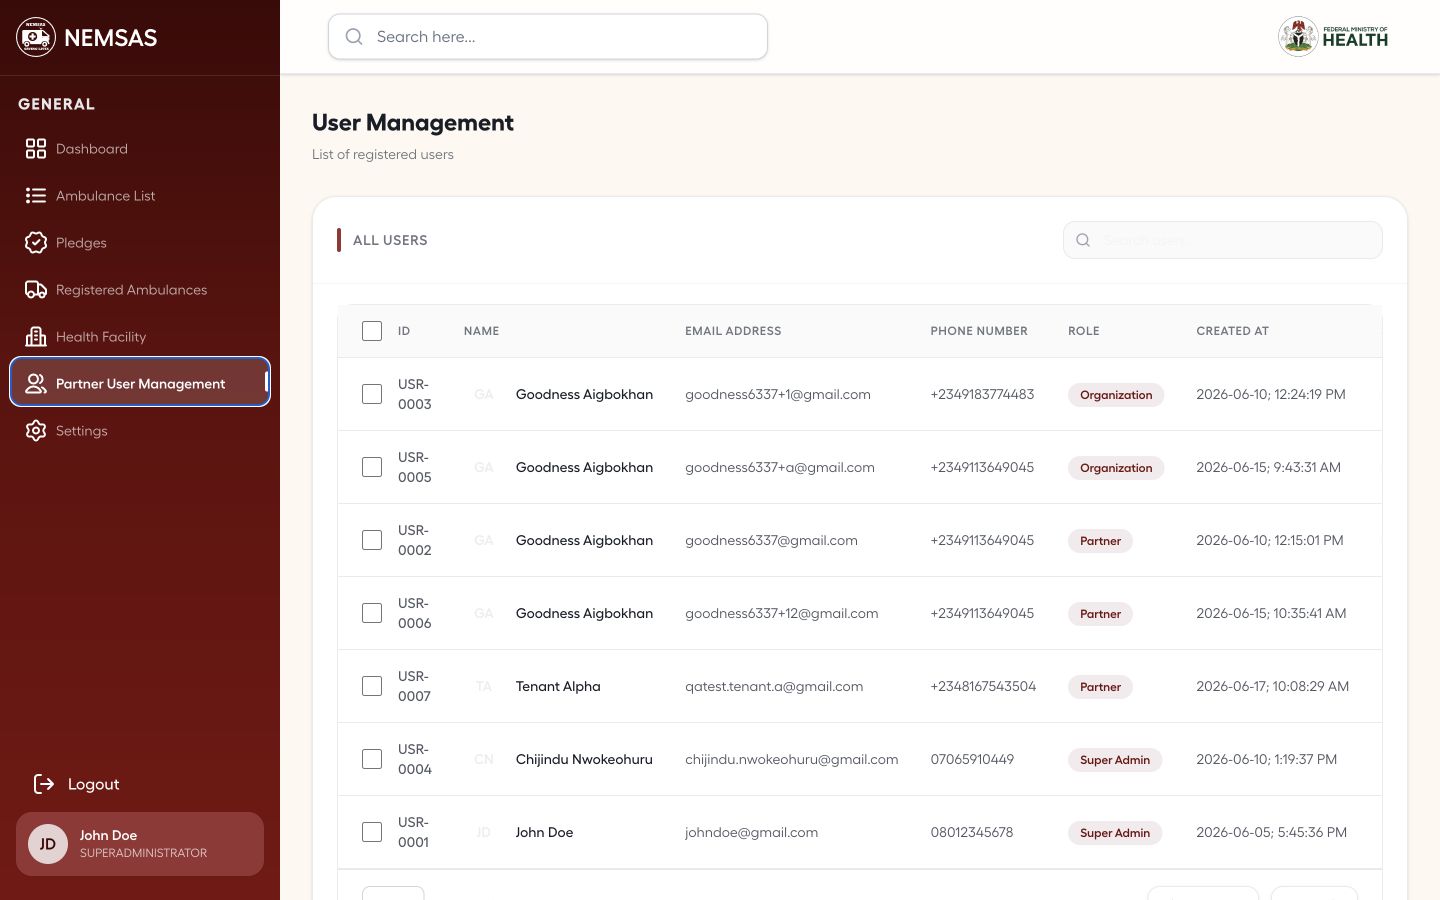
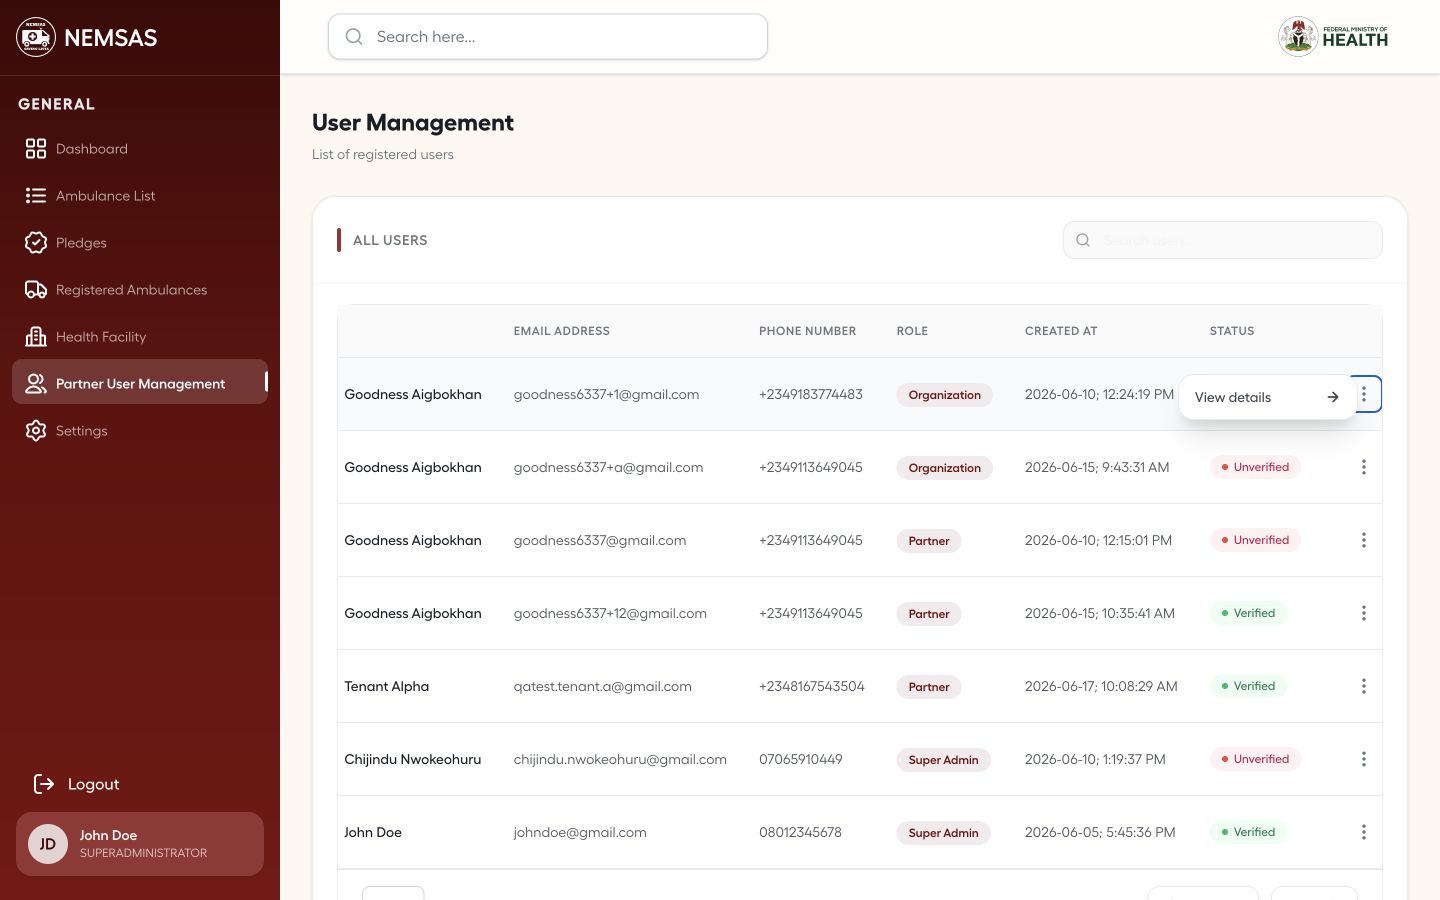
Open Partner User Management and use Search users to locate the account. Compare role, creator and verification status before opening it.

Connect Partner User Management list with search, roles and verification statuses

1 — Search users field.

Connect Partner User Management list with search, roles and verification statuses

Open the row action

Open the action menu on the matching user row and select View details.

Partner user row with View details action open

1 — View details action.

Partner user row with View details action open

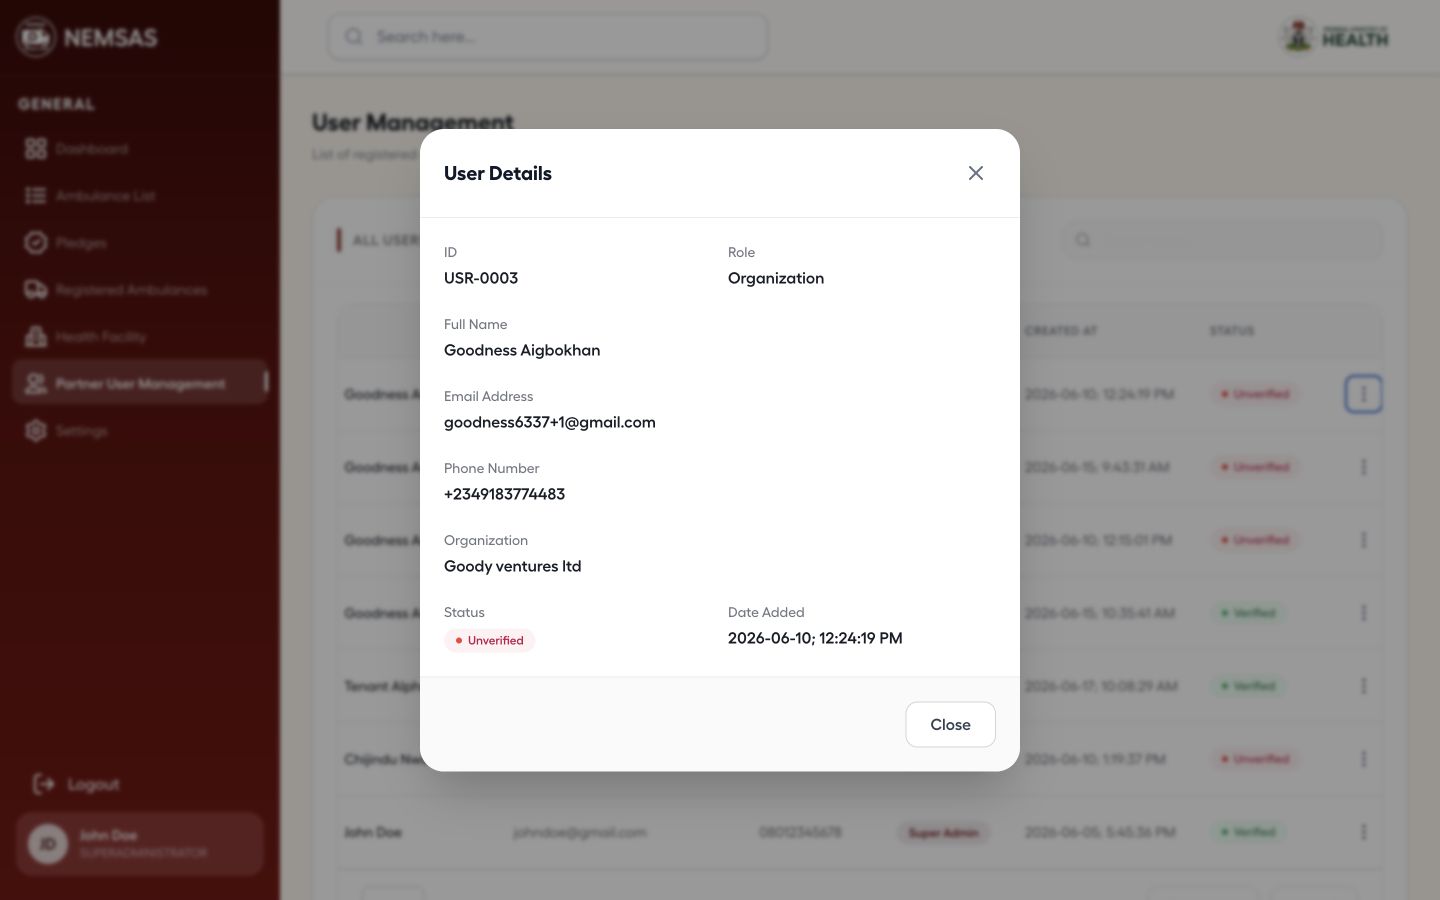
Review the user details

Confirm the identifier, role, name, email, phone number, organization, creator, creation date and verification state.

Partner user details dialog with role, contact, organization and verification status

1 — identifier and role · 2 — account and organization details · 3 — verification and creation details.

Partner user details dialog with role, contact, organization and verification status

Access: This workspace provides view-only access to partner user records.

Done. You have verified the selected partner's identity, role, contact and account status.

If something goes wrong

Partner User Management is absent.

The workspace is restricted to Connect administrators and does not appear for Partner accounts.

Ambulance registration

Prepare an ambulance registration

Complete the five-stage ambulance form and prepare the supporting documents for submission.

Connect partners 12–18 min read Web

Before you start

  • Vehicle, driver and ownership details
  • Accreditation type and operating location
  • Technical and equipment information
  • Roadworthiness, inspection and insurance records
  • Roadworthiness, licence and insurance files in PDF, JPG or PNG under 1 MB each

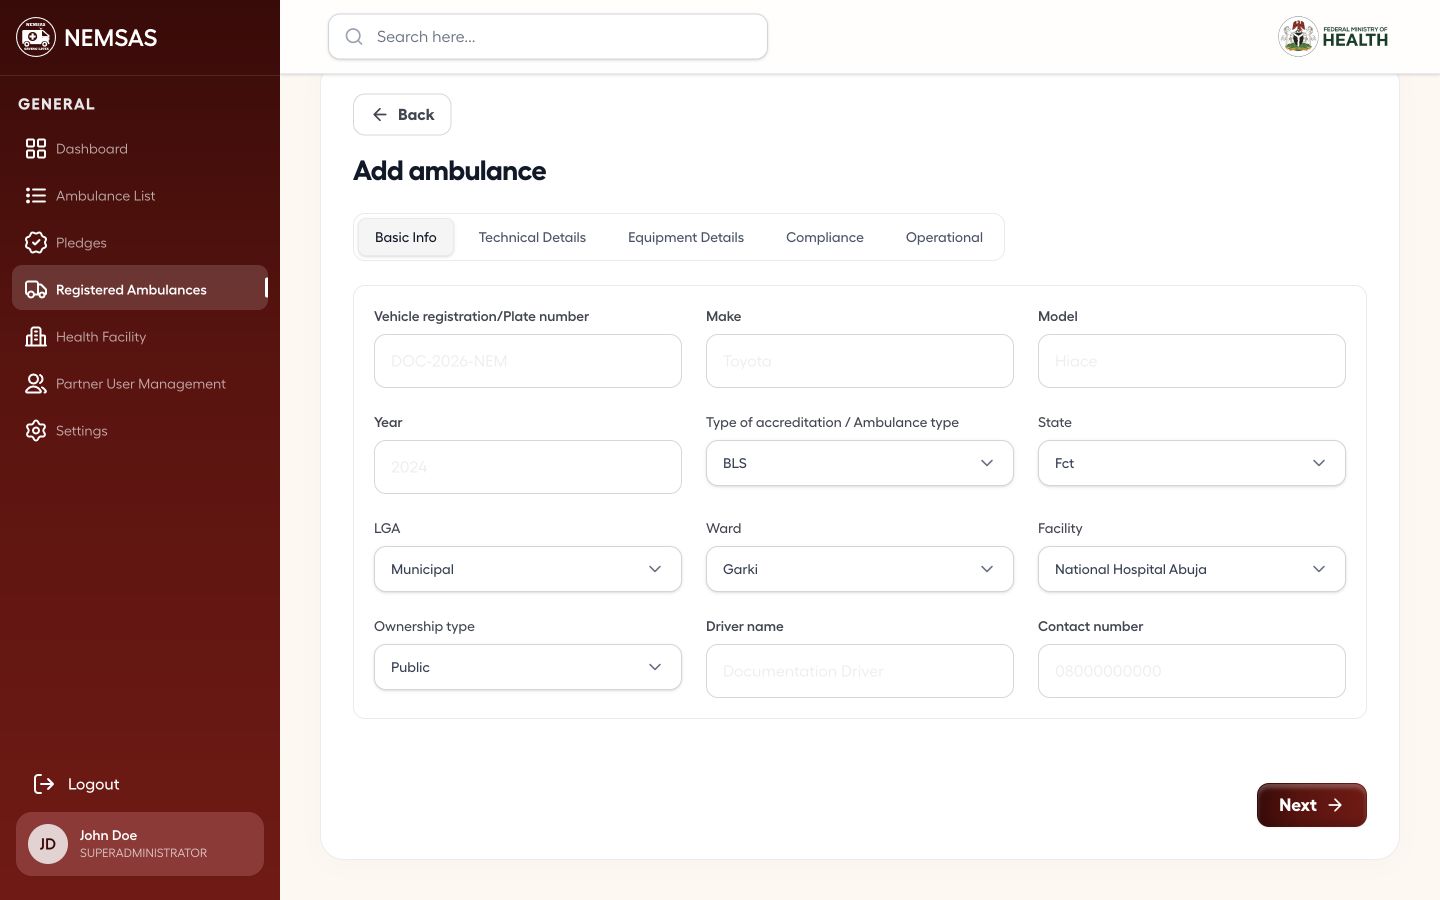
Enter the basic information

Select Add Ambulance and complete the registration, make, model, year, accreditation type, State, LGA, Ward, Facility, ownership, driver and contact fields.

Add ambulance Basic Info stage populated with demonstration vehicle, location, ownership and driver details

1 — vehicle details · 2 — year, type and State fields · 3 — location, ownership and driver fields.

Add ambulance Basic Info stage populated with demonstration vehicle, location, ownership and driver details

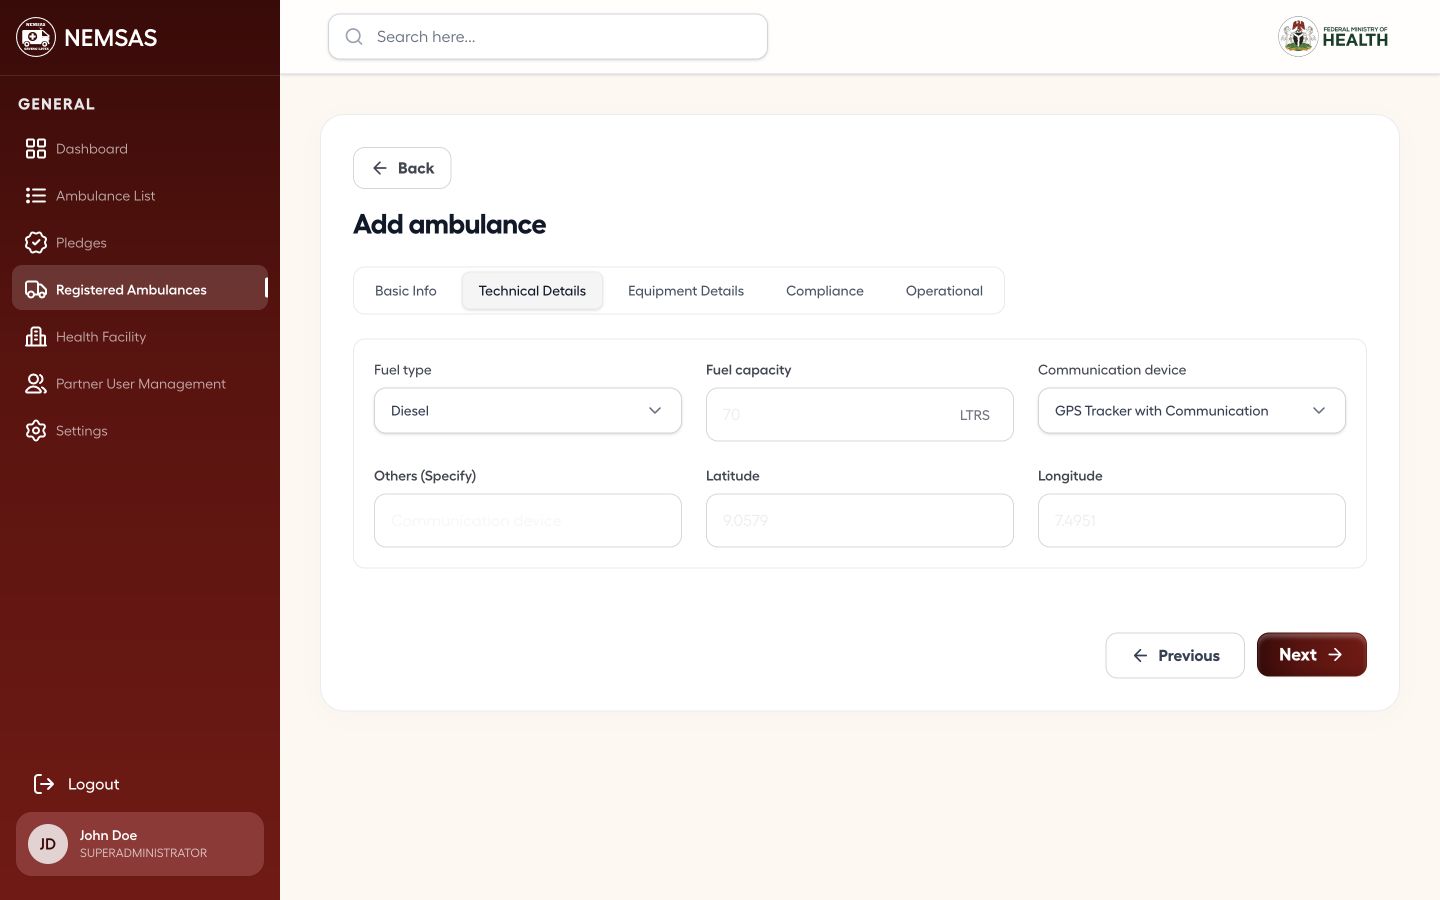
Configure the technical details

Select the fuel type, enter fuel capacity, choose the communication device and record the operating coordinates.

Add ambulance Technical Details stage populated with fuel, communications and coordinates

1 — fuel type and capacity · 2 — communication device field · 3 — operating coordinates.

Add ambulance Technical Details stage populated with fuel, communications and coordinates

Add the carried equipment

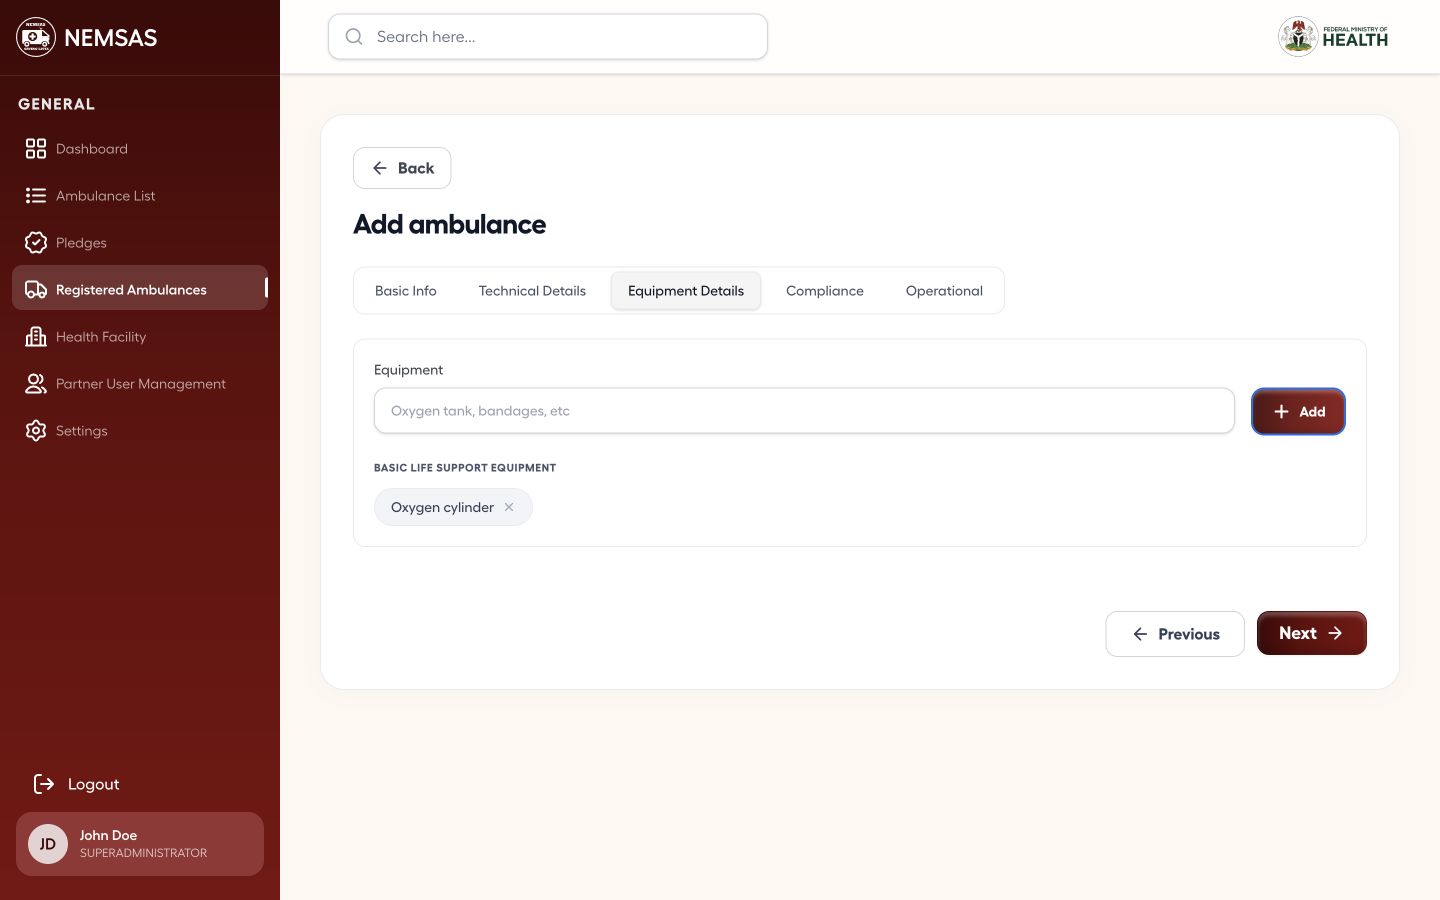
On Equipment Details, describe the life-support equipment carried by the vehicle and select Add so the entry appears in the list.

Add ambulance Equipment Details stage with a demonstration life-support equipment entry

1 — equipment field · 2 — Add button · 3 — added equipment item.

Add ambulance Equipment Details stage with a demonstration life-support equipment entry

Record compliance details

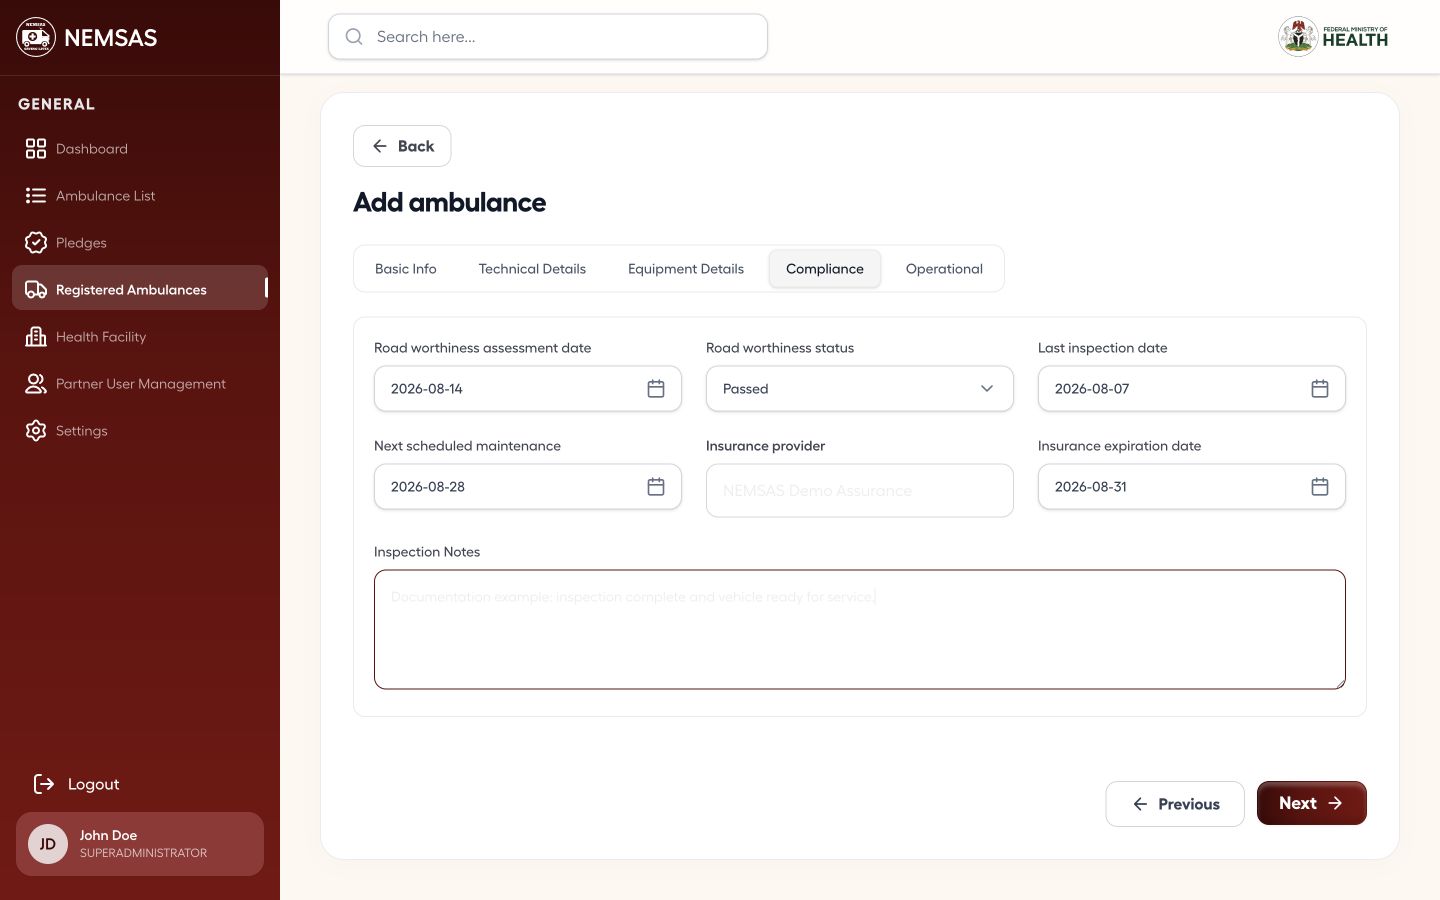
Enter the roadworthiness assessment, status, inspection date, next maintenance, insurer, insurance expiry and inspection notes.

Add ambulance Compliance stage populated with assessment, inspection, maintenance and insurance details

1 — assessment, status and inspection · 2 — maintenance and insurance details · 3 — inspection notes.

Add ambulance Compliance stage populated with assessment, inspection, maintenance and insurance details

Prepare the operational documents

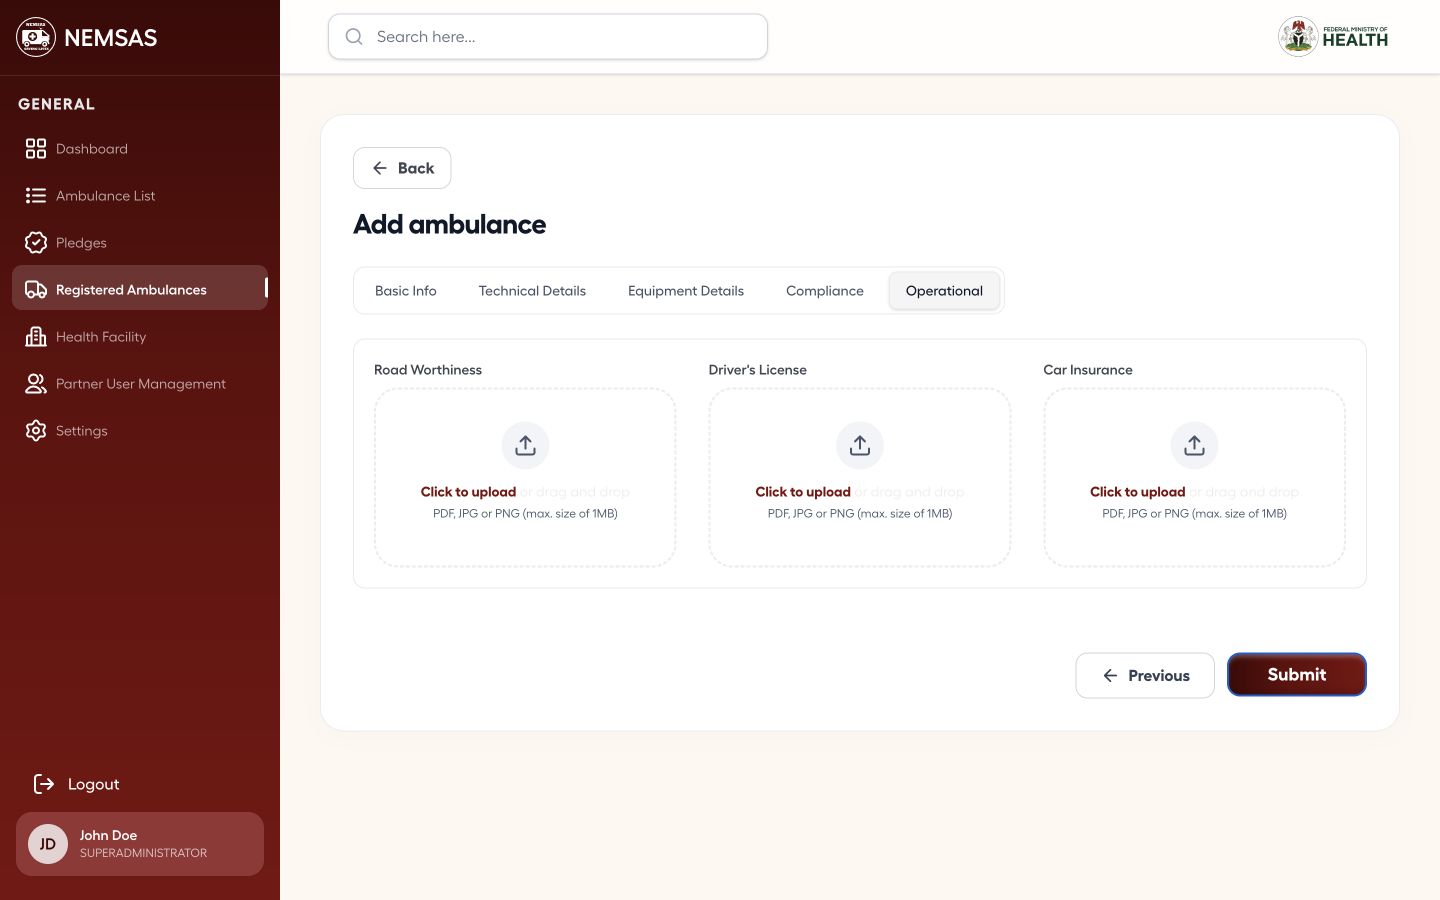
On Operational, attach the roadworthiness document, driver's licence and vehicle insurance, then review every stage before selecting Submit.

Add ambulance Operational stage showing the three required document upload controls and Submit

1 — operational document uploads · 2 — Submit button.

Add ambulance Operational stage showing the three required document upload controls and Submit

Important: Submit creates the registration request. Confirm the files and all earlier stages first.

Done. All five registration stages are prepared and the Submit control is visible. No registration is created until you submit.

If something goes wrong

A location or facility option is empty.

Select State, LGA and Ward in order, waiting for each dependent list before continuing.

A document does not upload.

Confirm that it is a PDF, JPG or PNG and no larger than 1 MB.

Facility registration

Prepare a health facility request

Enter a facility's identity, address, type and state location before requesting registration.

Connect partners 5 min read Web

Before you start

  • Facility name and NHIA or SHIA identifier
  • Location, landmark and address
  • Facility type, state and LGA

Enter and review the facility details

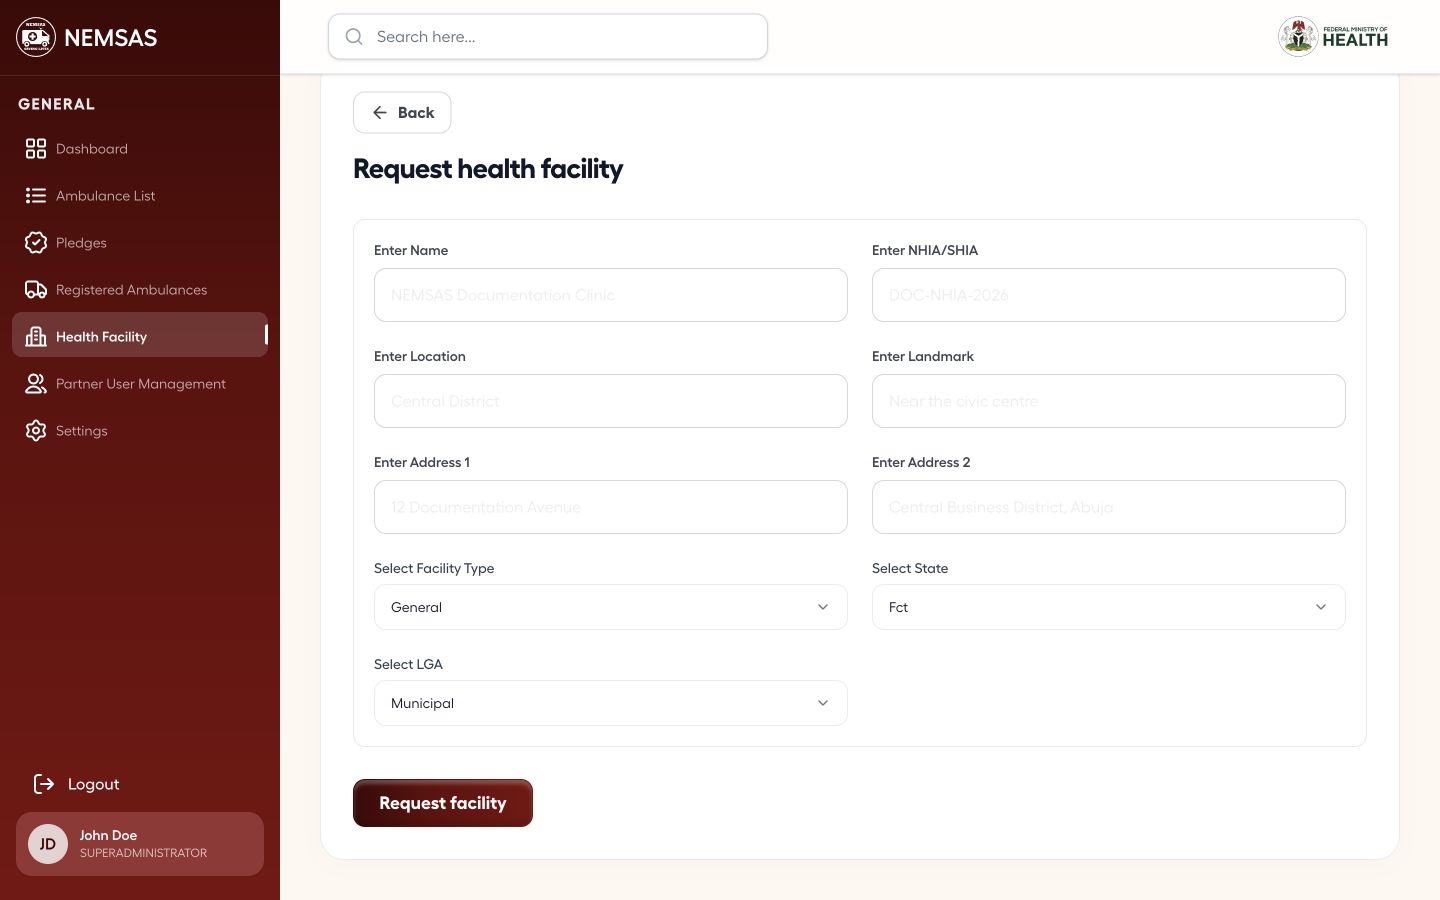
From Health Facility, select Add Facility. Enter the name, NHIA or SHIA identifier, location, landmark and addresses, then select the facility type, State and LGA. Review the form before selecting Request facility.

Request health facility form populated with demonstration identity, address, type and location details

1 — facility identity and address fields · 2 — facility type, State and LGA · 3 — Request facility button.

Request health facility form populated with demonstration identity, address, type and location details

Done. The facility request is fully prepared. It is not created until Request facility is selected.

If something goes wrong

The LGA list is empty.

Select the State first and wait for the LGA list to load.

Pledges

Prepare a new ambulance pledge

Record a donor's proposed ambulance contribution and delivery details.

Connect partners 5 min read Web

Before you start

  • Donor and contact details
  • Ambulance type and quantity
  • Destination location, facility and delivery date

Review the pledge register

Open Pledges, compare existing donor records and statuses to avoid a duplicate, then select New Pledge.

NEMSAS Connect pledge register with donor records, dates, quantities and statuses

1 — New Pledge button.

NEMSAS Connect pledge register with donor records, dates, quantities and statuses

Enter and review the pledge

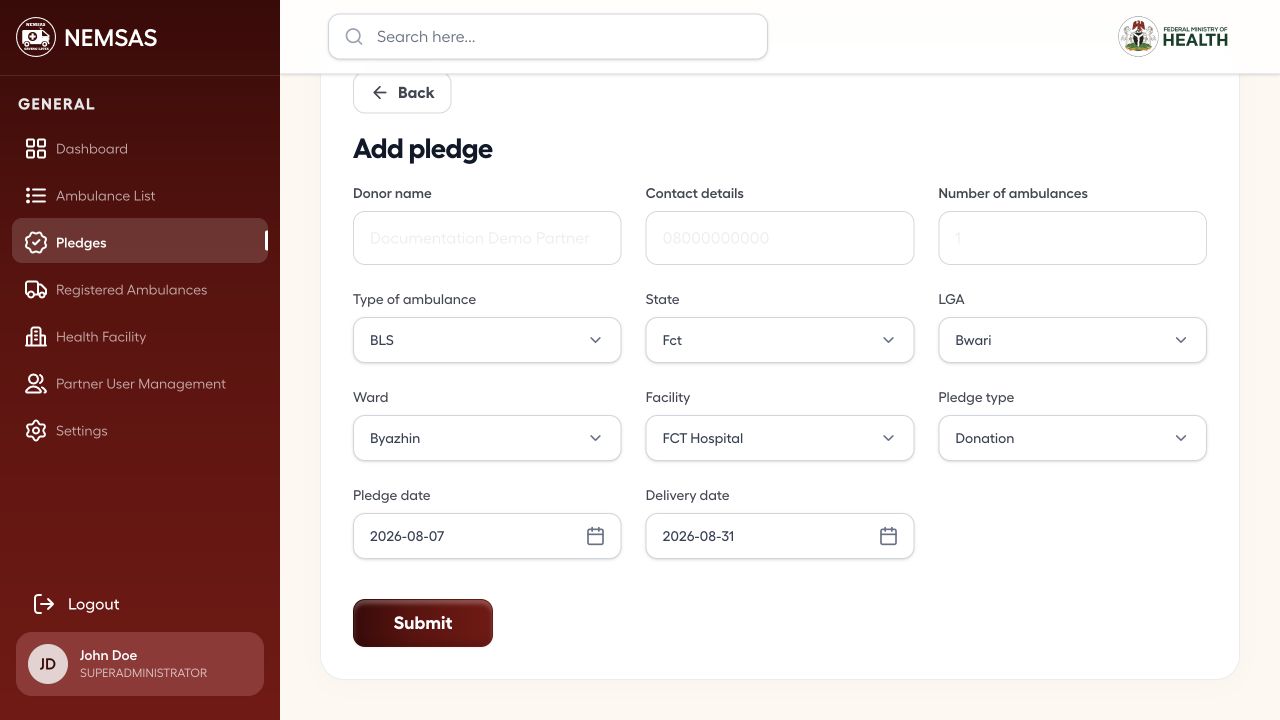
Enter the donor, contact, quantity, ambulance type, State, LGA, Ward, Facility, pledge type and dates. Review every field before selecting Submit.

Add pledge form populated with demonstration donor, ambulance, location, facility and delivery details

1 — donor, contact and quantity · 2 — ambulance, location and pledge details · 3 — Submit button.

Add pledge form populated with demonstration donor, ambulance, location, facility and delivery details

Important: Submit creates the pledge record. Use accurate donor and delivery information.

Done. The pledge is ready for submission and will appear in the pledge register after it is submitted.

If something goes wrong

A location or facility list is empty.

Select State, LGA and Ward in order, then reopen the Facility list.

The donor already appears in the register.

Compare the quantity, destination and dates before creating another pledge.

Mobile getting started

Sign in and read the Ambulance App home screen

Access the assigned ambulance workspace and interpret the incident and claim summaries.

Ambulance user 3 min read Mobile

Before you start

  • The installed NEMSAS Ambulance App
  • An active Ambulance User account
  • Network access

Open the mobile sign-in screen

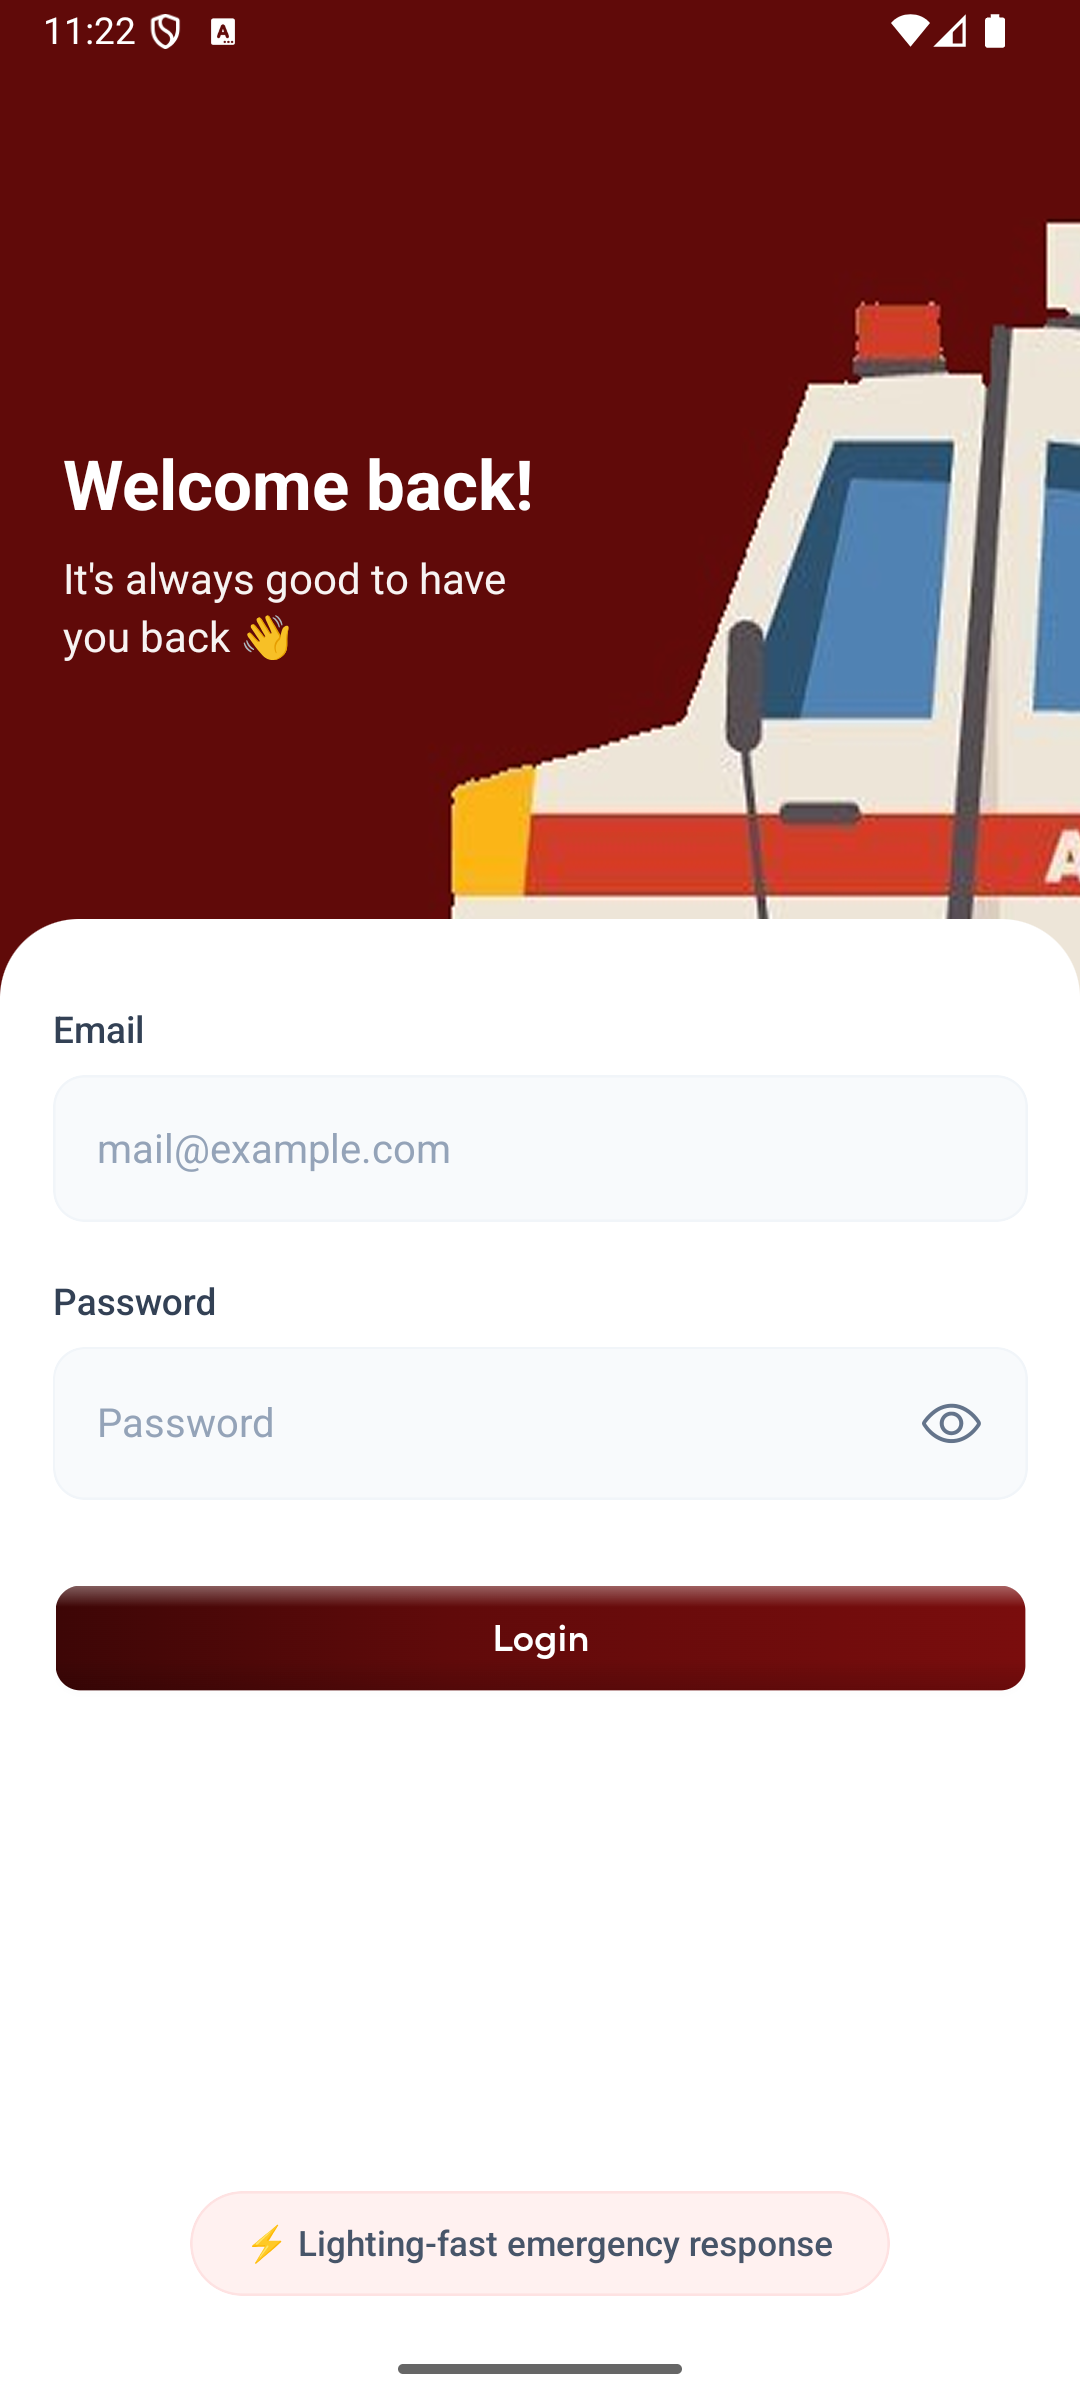
Launch the NEMSAS Ambulance App, enter the assigned Email and Password, then select Login.

NEMSAS Ambulance App sign-in screen with email, password and Login controls

1 — Email field · 2 — Password field · 3 — Login button.

NEMSAS Ambulance App sign-in screen with email, password and Login controls

Confirm the assigned ambulance workspace

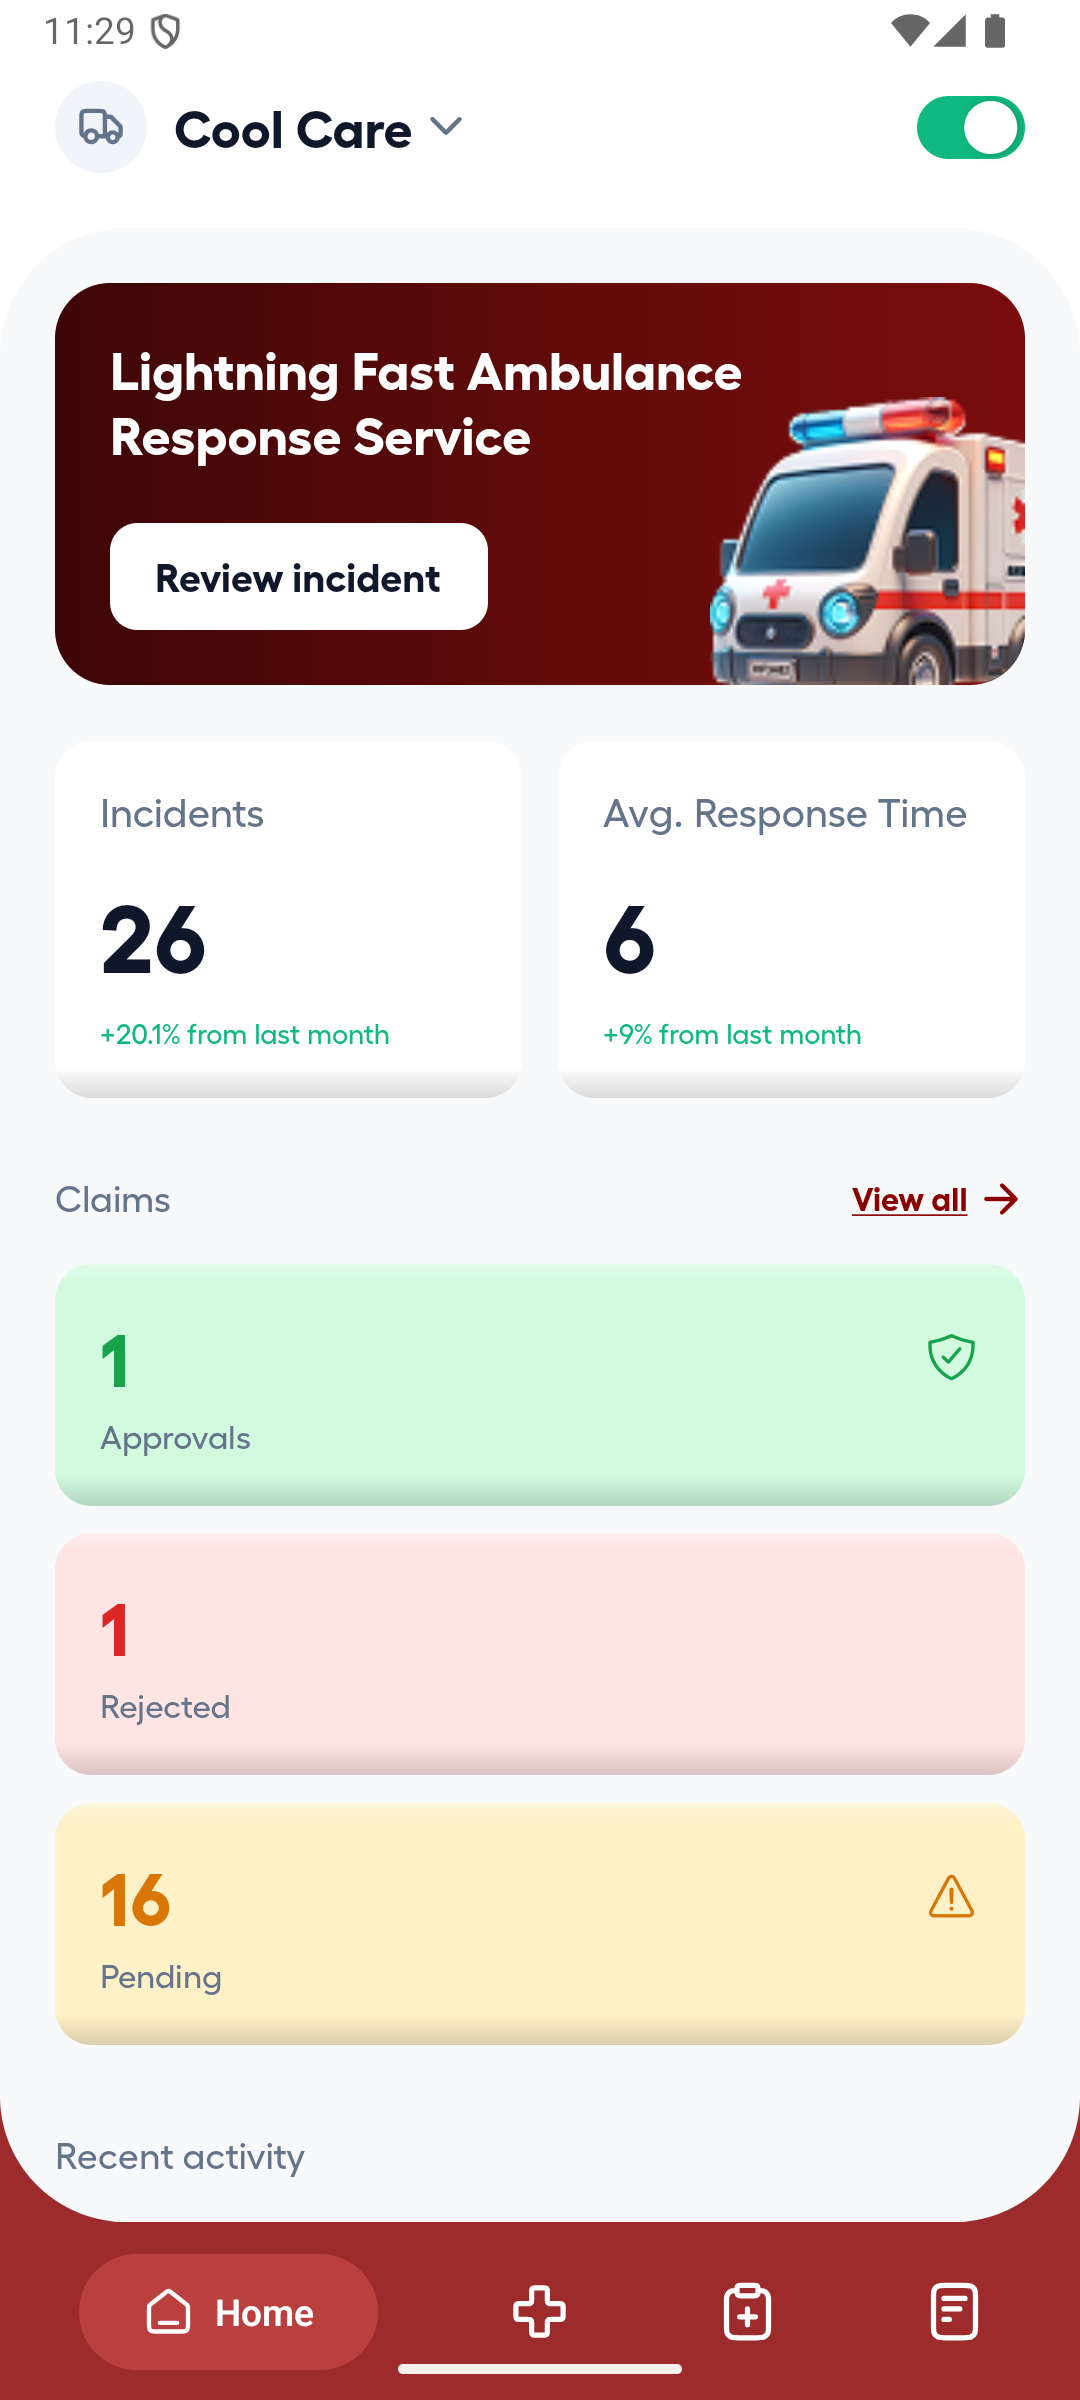
After Login succeeds, confirm the ambulance name and availability toggle, then review incident count, average response time, claim approvals, rejections and pending items.

NEMSAS Ambulance App Home screen with assigned ambulance, availability, incident and claim summary cards

1 — ambulance name and availability · 2 — incident and response metrics · 3 — claim status cards.

NEMSAS Ambulance App Home screen with assigned ambulance, availability, incident and claim summary cards

Done. You are signed in and can see the assigned ambulance, incident summary and claim statuses.

If something goes wrong

The app reports an incorrect email or password.

Re-enter the assigned details carefully and ask an administrator to confirm that the mobile account is active. Do not repeatedly guess passwords.

Mobile incidents

Review and respond to assigned incidents

Review assigned incident statuses and verify patient, caller and destination details before accepting or rejecting a dispatch.

Ambulance user 4–6 min read Mobile

Before you start

  • An authenticated Ambulance App session
  • An assigned incident
  • Location permission when required by the operational process

Review incident statuses

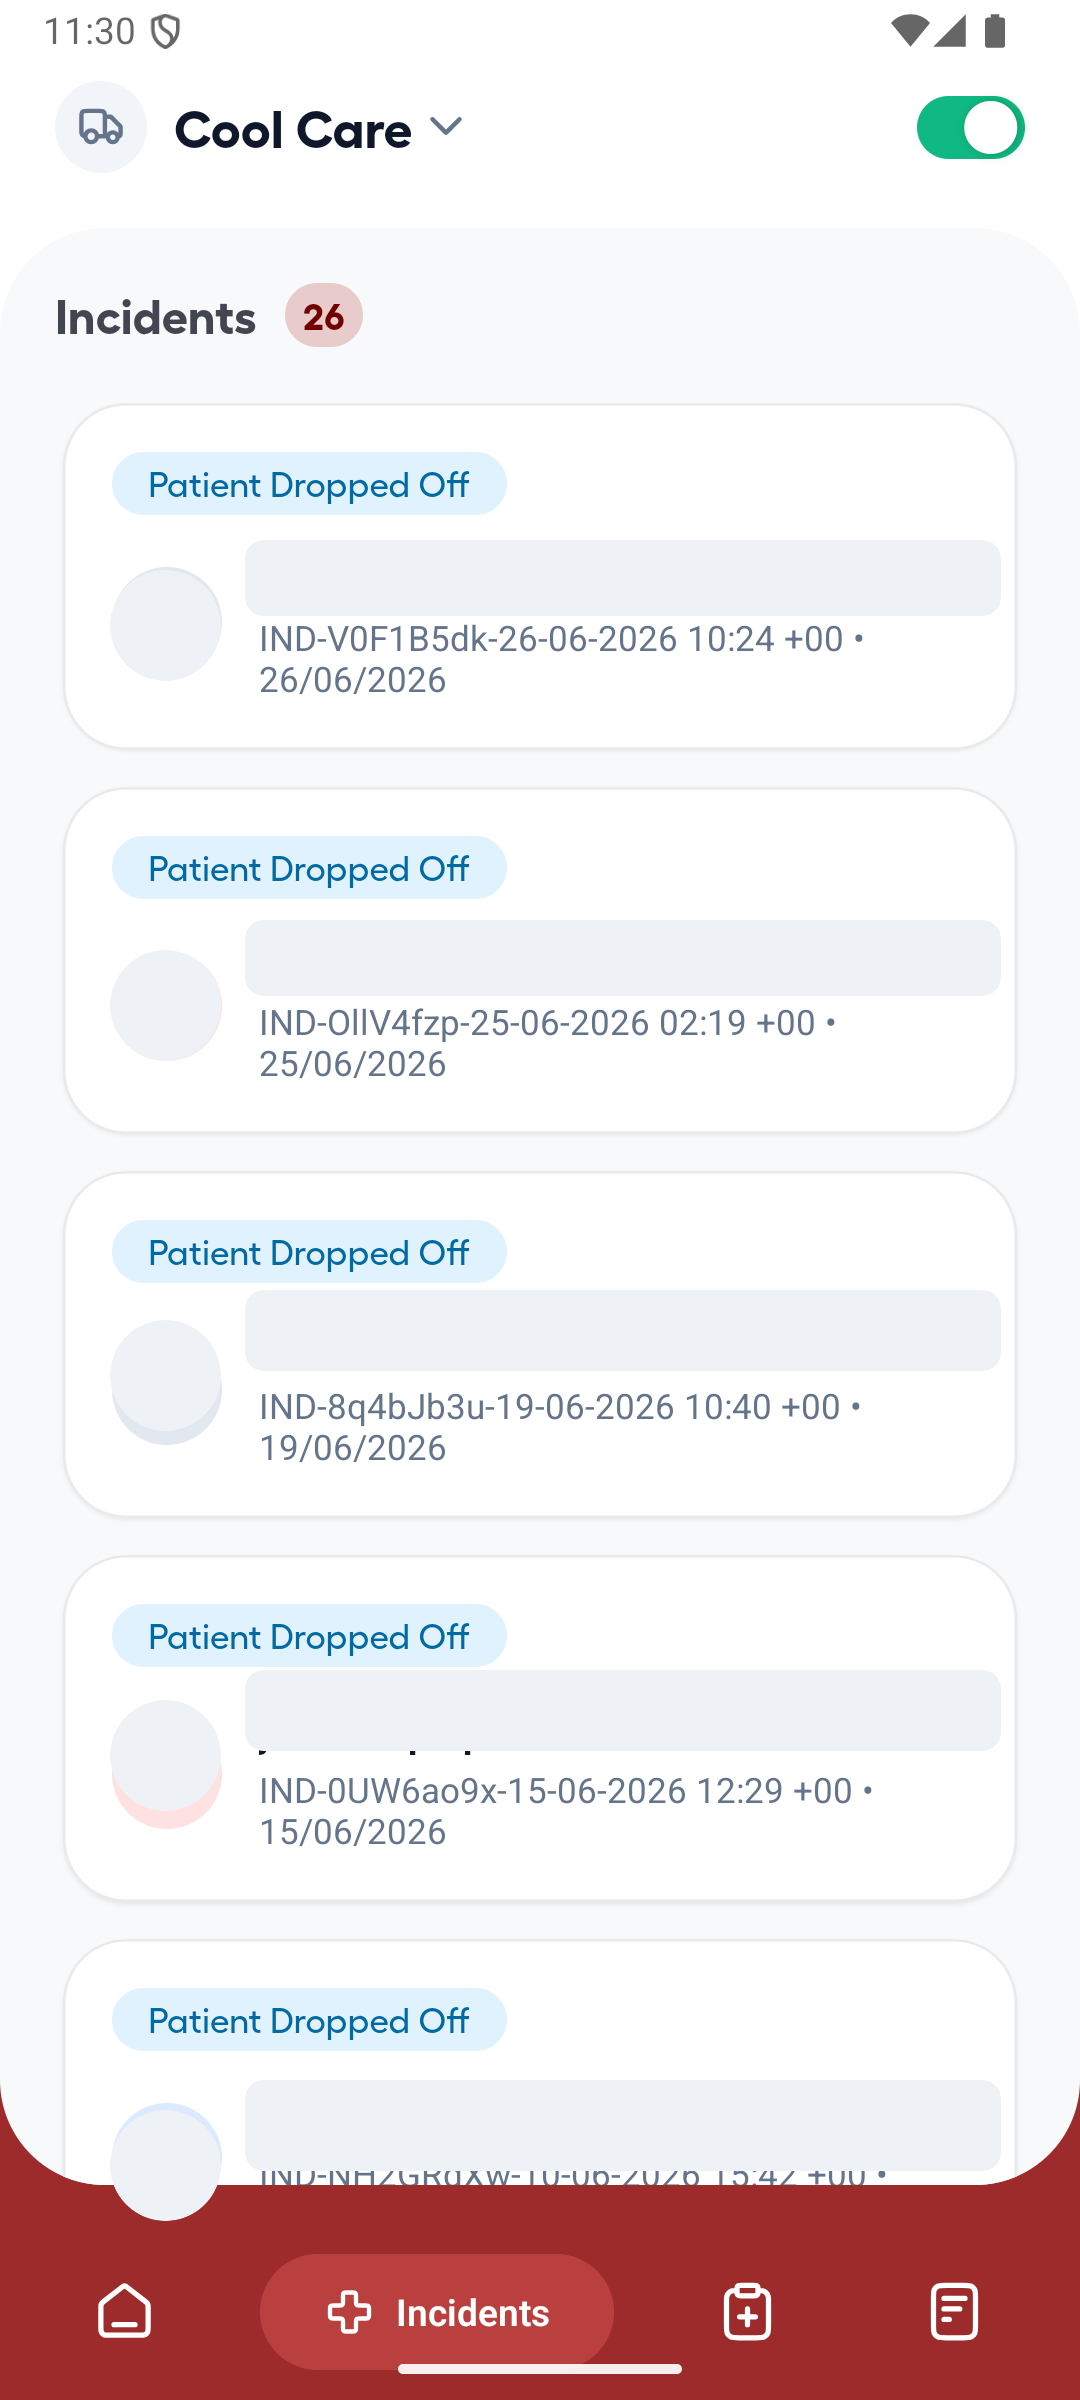
Open Incidents and compare the status, incident identifier and date. Patient names are obscured in the example for privacy.

Ambulance App incident list with patient names redacted and Patient Dropped Off statuses visible

1 — incident status · 2 — incident identifier and date.

Ambulance App incident list with patient names redacted and Patient Dropped Off statuses visible

Verify the dispatch before responding

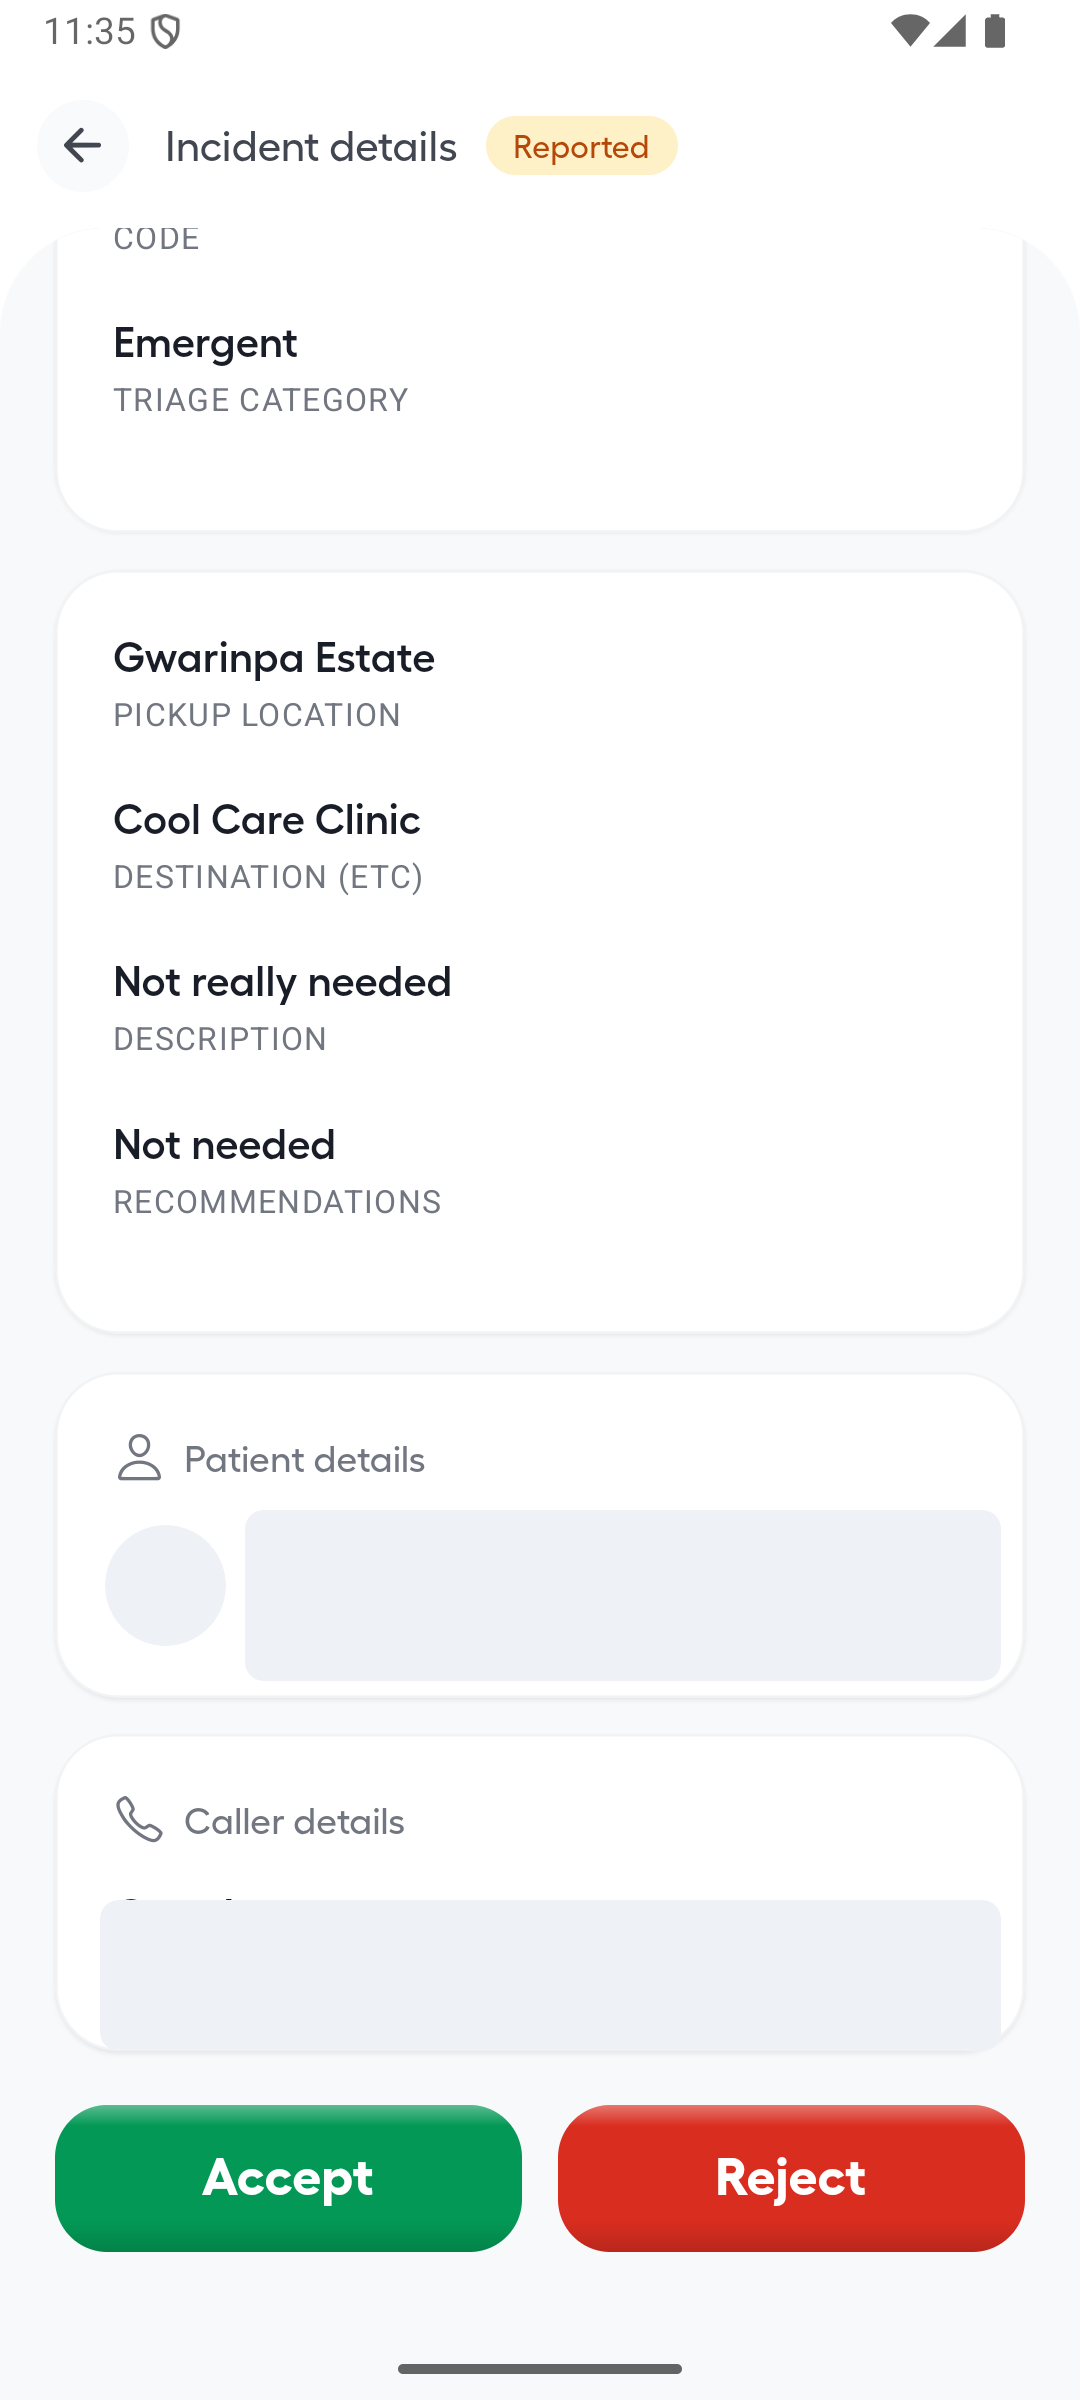
Open a Reported incident and review the triage category, pickup, destination, description, patient and caller details before choosing Accept or Reject.

Ambulance App reported incident details with personal values redacted and Accept and Reject controls visible

1 — triage category · 2 — pickup, destination and description · 3 — Accept and Reject buttons.

Ambulance App reported incident details with personal values redacted and Accept and Reject controls visible

Important: Accept and Reject change the operational dispatch. Select one only after verifying the incident and following dispatch procedure.

Done. You have verified the incident and identified the correct response control without changing the dispatch state.

If something goes wrong

The app requests location permission.

Follow your organization's location policy. Location may be needed for routing and response tracking; do not grant it on an unauthorized device.

Mobile run sheets

Review ambulance run sheets

Locate a completed route record and review its times, distance, status and price.

Ambulance user 3–5 min read Mobile

Before you start

  • An authenticated Ambulance App session
  • A completed or draft ambulance run

Open the run-sheet list

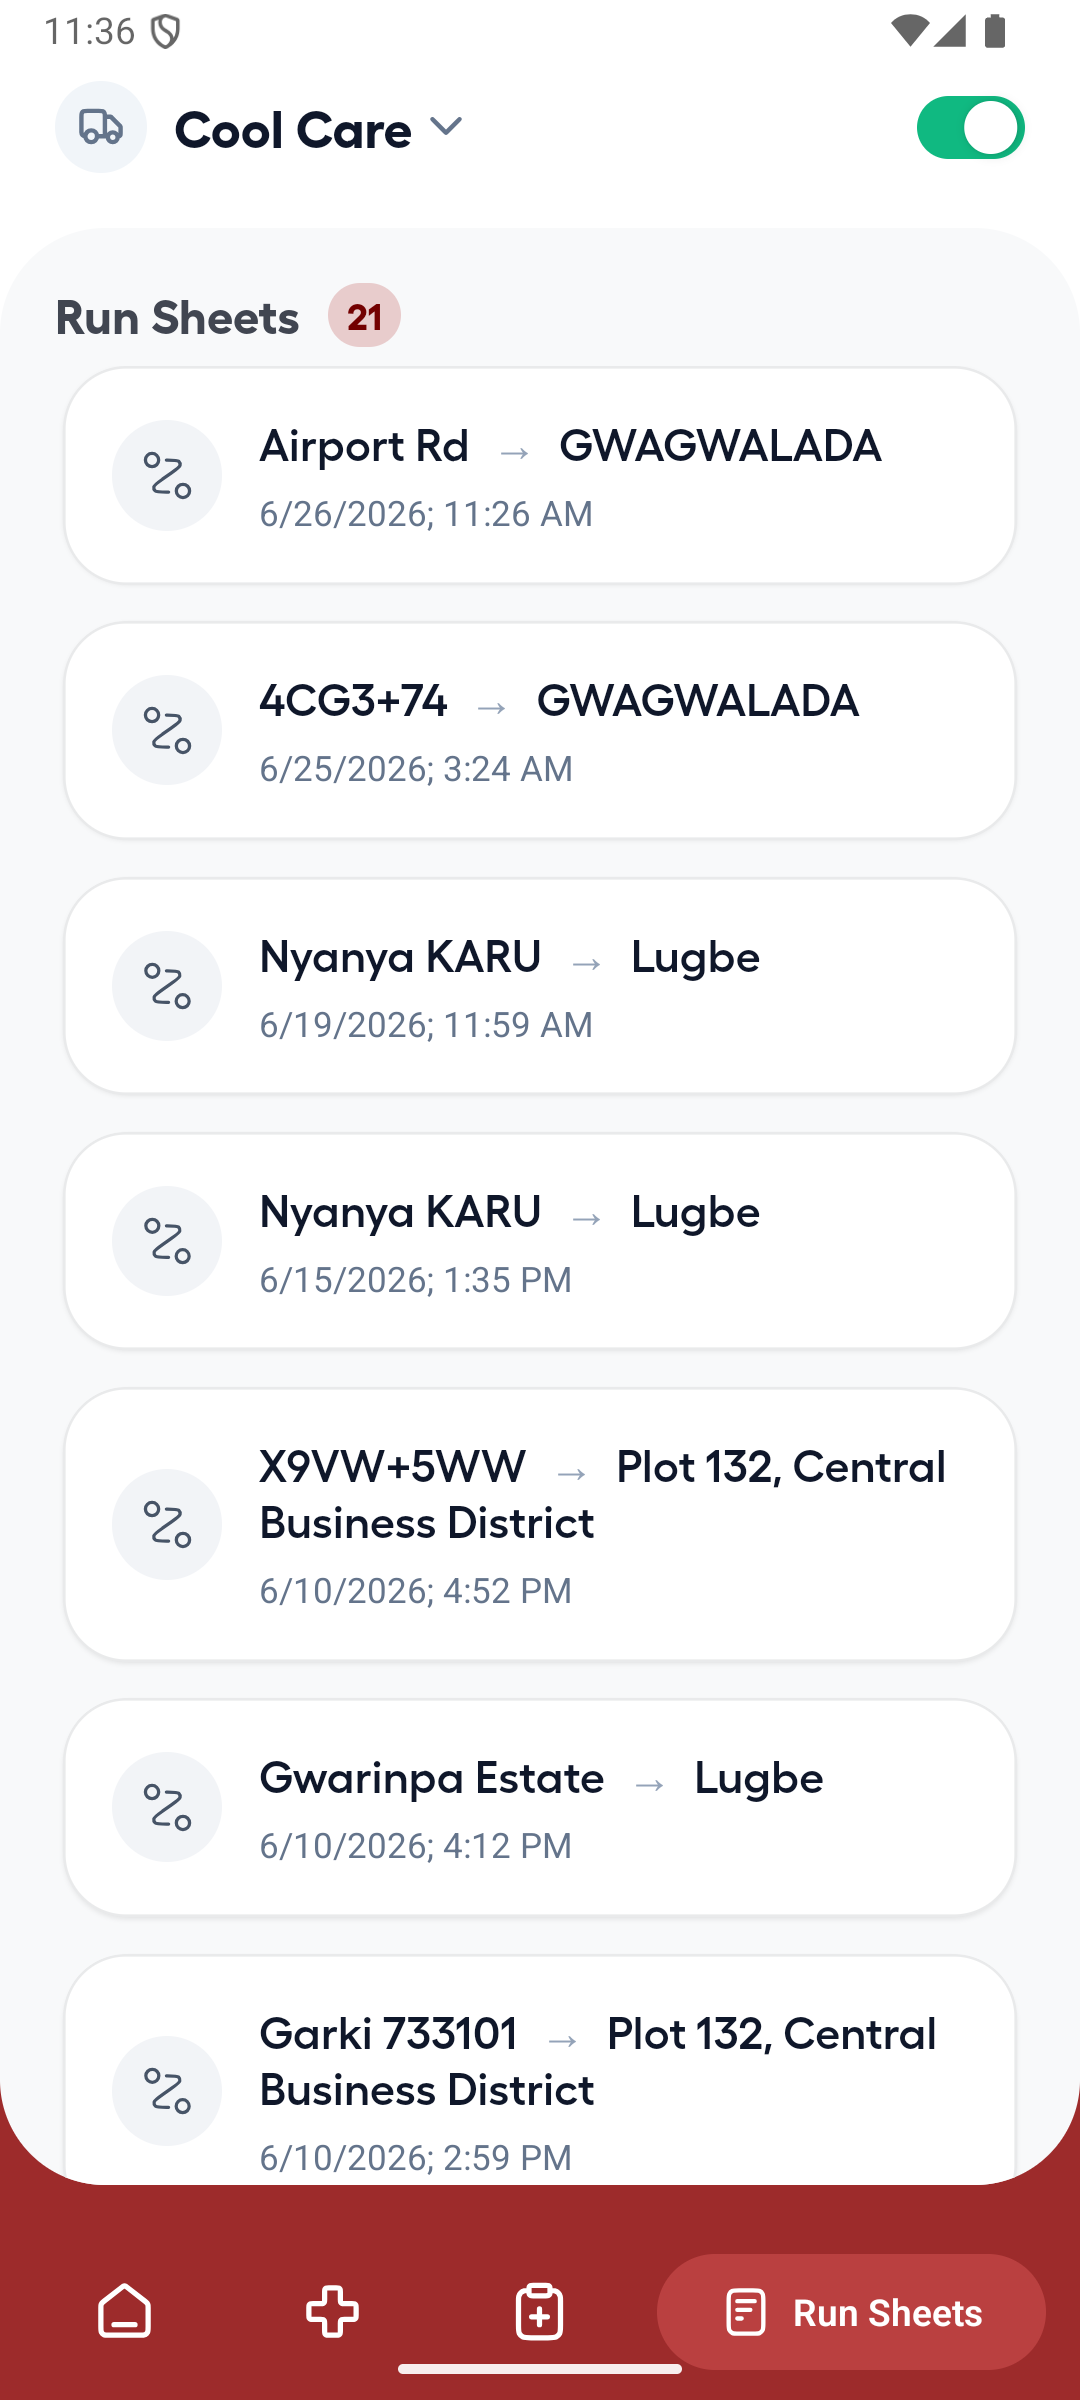
Select Run Sheets and locate the route using the origin, destination and timestamp.

Ambulance App Run Sheets list with route pairs and timestamps

1 — route and timestamp.

Ambulance App Run Sheets list with route pairs and timestamps

Review the run-sheet details

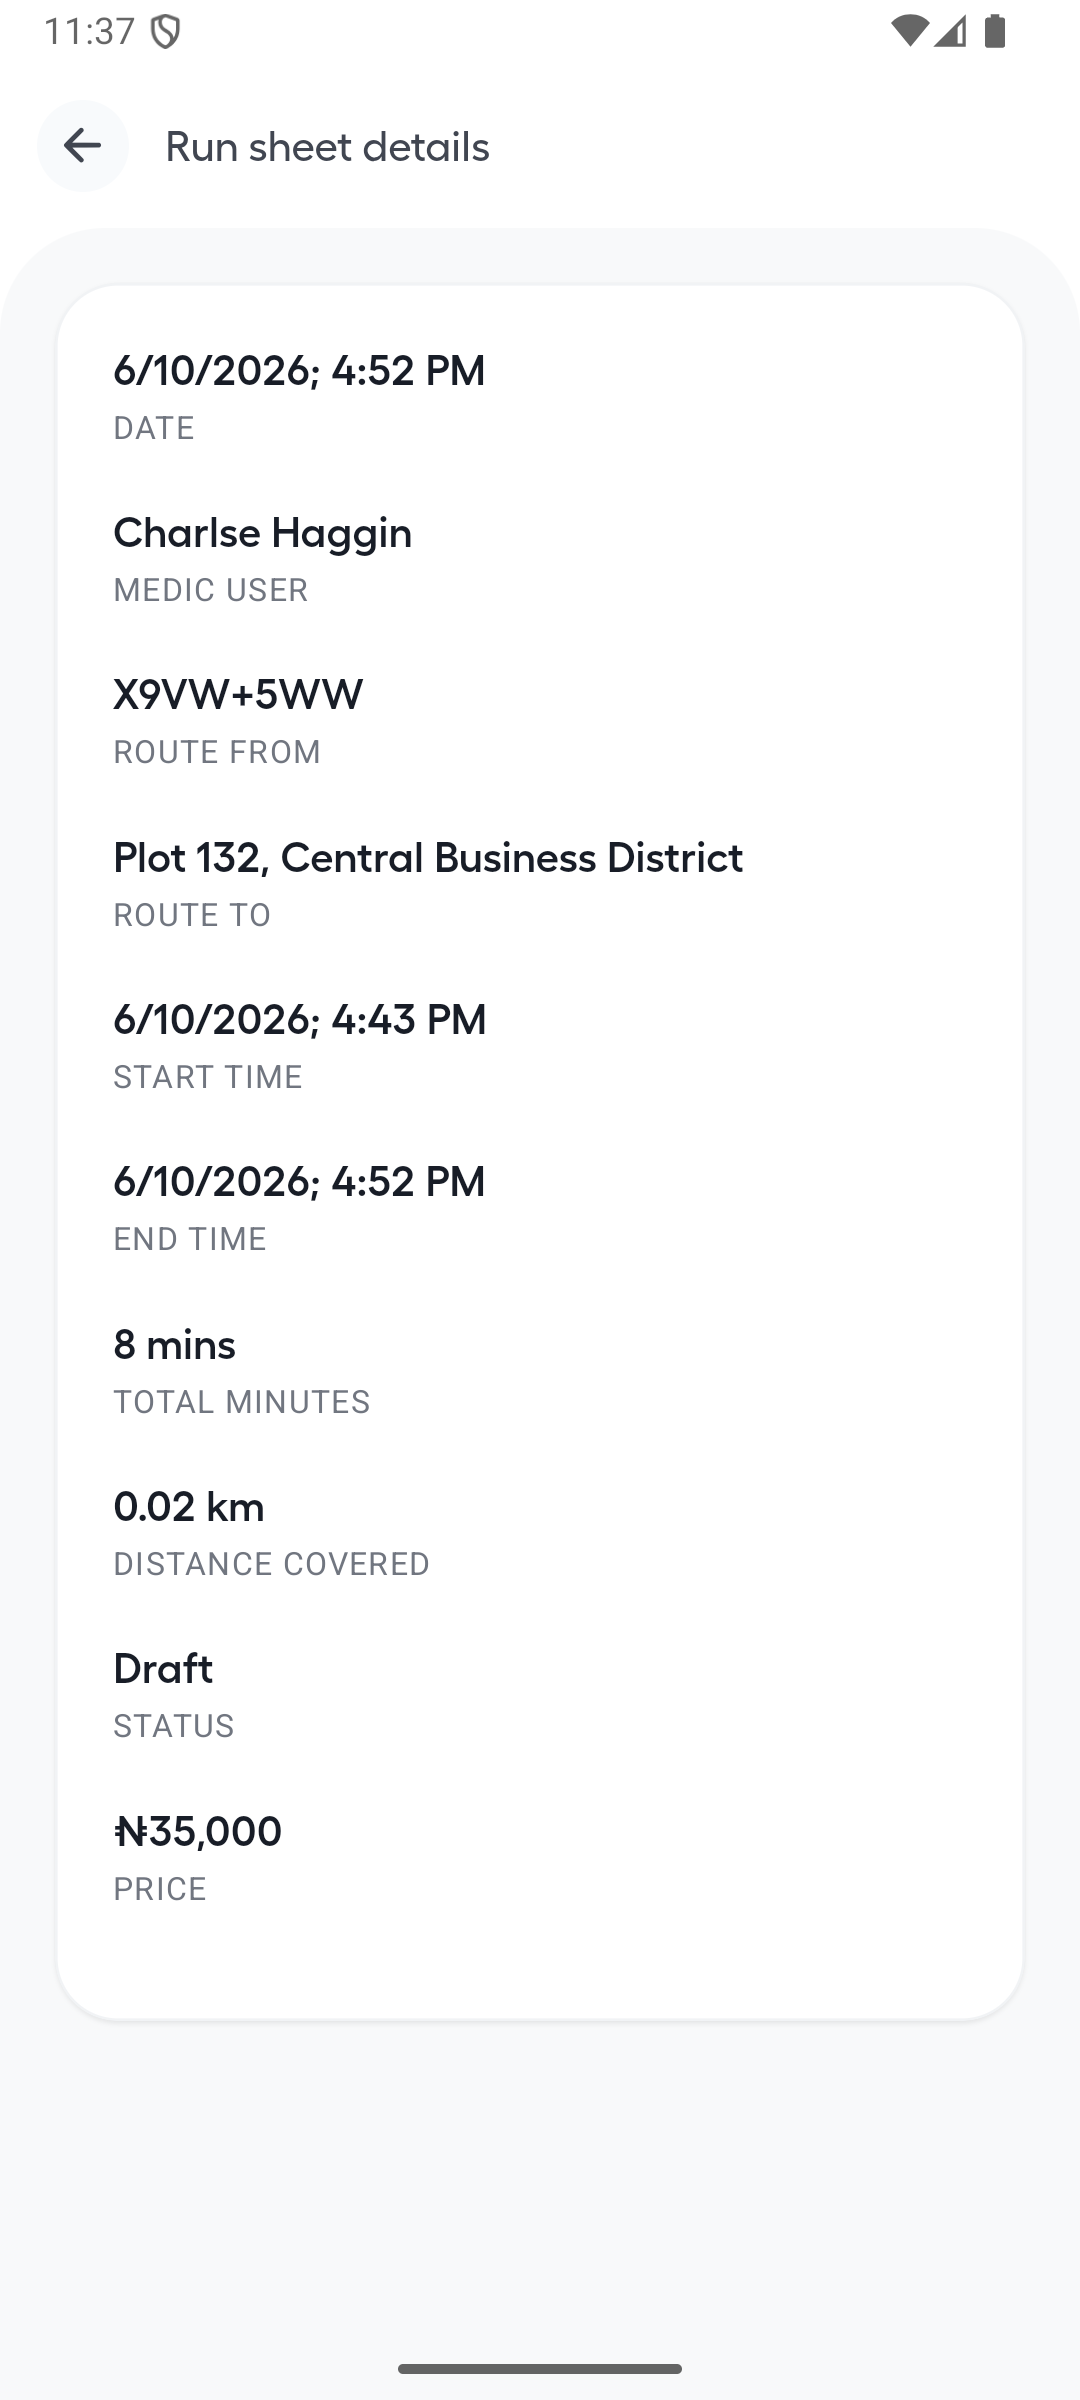
Open the matching run and verify the medic user, route, start and end times, duration, distance, status and price.

Ambulance App run-sheet details with route, times, duration, distance, draft status and price

1 — medic user · 2 — route · 3 — time, distance, status and price.

Ambulance App run-sheet details with route, times, duration, distance, draft status and price

Done. You have verified the selected run's route, time, distance, status and price.

If something goes wrong

A completed incident has no run sheet.

Confirm that all required trip stages were recorded. Escalate a missing generated run sheet to the platform administrator.

Mobile claims

Review ambulance claims

Review claim history, system-calculated amounts and any claim-review note.

Ambulance user 4–6 min read Mobile

Before you start

  • An authenticated Ambulance App session
  • A generated ambulance claim

Review the claims list

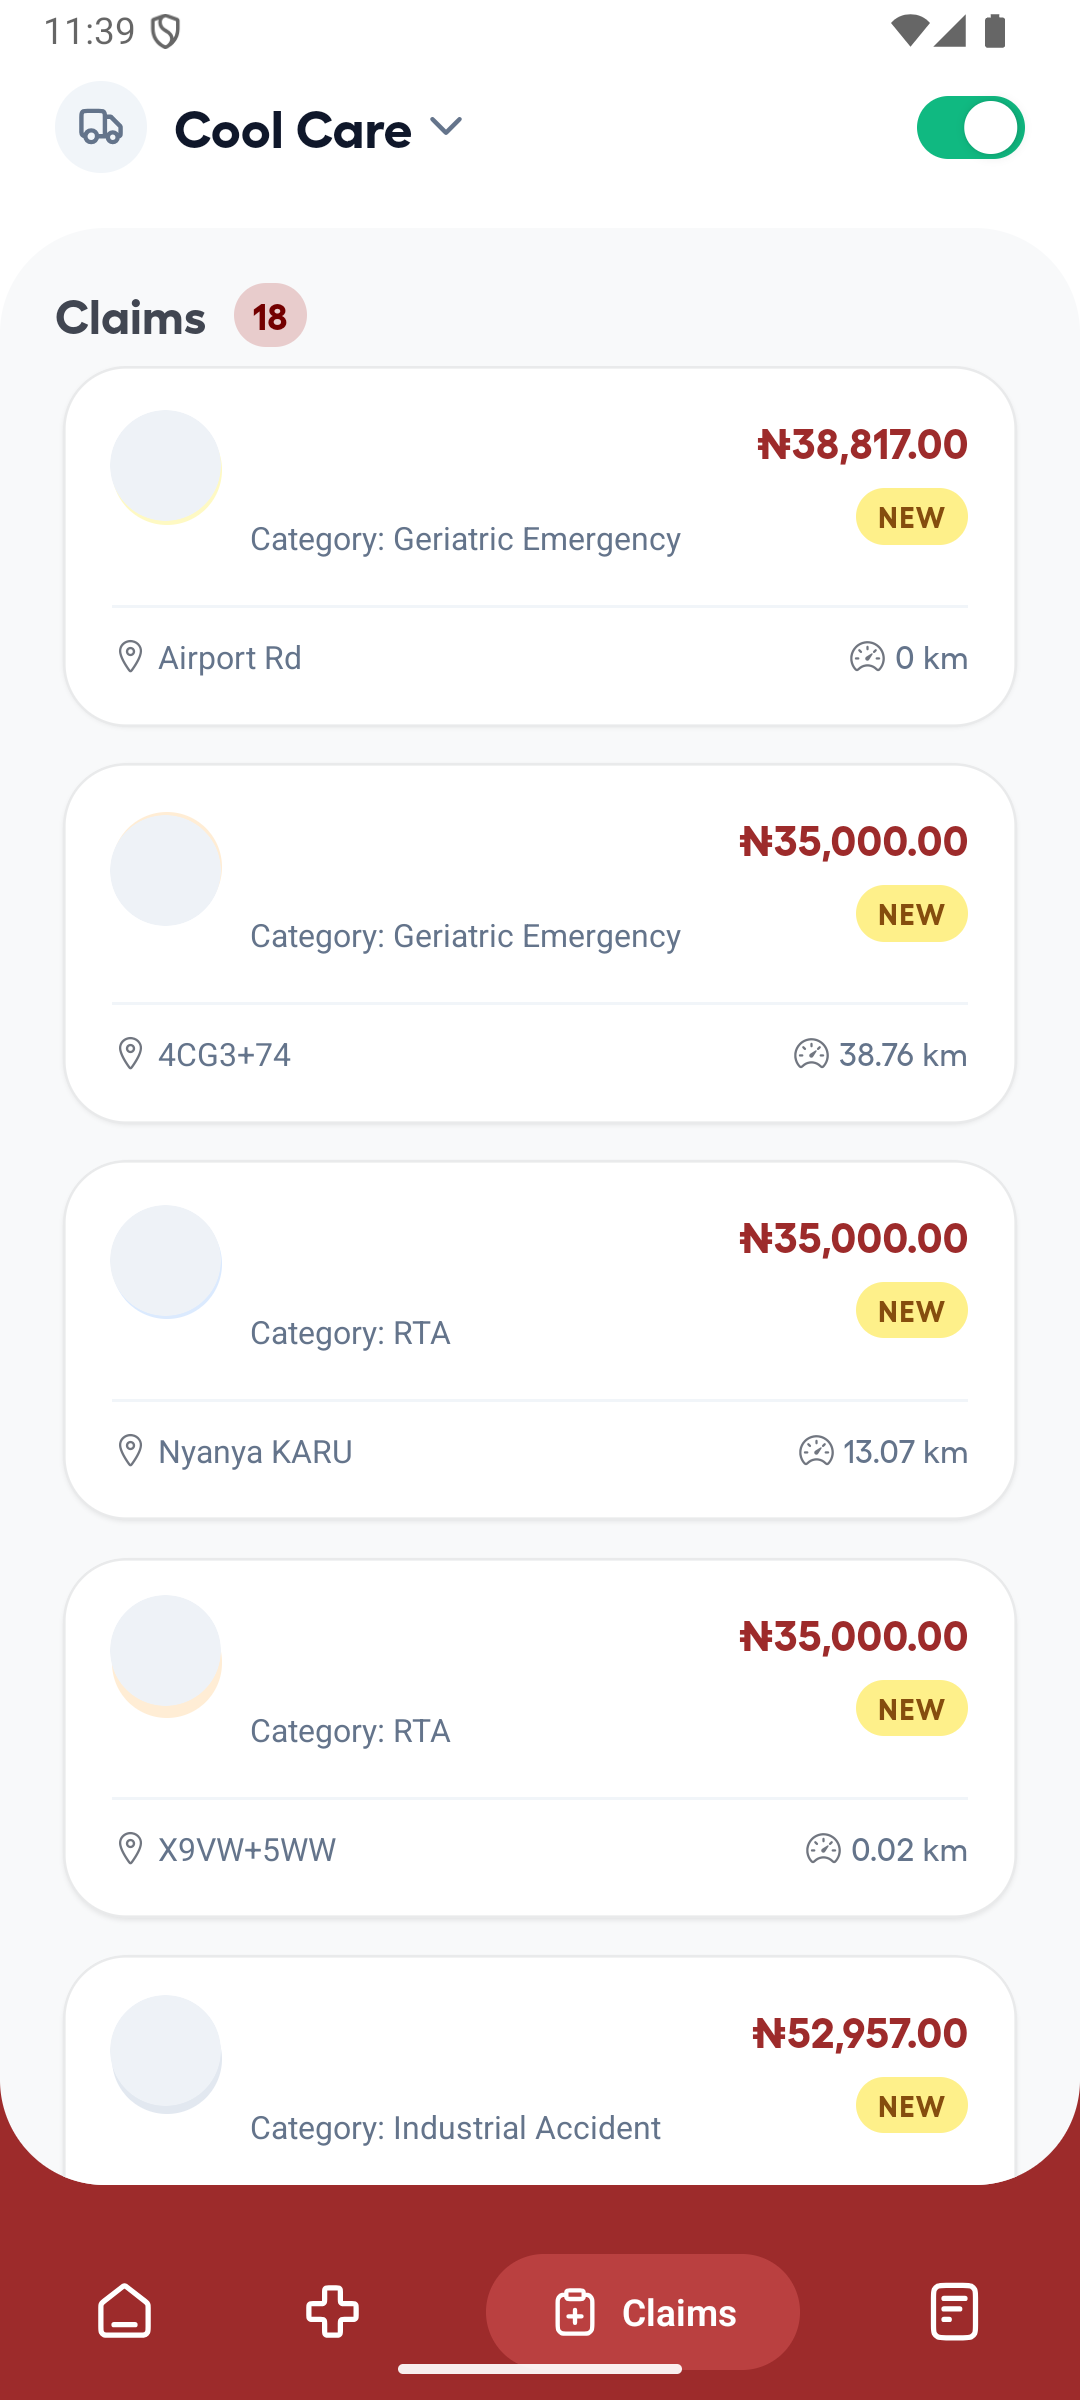
Open Claims and compare each claim's category, amount, date and status. Patient values in the example are obscured for privacy.

Ambulance App claims list with patient values redacted and claim categories, amounts and statuses visible

1 — claim category · 2 — amount and status.

Ambulance App claims list with patient values redacted and claim categories, amounts and statuses visible

Verify the claim amount and incident

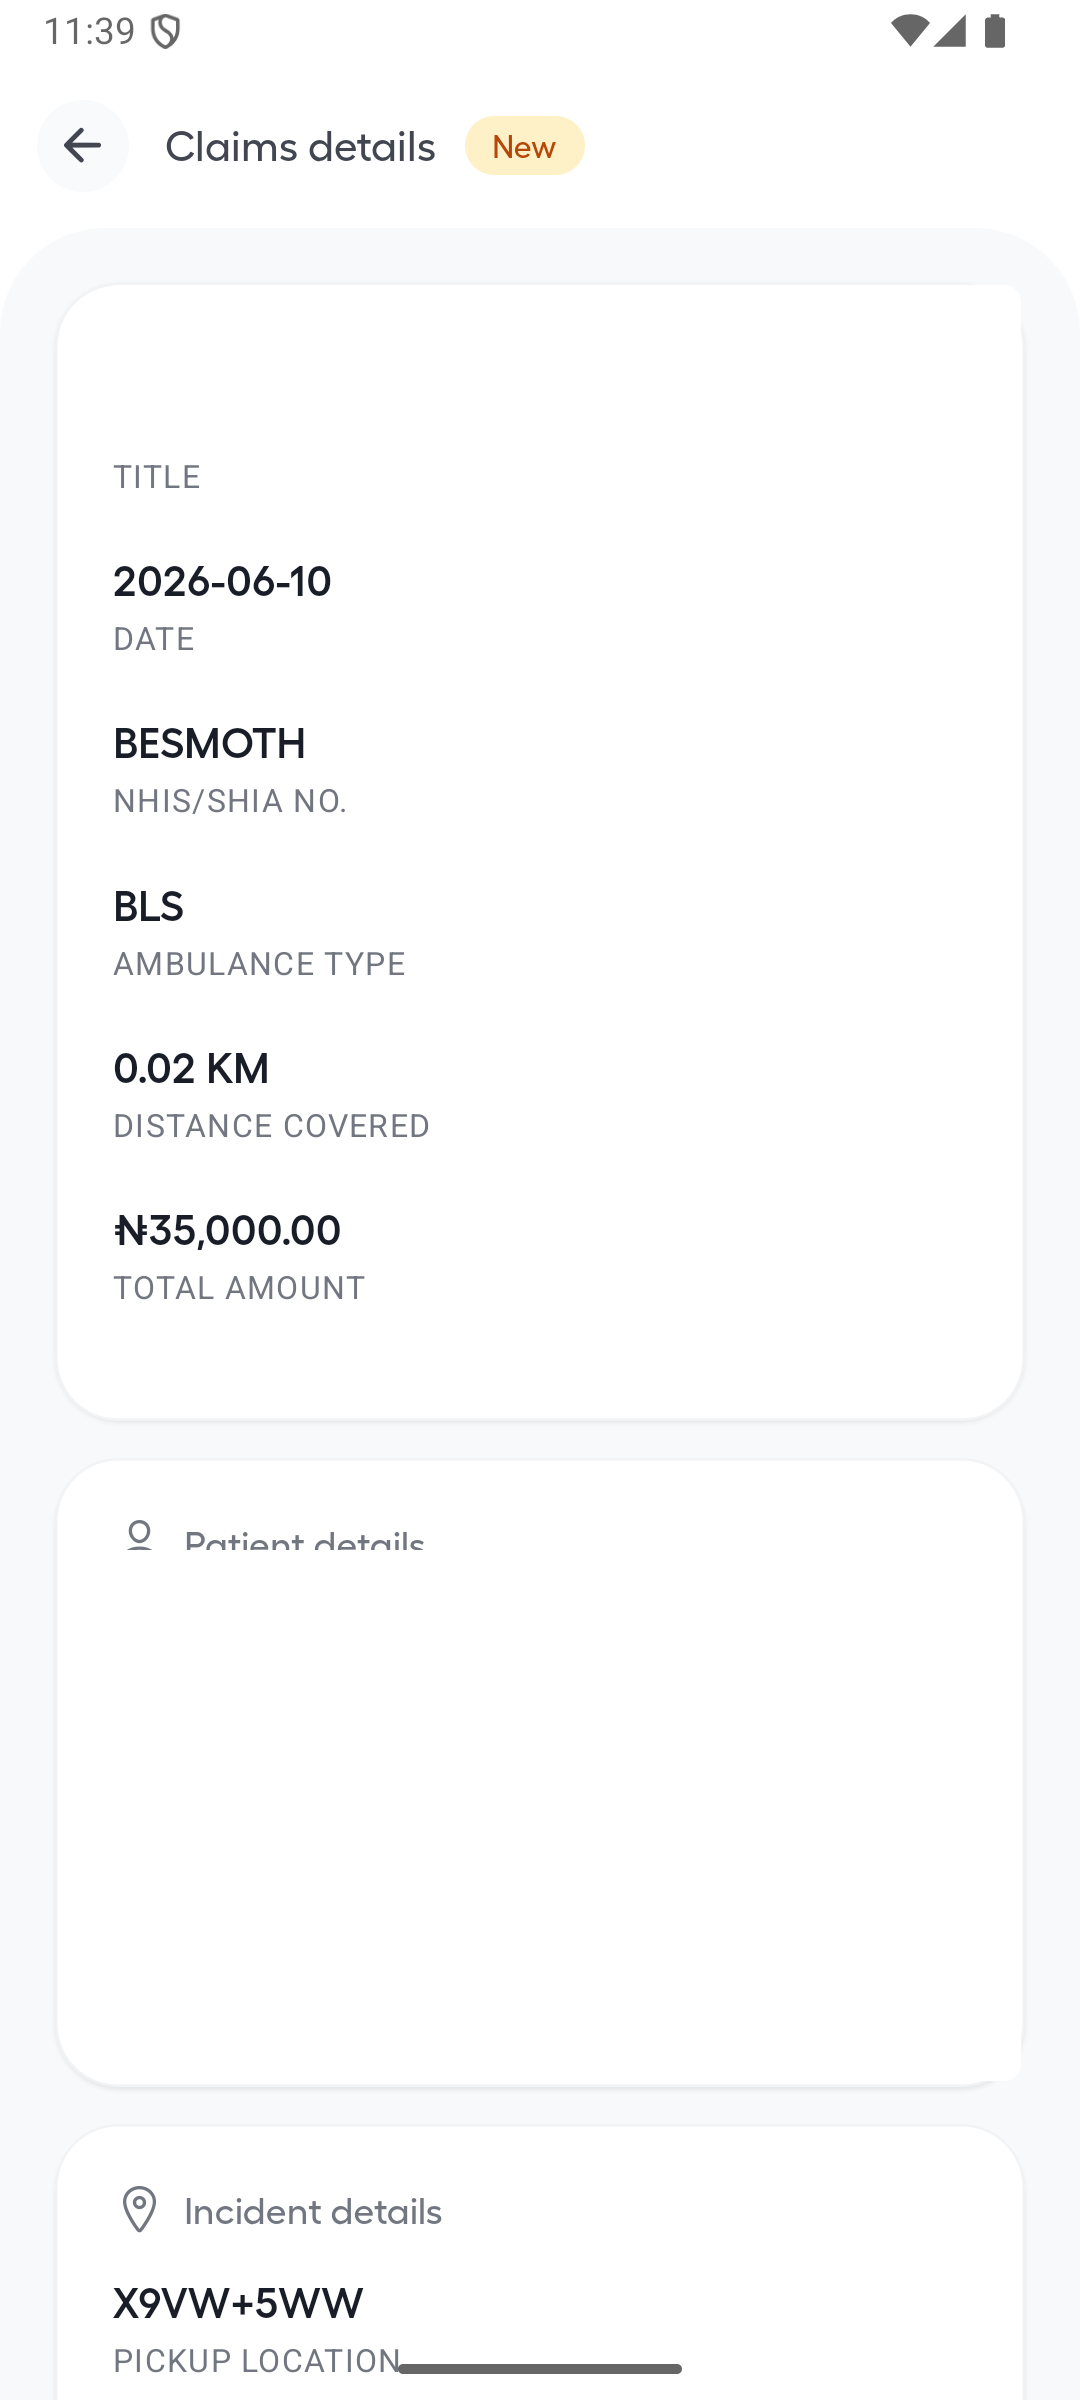
Open the claim and review the date, NHIA or SHIA reference, ambulance type, distance, total amount, redacted patient section and incident details.

Ambulance App claim details with patient values redacted and claim amount and incident information visible

1 — date, insurance reference and ambulance type · 2 — distance and total amount · 3 — incident details.

Ambulance App claim details with patient values redacted and claim amount and incident information visible

Read the review note

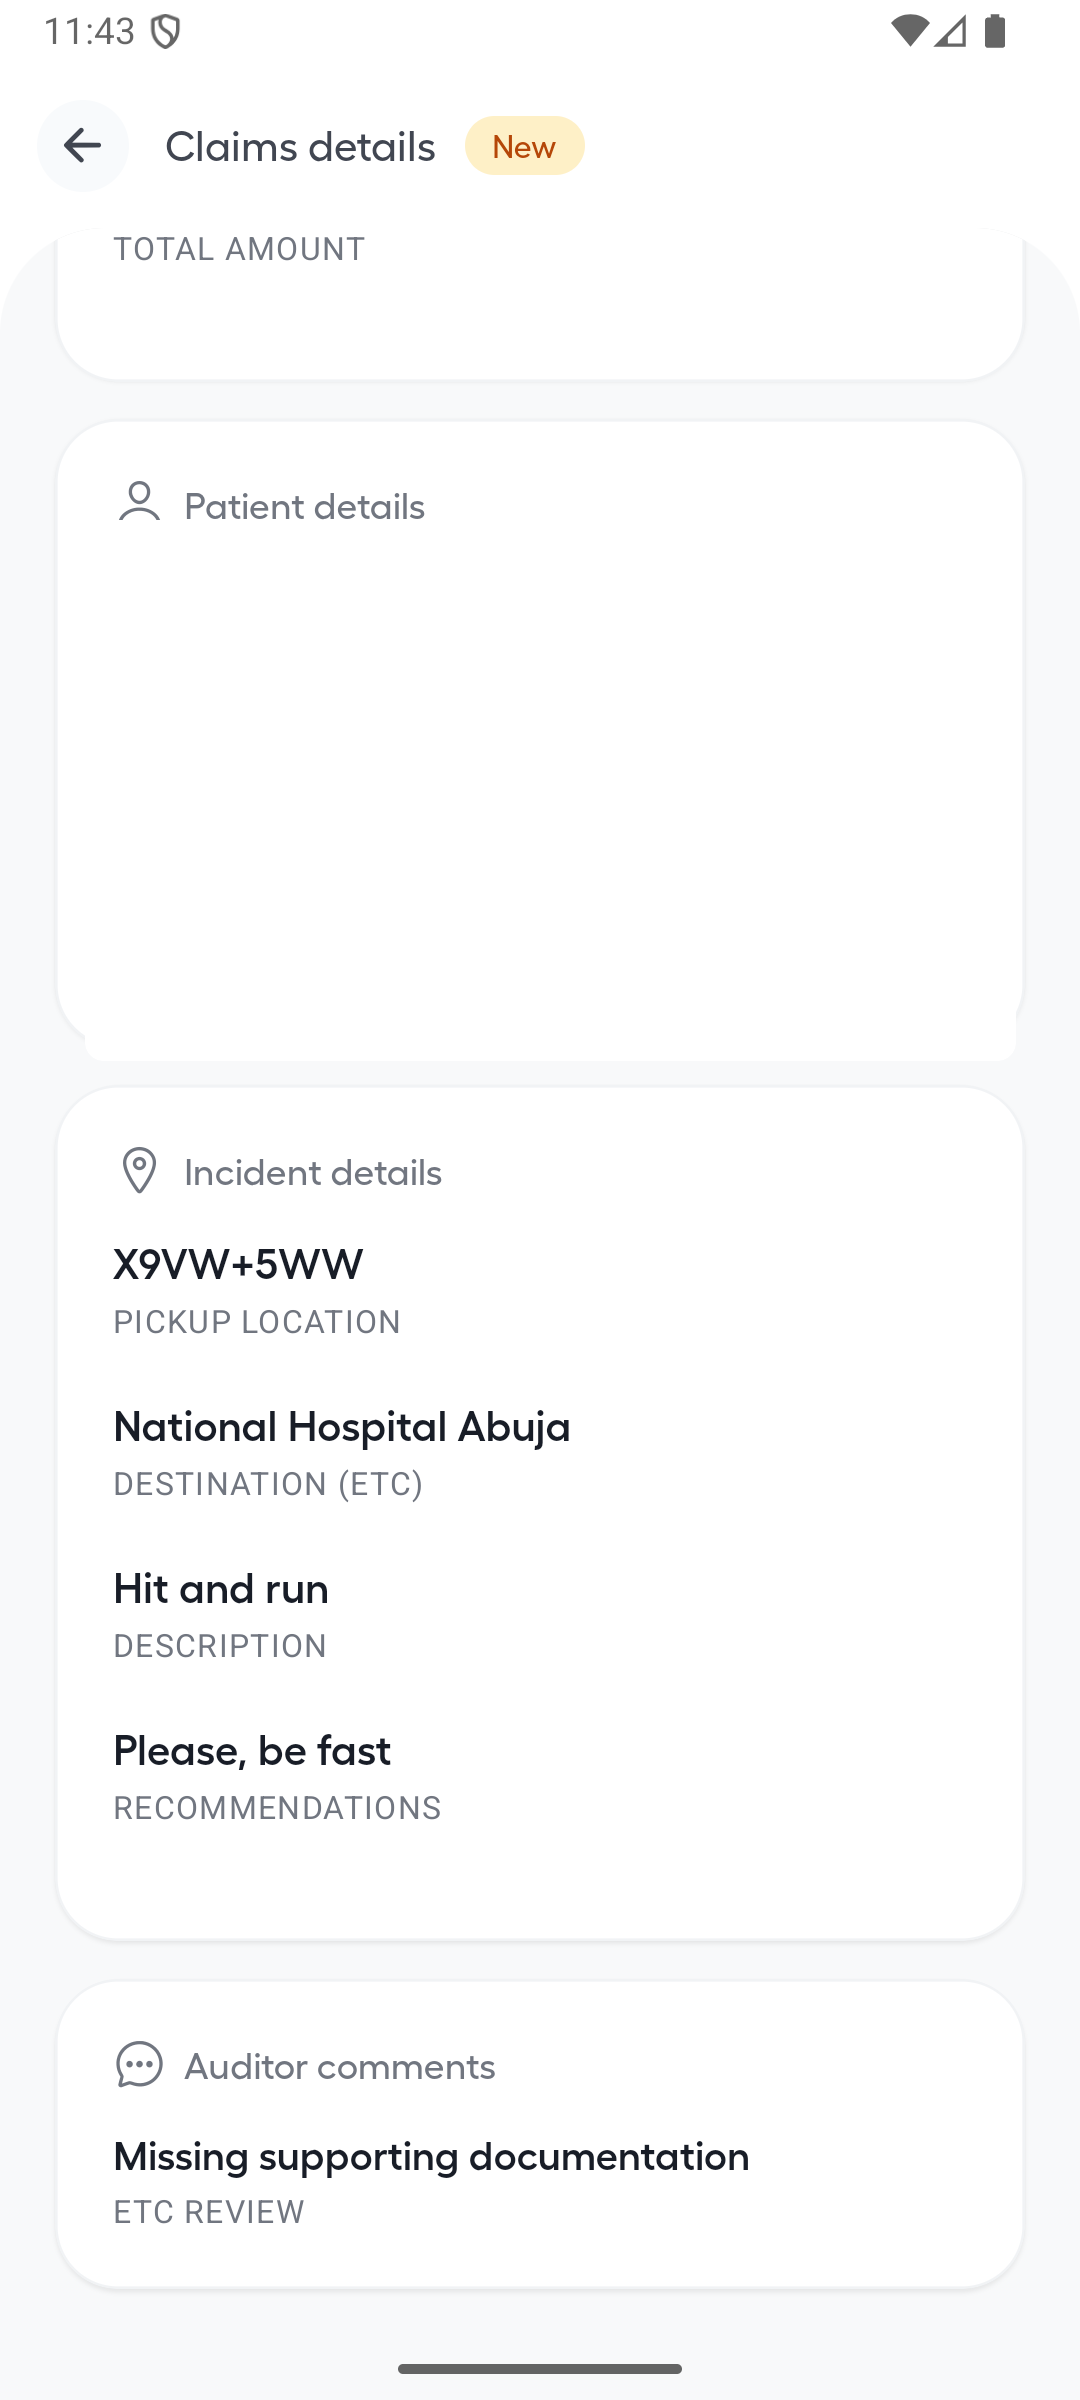
Scroll to Auditor comments or ETC review and use the note to understand missing evidence or the next required action.

Ambulance App claim details showing redacted patient information, incident details and a review note

1 — Auditor comments.

Ambulance App claim details showing redacted patient information, incident details and a review note

Done. You can identify the claim amount, supporting incident details and any review feedback.

If something goes wrong

A queried or rejected claim needs correction.

Review the displayed note and follow the approved offline claims-resolution process. The current platform does not provide an in-app response to a query.